-
- 1 - Javascript Drum Kit
- 2 - JS + CSS Clock
- 3 - CSS Variables
- 4 - Arrays
- 5 - Flex Panels Image Gallery
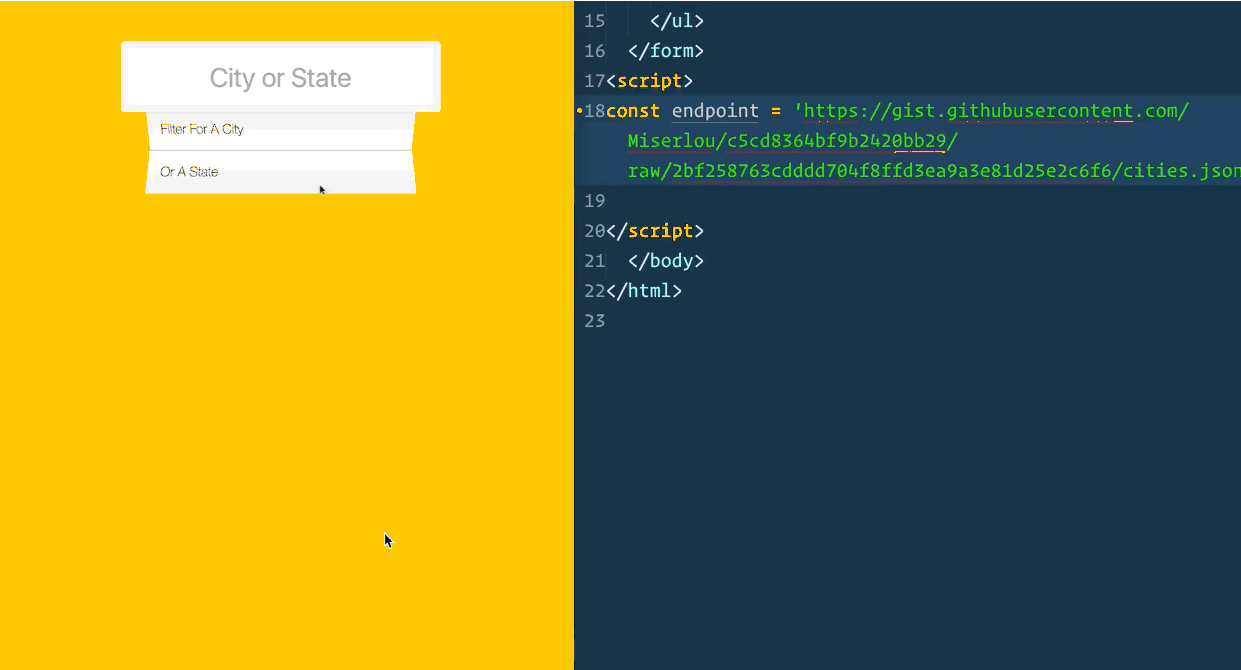
- 6 - Ajax Type Ahead Fetch
- 7 - Array Methods Continued (Array Cardio #2)
- Fun with HTML5 Canvas
- 9 - Twelve Must Know Dev Tools Trick
- 10 - Hold Shift to Check Multiple Checkboxes
- 11 - Custom HTML5 Video Player
- 12 - Key Sequence Detection (KONAMI CODE)
- 13 - Slide in on Scroll
- 14 - Objects and Arrays - Reference VS Copy
- 15 - LocalStorage and Event Delegation
- 16 - Css Text Shadow Mouse Move Effect
- 17 - Sorting Band Names without articles
- 18 - Tallying String Times with Reduce
- 19 - Unreal Webcam Fun
- 20 - Native Speech Detection
- 21 - GeoLocation
- 22 - Follow Along Links
- 23 - Speech Synthesis
- 24 - Sticky Nav
- 25 - Event Capture, Propagation, Bubbling and Once
- 26 - Stripe Follow Along Nav
- 27 - Click & Drag to Scroll
- 28 - Video Speed Controller UI
- 29 - Countdown Clock
- 30 - Whack a Mole Game
Javascript-30
1 - Javascript Drum Kit
Listen on keyup event.
If you call .play() on an audio element that is already playing, it won’t play. What we need to do is rewind it if we press key again.
Rather than setting a timer, we use a transition end event. That will fire when the thing has stopped animating itself in.
What is a transition end event? A click event is when you click something and it fires off an event saying something was a click event.
We have events that say I didn’t get clicked but I transitioned.
We can listen on each key for when the transition end event happens.
First we have to grab all key elements.
const keys = document.querySelectorAll(“.key”);
We want to add an event listener to each key. We cannot do keys.addEventListener(‘transitioned’) because keys is an node list / array and you cannot listen on all of them. You must explicitly loop through each of them and add an event listener.
keys.forEach(key=>key.addEventLisetner(‘transitioned’, removeTransition));
You can do things like this to mix JS in the sector:
const key = document.querySelector(`div[data-key="${e.keyCode}"]`);You can do audio.play() to play audio files and you can also do audio.currentTIme = 0;
key.classList.add or .remove() removes classes using vxalnilla js.
const keys = Array.from(document.querySelectorAll(“.key”));
2 - JS + CSS Clock
Transform’s by default are set to transform-origin: 50% which means that the transform axis is at the middle. transform-origin:100% makes the clock hands move on the end axis.
Because the div element that contains the hands
How to make something run every second? Use setInterval(functionNam,milliseconds)
The clock will do a weird thing on the minute where the hand has to go back, this is du to the transition. What you could do is remove the transition and add it back
3 - CSS Variables
:root is CSS way of getting the root element of the tree (html tag)
Css variables are declared like so: with two dashes
—base
https://developer.mozilla.org/en-US/docs/Web/CSS/:root
When you do document.querySelectorAll() it doesn’t return an array, instead it returns a NodeList. This is similar to an array however has different functions available to it (does not have map() for example)
For the input event, we are going to listen to “change”. However, this means that while we are sliding the values and before we let go, no changes happen. To listen on that as well we use “mousemove”.
One challenge here is that some of the variables require suffixes such as .px and those are not returned from the input slider. What we do is add data attribute called data-sizing like so: data-sizing:px.
dataset is an object that contains all the data attributes from that element.
How do we select a variable? We are going to select entire document (root), and set a property of the css variables.
You can also scope the variables to be on a specific div. For example if we wanted to change the variable for just one element, we can scope it inline on that other variable (as long as it is lower down and referencing the variable).
4 - Arrays
map() -> function creates a new array with the results of calling a provided function for every element in the array. (Tip: it’s like a FACTORY!). Always returns the same number of elements in the array.
const namedInventors = inventors.map(inventor => `${inventor.first} ${inventor.last}`);Filter -> creates a new array with all the elements that pass the test of the provided function. It can return an array with a different number of elements than the original array
const filteredInventors = inventors.filter(inventor => inventor.year >= 1500 && inventor.year < 1600);Sort -> sorts through items in an array using the defined sort function and returns the array. If compare function is omitted, it compares them as strings. This sorts the array in place and no copy is made. Return 1 and negative one.
 const sortedInventors = inventors.sort((a, b) =>
        a.year > b.year ? 1 : -1
      );
const alpha = people.sort(function(lastOne, firstOne) {
const [aLast, aFirst] = lastOne.split(“, “);
const [bLast, bFirst] = firstOne.split(“, “);
return aLast > bLast ? 1 : -1;
//console.log(last, first);
});Reduce -> it allows you to build something on every one. Instead of foreach loop and incrementing.
 const totalYears = inventors.reduce((total, inventor) => {
        return total + (inventor.passed - inventor.year);
      }, 0);
const transportation = data.reduce(function(obj, item) {
if !obj[item]) {
obj[item] = 0;
}
obj[item]++;
return obj;
}, {});Data ->
const inventors = [
{ first: "Albert", last: "Einstein", year: 1879, passed: 1955 },
{ first: "Isaac", last: "Newton", year: 1643, passed: 1727 },
{ first: "Galileo", last: "Galilei", year: 1564, passed: 1642 },
{ first: "Marie", last: "Curie", year: 1867, passed: 1934 },
{ first: "Johannes", last: "Kepler", year: 1571, passed: 1630 },
{ first: "Nicolaus", last: "Copernicus", year: 1473, passed: 1543 },
{ first: "Max", last: "Planck", year: 1858, passed: 1947 },
{ first: "Katherine", last: "Blodgett", year: 1898, passed: 1979 },
{ first: "Ada", last: "Lovelace", year: 1815, passed: 1852 },
{ first: "Sarah E.", last: "Goode", year: 1855, passed: 1905 },
{ first: "Lise", last: "Meitner", year: 1878, passed: 1968 },
{ first: "Hanna", last: "Hammarström", year: 1829, passed: 1909 }
];
const people = [
"Beck, Glenn",
"Becker, Carl",
"Beckett, Samuel",
"Beddoes, Mick",
"Beecher, Henry",
"Beethoven, Ludwig",
"Begin, Menachem",
"Belloc, Hilaire",
"Bellow, Saul",
"Benchley, Robert",
"Benenson, Peter",
"Ben-Gurion, David",
"Benjamin, Walter",
"Benn, Tony",
"Bennington, Chester",
"Benson, Leana",
"Bent, Silas",
"Bentsen, Lloyd",
"Berger, Ric",
"Bergman, Ingmar",
"Berio, Luciano",
"Berle, Milton",
"Berlin, Irving",
"Berne, Eric",
"Bernhard, Sandra",
"Berra, Yogi",
"Berry, Halle",
"Berry, Wendell",
"Bethea, Erin",
"Bevan, Aneurin",
"Bevel, Ken",
"Biden, Joseph",
"Bierce, Ambrose",
"Biko, Steve",
"Billings, Josh",
"Biondo, Frank",
"Birrell, Augustine",
"Black, Elk",
"Blair, Robert",
"Blair, Tony",
"Blake, William"
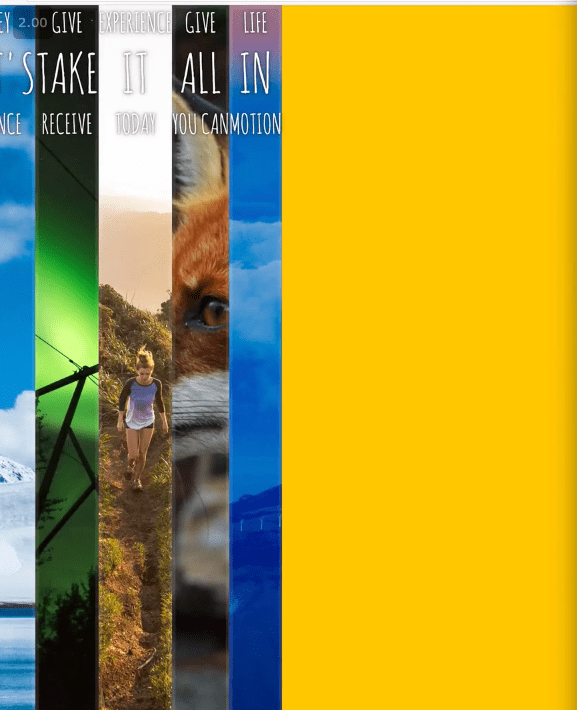
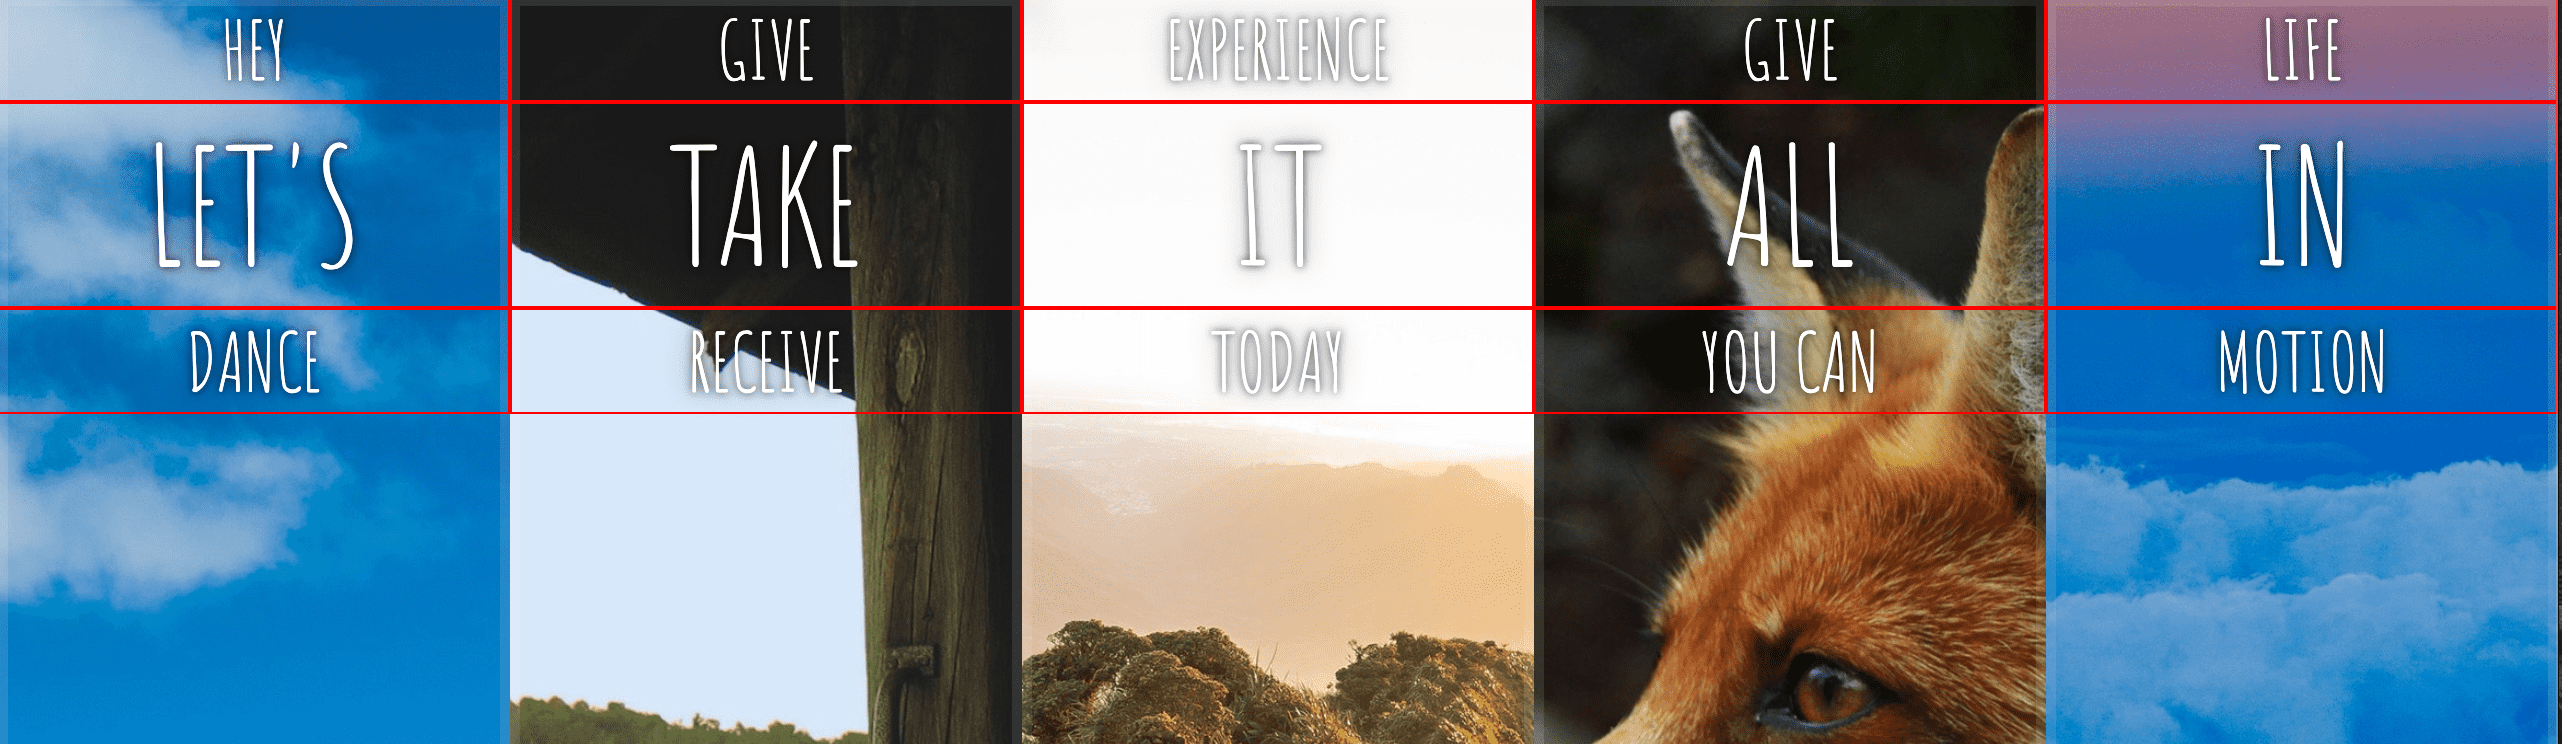
];5 - Flex Panels Image Gallery
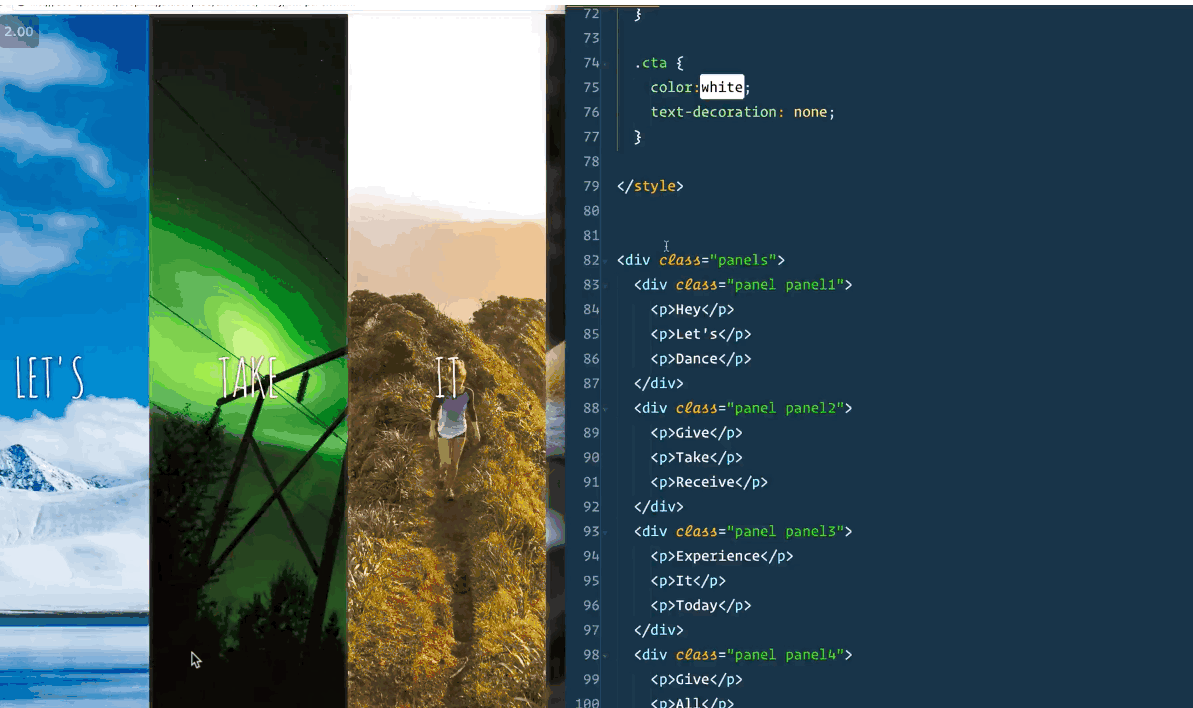
Starting:
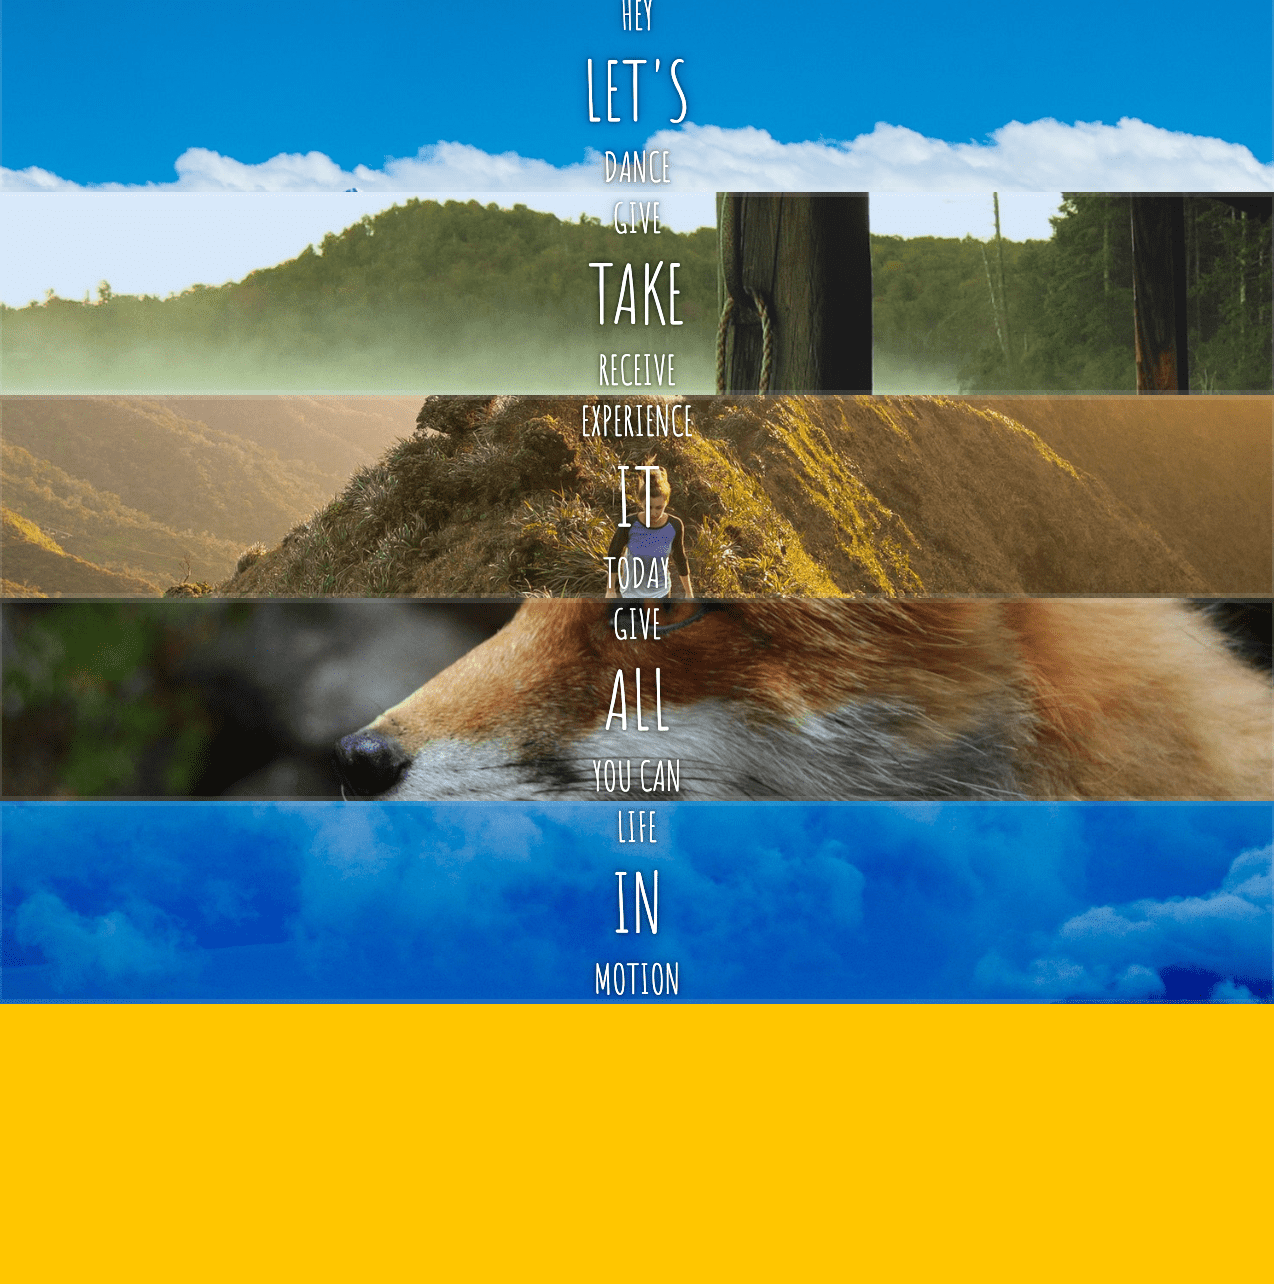
Html Structure:
  <div class="panels">
      <div class="panel panel1">
        <p>Hey</p>
        <p>Let's</p>
        <p>Dance</p>
      </div>
      <div class="panel panel2">
Set panels to display:flex
.panel
{
...
text-align:center,
alight-items:center;
}
(not width is set);
Which results in:
We want to tell the flex-items to spread the extra space between each other.
.panels {
flex:1;
Add border to flex-children (.panel > *) :
We want to centre the flex-children vertically and left to right.
 /* Flex Children */
      .panel  {
        ...
			justify-content: center;
        align-items: center;

      }
^ that doesn’t do much.
We also want to add.panel {display:flex; .. for nested flex box.
An element in CSS can be both flex item and flex container.

That positions them left to right by default, we want to switch that by adding flex-direction:column

Add
    /* Flex Children */
      .panel > * {
     ...
        flex: 1 0 auto;
        justify-content: center;
        align-items: center;
			display:flex
      }
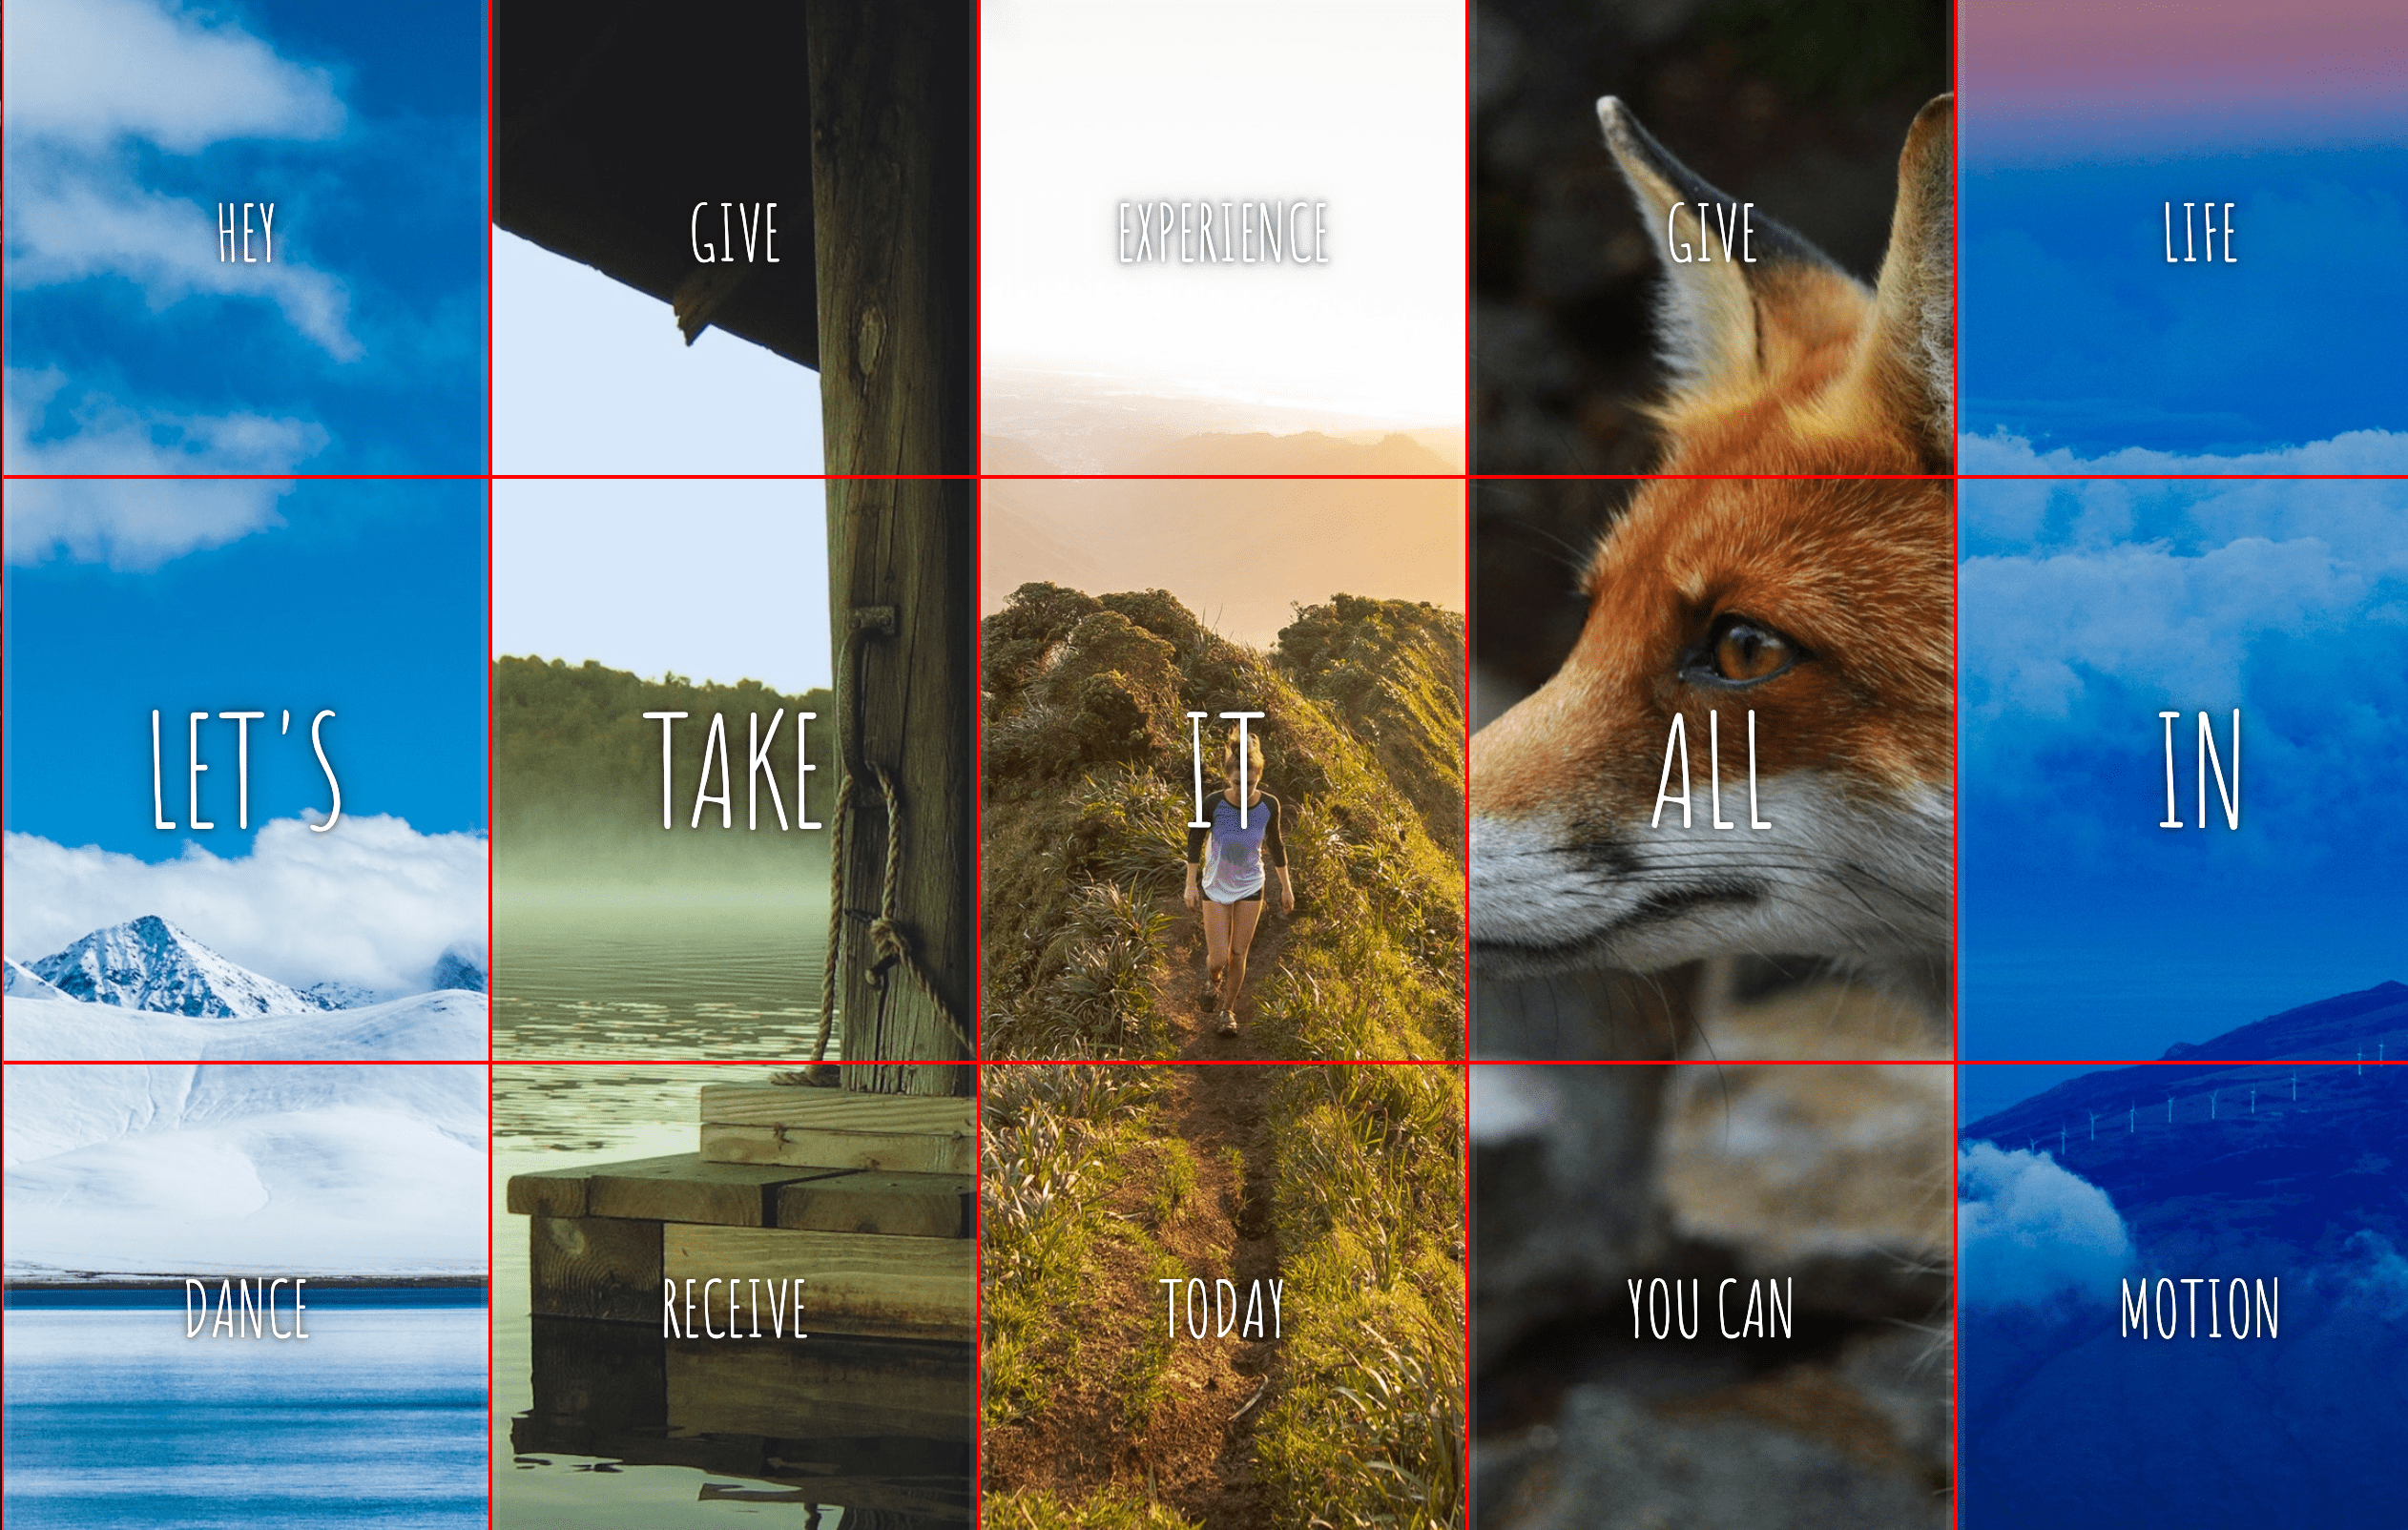
Next we want to hide the top row and bottom row text until the pane is clicked on.
For top panels add:
 .panel > *:first-child {
        transform: translateY(-100%);
      }
Which puts them offscreen.
Bottom panels:
  .panel > *:last-child {
        transform: translateY(100%);
      }
When the panel is clicked, it will have a class .open-active and that will change the css to move it down
.panel.open-active > *:first-child {
transform: translateY(0);
}
.panel.open-active > *:last-child {
transform: translateY(0);
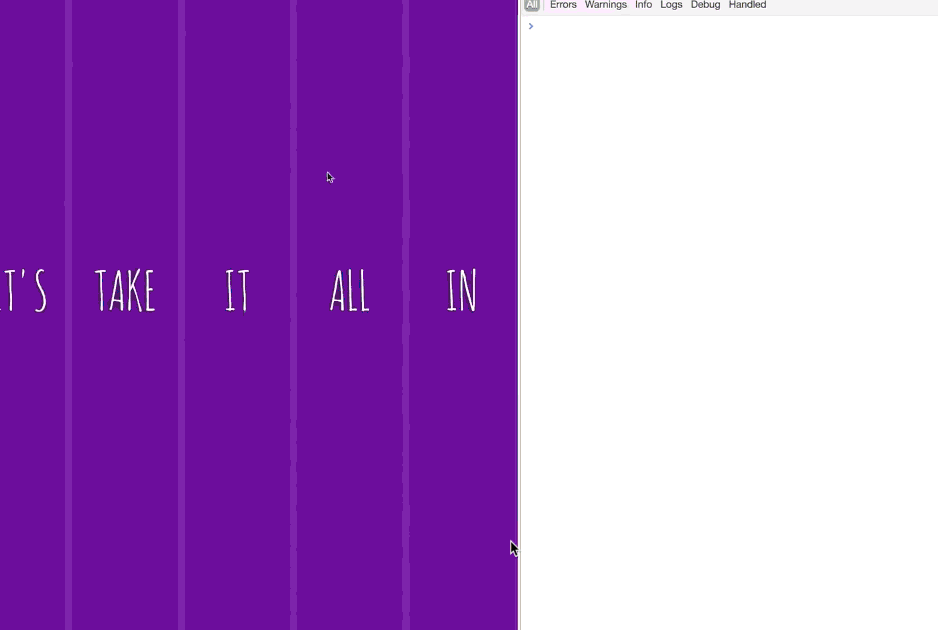
}When the panel has class of .open we want to increase it. All .panel had flex:1.
When it has class of open, modify that flex value to ->
.panel.open{
flex:5
}
Now that panel will take 5 times the room of the rest of them.

Now we need to write javascript to work with the click events for the panels.
const panels = document.querySelectorAll(".panel");We are going to loop through each panel, listen to a click event on it and then toggle the class open.
panels.forEach(panel => panel.addEventListener(“click”, toggleOpen));
      function toggleOpen() {
        this.classList.toggle(“open”);
      }
You pass toggleOpen rather than toggleOpen() because the second one would run on page load. We don’t want to run the function, we just want to give it reference to the function.
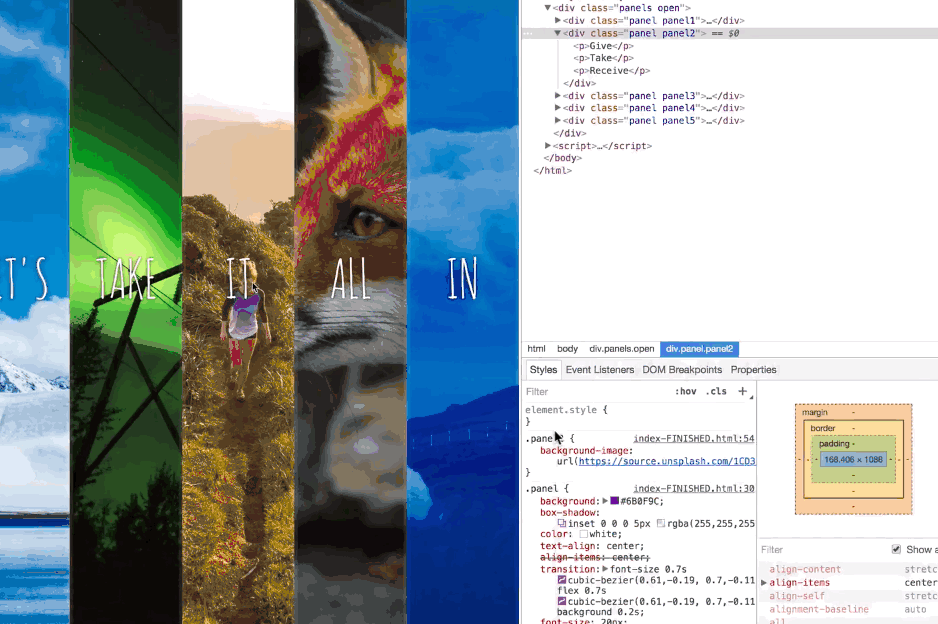
Once the panel has transitioned to opened, we want to bring in the words from the top and bottom.
To do that we add another event listener to “transitioned” and call toggleActive ->
function toggleActive(e) {
        if (e.propertyName.includes("flex")) {
          this.classList.toggle("open-active");
        }
      }
 panels.forEach(panel =>
        panel.addEventListener("transitionend", toggleActive)
      );
There will be many transition events, so in toggleActive, we listen specifically for the transition that includes “flex” (not flex-grow because safari has a bug where it calls it’s property flex instead of flex-grow like the other browsers).
To figure this out, you can console.log(e.propertyName);
You will see there are two transitions .. flex, and font size due to the .open class css.
We only want to run this on the the flex transitions.
6 - Ajax Type Ahead Fetch
Fetch itself returns a promise.
And then you call .then();
You need to convert the returned variable to JSON.
If you call blob.json() it will return another promise
 const endpoint =
        “https://gist.githubusercontent.com/Miserlou/c5cd8364bf9b2420bb29/raw/2bf258763cdddd704f8ffd3ea9a3e81d25e2c6f6/cities.json”;

      const cities = [];

      fetch(endpoint)
        .then(blob => blob.json())
        .then(data => cities.push(…data));
Steps:
Wes supplied JSON file of cities:
const endpoint = “https://gist.githubusercontent.com/Miserlou/c5cd8364bf9b2420bb29/raw/2bf258763cdddd704f8ffd3ea9a3e81d25e2c6f6/cities.json”;
When you type in a word, it will look for states or city names that match what you’ve typed.
We will put our cities into an empty array.
Now we want to fetch the endpoint.
Fetch actually returns a promise, not the data, so if you did
const prom = fetch(endpoint);
console.log(prom);
It return ->
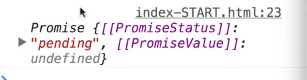
To get the data you chain a .then() like so: fetch(endpoint).then(blob => console.log(blob));
Blob ->
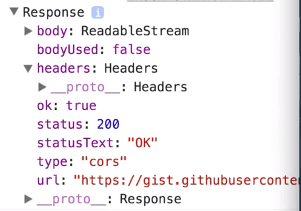
The data the comes back from the fetch, it doesn’t know what kind of data it is. We explicitly know that it’s json, but we can’t do JSON.parse(blob) because the blob needs to be converted from raw data. You need to call
blob.json() which returns a promise which we will call .then() on.
If you do ->
   fetch(endpoint)
        .then(blob => blob.json())
        .then(data => cities.push(data));
You’ll get a nested array ->
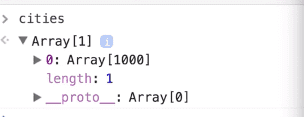
When you push something like so:
 It will add it to the array separately so what we need to do is spread our array items.
You need to spread it like so ->
   fetch(endpoint)
        .then(blob => blob.json())
        .then(data => cities.push(…data));
We are going to match the input value to the city.
  function findMatches(wordToMatch, cities) {
        return cities.filter(place => {
          const regex = new RegExp(wordToMatch, “gi”);
          return place.city.match(regex) || place.state.match(regex);
          //here we need to figure out if the city or state matches what was searched
        });
      }
function displayMatch(){
console.log(this.value)
}
findMatches(“bos”) should return Boston for example.
To pass a variable to a regex, you can’t use /word/ syntax, you need to do -> const regex = new RegExp(wordToMatch, “gi”);
Add event listener to input on keyup and change
  searchInput.addEventListener("change", displayMatches);
      searchInput.addEventListener("keyup", displayMatches);
This will match the value typed to the cities array.
  function displayMatches() {
        const matchArray = findMatches(this.value, cities);
Now we want to display those matches:
function displayMatches() {
        const matchArray = findMatches(this.value, cities);
			const html = matchArray
          .map(place => {
  return `<li><span class="name">${place.city}, ${place.state}</span><span class="population">${place.population}</span></li>`;}).join("");
      console.log(html);
		suggestions.innerHTML = html;
Next we want to add the highlighter functionality to the matches word ->
Modify displayMatches to include (and replace) the following ->
    const regex = new RegExp(this.value, “gi”);
            const cityName = place.city.replace(
              regex,
              `<span className="hl">${this.value}</span>`
            );
            const stateName = place.state.replace(
              regex,
              `<span className="hl">${this.value}</span>`
            );

            return `<li><span class=“name”>${cityName}, ${stateName}</span><span class=“population”>${numberWithCommas(
              place.population
            )}</span></li>`;
          }).join("");
Next we want to include a comma ->

javascript
function numberWithCommas(x) {
        return x.toString().replace(/\B(?=(\d{3})+(?!\d))/g, “,”);
      }
Modify the return html to include ->
${numberWithCommas(
              place.population
            )}

7 - Array Methods Continued (Array Cardio #2)
Data ->
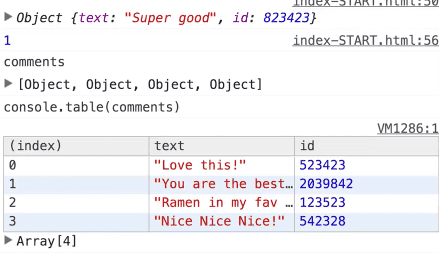
const people = [
{ name: “Wes”, year: 1988 },
{ name: “Kait”, year: 1986 },
{ name: “Irv”, year: 1970 },
{ name: “Lux”, year: 2015 }
];
const comments = [
{ text: “Love this!”, id: 523423 },
{ text: “Super good”, id: 823423 },
{ text: “You are the best”, id: 2039842 },
{ text: “Ramen is my fav food ever”, id: 123523 },
{ text: “Nice Nice Nice!”, id: 542328 }
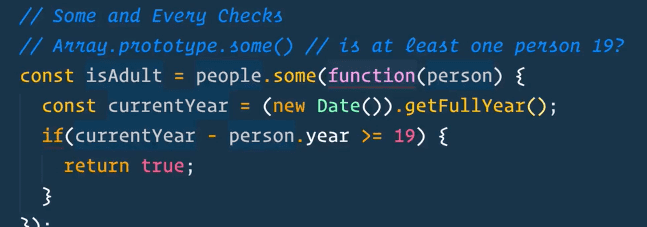
];Array.prototype.some() -> checks whether at least one thing in the array meets the criteria
const isAdult = people.some(person => currentYear - person.Year >= 19);
Returns a boolean. Above is an example of an implicit return
Before refactoring ->
Array.prototype.every() -> checks whether every item in the array meets the criteria
const allAdult = people.every(person => currentYear - person.Year >= 19);
Array.prototype.find() -> like filter but will return the first result that matches the criteria
const comment = comments.find(comments => comment.id == 823423);
Array.prototype.findIndex() -> like find but will return the index of the first element in the array that matches the criteria
const index = comments.findIndex(comment => comment.id === 823423);
Next we want to delete the comment with the id of 823423.
Two ways to do that:
- splice
comments.splice(index, 1);(splice starting at index and go for 1)
-
Create a new array of the updated comments a. Slice starting at zero and go until the index. b. Next we start at
index + 1and you end at the end so you don’t pass it a second parameter.const newComments = [ comments.slice(0, index), comments.slice(index + 1) ]
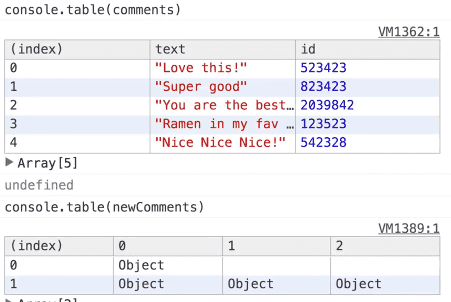
newComments has given us an array of two arrays. That is because we did not spread the items into the array.
Update it to ->
const newComments = [
...comments.slice(0, index),
....comments.slice(index + 1)
]

This preserves the original comments array.
Fun with HTML5 Canvas
We are going to manipulate the canvas so you can draw on it.
First we grab the canvas, and then the context. You draw on the context, not directly on the HTML. There is both 2d and 3d context.
Next we need to resize canvas to see exact width of window:
const canvas = document.querySelector("#draw");
const ctx = canvas.getContext("2d");
canvas.width = window.innerWidth;
canvas.height = window.innerHeight;
We set the stroke colour and shape like so:
		ctx.strokeStyle = “#BADA55";
      ctx.lineJoin = "“ound"”
      ctx.lineCap = ““ound””
now we need a variable called isdrawing to be a flag so we know when the user is pressing down and when they have released the mouse. So we know when to draw.
In order to draw, you need a starting x and y and an ending x and y.
     let isDrawing = false;
      let lastX = 0;
      let lastY = 0;

      function draw(e) {
        console.log(e);
      }

      canvas.addEventListener("mousemove", draw);
Now when you move your mouse anywhere, it will console log the event.
However we don’t always want to run this event, only when the user is clicking down. Add the following ->
      canvas.addEventListener(“mousemove”, draw);
      canvas.addEventListener(“mousedown”, () => (isDrawing = true));
      canvas.addEventListener(“mouseup”, () => (isDrawing = false));
canvas.addEventListener(“mouseout”, () => (isDrawing = false)); function draw(e) {
if !isDrawing) return; //stop the fn from running when they are not moused down
console.log(e);
ctx.beginPath();
ctx.moveTo(lastX, lastY);
ctx.lineTo(e.offsetX, e.offsetY);
ctx.stroke();The above code gives us -> https://cl.ly/b854ff0ee589
If you add ->
        lastX = e.offsetX;
        lastY = e.offsetY;
It will work better. You can also refactor the above code with destructing like so -> const [lastX, lastY] = [= e.offsetX, e.offsetY];
One problem is it always starts at 0, 0 and you can only draw one continous line with this code..
Like so ->
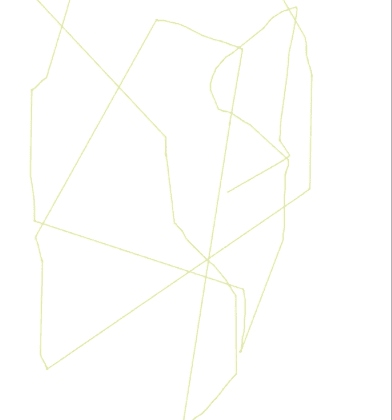
Modify code to:
      canvas.addEventListener("mousedown", (e) =>  {
        isDrawing = true;
        [lastX, lastY] = [e.offsetX, e.offsetY];
        });
Now when the user presses down, it will jump to the coordinates on which they pressed.
Modify the width with ctx.lineWidth = 100
HSL = [Mothereffing HSL](http://mothereffinghsl.com/)
Add -> let hue = 0
At the top of the draw() function, add ctx.strokeStyle = hsl(${hue}, 100% 50%); at the end of the method, add hue++;
****
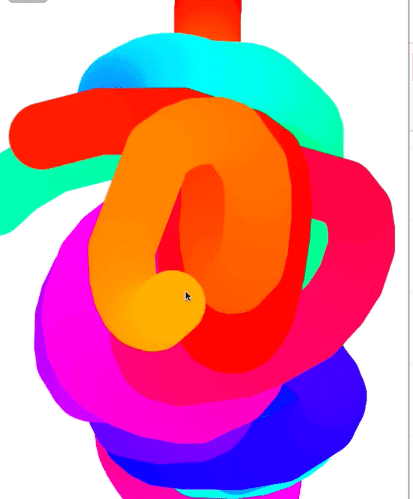
WIth HSL, if you go over 360 it will start the colours again like 960.
You can set the lineWidth = hue which will modify the line width.
You can manually reset hue if it’s over 360 to reset it like so:
if(hue>= 360){
hue = 0;
}
We want the line width to start small, go to 100, and then reverse. So we add the following variable let direction = true
If it’s greater than 100 or less than one, flip the direction.
if(ctx.lineWidth >= 100 || ctx.lineWidth <=1 ){
direction = !direction;
}
if(direction){
ctx.lineWidth++;
} else {
ctx.lineWidth--;
}
9 - Twelve Must Know Dev Tools Trick
- You can select elements in the dev tools and select “Break on”
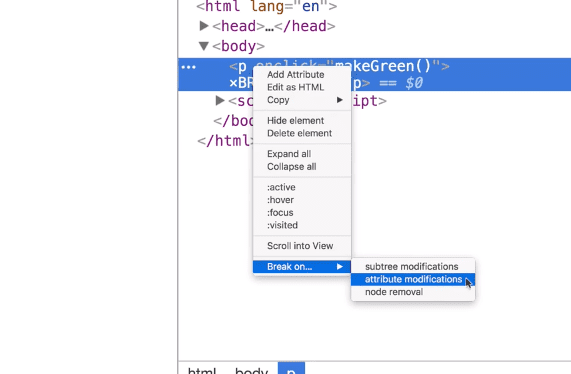
It will pause the debugger exactly where that is happening.
-
There are many ways to use console.log.
-
You can do
console.log(‘Hello I am a %s string!’, ‘test’); -
You can style it..
console.log(‘%c I am some great text’, ‘font-size:50px; background:red') -
Warning!
console.warn(‘Oooh no!’)->
-
4. Error -> `console.error(’Shit!!’)` ->

5. Info -> `console.info('test')` ->

6. Testing -> `console.assert(1 === 2, ‘That is wrong!’)` it will only log to the console if it returns false.

7. Clearing ->   `console.clear()`

8. Viewing Dom elements -> `console.dir(p)`  ->
9. Grouping together -> `console.group(‘string’); console.log(‘test’); console.groudEnd(‘string’)` ->
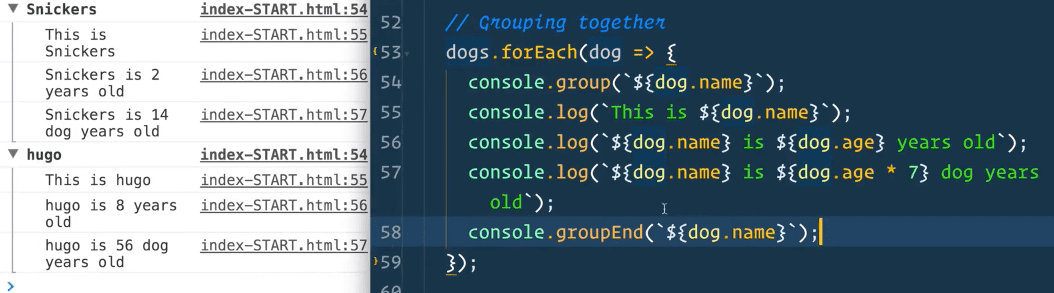
You can also use console.groupCollapsed()
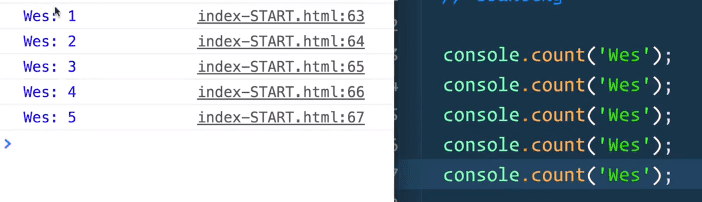
10. Counting -> `console.count(‘Wes’)` will count the number of times you have used a Dom element, string, whatever. ->
11. Timing -> count the time it takes to do somethingconsole.time('fetching data');
fetch('https://api.github.com/users/wesbos')
.then(data => data.json())
.then(data => {
console.timeEnd('fetching data');
console.log(data);
});

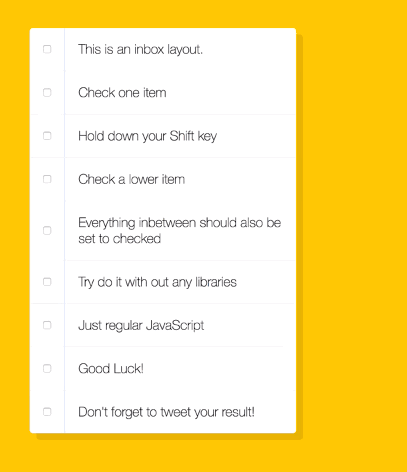
12. Table -> `console.table(dogs)` -> 10 - Hold Shift to Check Multiple Checkboxes
What should happen is when a user clicks a checkbox, and holds down the shift key, then clicks another check box, all the checkboxes in-between should be checked.
First we need to grab all the checkboxes:
const checkboxes = document.querySelectorAll(‘.inbox input[type=“checkbox”]’);
Now we need to listen for when one of them is clicked or changed.
The click event will fire even if you use your keyboard.
      checkboxes.forEach(checkbox =>
        checkbox.addEventListener("click", handleCheck)
      );
Next add the handleClick function and log the event:
function handleCheck(e) {
console.log(e);
}
When we check the first one, we need to put it into a variable.
Because when we check the second one and we are holding down shift we need to know what that last one was.
We are going to make it a let lastChecked variable so it can be reassigned.
Now if we do
function handleCheck(e) {
lastChecked = this;
}
Which will give you reference to the last input that was checked ->

Next we need to check if the shift key was pressed down
We can use e.shiftKey to check that.
and that they are checking an item (not unchecking it).
->
if (e.shiftKey && this.checked)
Everytime both shift and checked are true, we will loop through every single check box and look for the first one that was checked. Then after we find the fist one that was checked, we go to the next one and check it, and the next one and check it, until we get to the last one that is checked and then stop it.
We are going to make a variable called in-between. We will loop over each input and if it’s not between one of the checked inputs, we will set in-between to false.
let inBetween = false;
        if (e.shiftKey && this.checked) {
          // go ahead and do what we please
          // loop over every single checkbox
          checkboxes.forEach(checkbox => {
            if (checkbox === this || checkbox === lastChecked) 				{
              inBetween = !inBetween;
            }
...
if(checkbox === this || checkbox === lastChecked)
The first time you check an item, if you’re not holding shift, that will merely assign that input to lastChecked.
So when you press shift and select the second checkbox, that item is the “this” referenced in checkbox === this .
It will loop through all of them until it gets to the first input that we clicked OR the “this” value, at which point it will flip the value of inBetween from either true or false.
If you select the top one first, and then a lower one, the checkbox === lastChecked will equal true.
If you select a bottom one first, and then a top one, the checkbox === this will evaluate to true.
Add this line after the forEach ->
 if (inBetween) {
              checkbox.checked = true;
    }
full code ->
const checkboxes = document.querySelectorAll(
        ‘.inbox input[type=“checkbox”]’
      );

      let lastChecked;

      function handleCheck(e) {
        // Check if they had the shift key down
        // AND check that they are checking it
        let inBetween = false;
        if (e.shiftKey && this.checked) {
          // go ahead and do what we please
          // loop over every single checkbox
          checkboxes.forEach(checkbox => {
            console.log(checkbox);
            if (checkbox === this || checkbox === lastChecked) {
              inBetween = !inBetween;
              console.log(“Starting to check them in between!”);
            }

            if (inBetween) {
              checkbox.checked = true;
            }
          });
        }

        lastChecked = this;
      }

      checkboxes.forEach(checkbox =>
        checkbox.addEventListener(“click”, handleCheck)
      );
We have a flag called inBetween = false
Once we hit the first one, it is going to be true, which is going to check if it’s one, and then we will programatically set it to checked. We do this until it gets to the last one, at which point we will set the flag variable to false, and it will no longer run it for the “non-inbetween” ones
11 - Custom HTML5 Video Player
It’s hard to style the video player by default, and it’s different from browser to browser.
We want to hide the default controls and make our own interface with a button to pause and play it.
There is going to be a volume slider, a speed slider, and skip buttons that allow you to skip ahead or back 25 / 10 seconds.
When you click the video itself, it will pause and play.
Wes had added some css that when you hover over it, we just transition the position of the div up and down.
<div class=“player”>
     <video class=“player__video viewer” src=“652333414.mp4”></video>

     <div class=“player__controls”>
       <div class=“progress”>
        <div class=“progress__filled”></div>
       </div>
       <button class=“player__button toggle” title=“Toggle Play”>►</button>
       <input type=“range” name=“volume” class=“player__slider” min=“0” max=“1” step=“0.05” value=“1”>
       <input type=“range” name=“playbackRate” class=“player__slider” min=“0.5” max=“2” step=“0.1” value=“1”>
       <button data-skip=“-10” class=“player__button”>« 10s</button>
       <button data-skip=“25” class=“player__button”>25s »</button>
     </div>
   </div>
The sider puts have a min, max and a“step” value which is how much it’s going to increment each notch on the slider. Then we have the skip buttons.
There will be three parts:
- Getting the elements
- Building out the functions
- Hooking up the event listeners
- Grabbing the elements ->
const player = document.querySelector(‘.player’);
const video = player.querySelector(‘.viewer’);
const progress = player.querySelector(‘.progress’);
const progressBar = player.querySelector(‘.progress__filled’);
const toggle = player.querySelector(‘.toggle’);
const skipButtons = player.querySelectorAll(‘[data-skip]’);
const ranges = player.querySelectorAll(‘.player__slider’);- Building out the functions
Play Buttons
First ->
We are going to start with togglePlay() which when it is called we will set .play() on the video or .pause()
There is no .playing property on the video but there is a pause property that we can check
function togglePlay() {
  if (video.paused) {
    video.play();
  } else {
    video.pause();
  }
}
If you go to the console and type togglePlay() it will start the video and if you call it again it will pause the video.
Another way to write that function is like so:
function togglePlay() {
  const method = video.paused ? 'play' : `pause`;
  video[method]();
}
video[method](); <- accesses the method name and calls it.
Next -> We want to hook up both to when you click the video and click the button.
video.addEventListener(“click”, togglePlay);
toggle.addEventListener(“click”, togglePlay);
However, when you click the play button, it doesn’t switch the icon to a pause. We need to modify the actual text inside of the button.
Rather than hooking up to togglePlay, what we want to do is listen on the video for whenever it is paused. So whatever causes it to pause (plugin etc) we can just update the actual buttons
We will add event listeners and new function ->
video.addEventListener(“play”, updateButton);
video.addEventListener(“pause”, updateButton);
You can use this in the method because it is bound on the event listener.
function updateButton() {
  const icon = this.paused ? “►” : “❚ ❚”;
  toggle.textContent = icon;
  console.log(“Update the button”);
}
Skip Buttons
We are going to make a function called skip and define how much we have to skip.
How Wes likes to define the amount we want to skip is look at the skip buttons.. they have data-skip=“-10” and data-skip=“25"
Whats nice about that method is it lets you add data skip on anything and it will work.
We want to add an event listener on the skip buttons..
skipButtons.forEach(button => button.addEventListener(“click”, skip));
Skip method ->
function skip() {
  console.log(this.dataset.skip);
  video.currentTime += parseFloat(this.dataset.skip);
}
We need to call parseFloat because the dataset returns a string.
Range Sliders
Two inputs of type=“range" named playbackRate and volume
First ->
Listen for change on those sliders.
You can also duplicate that line of code and also add the event listener on “mouse move”
ranges.forEach(range => range.addEventListener(“change”, handleRangeUpdate));

ranges.forEach(range => range.addEventListener("mousemove", handleRangeUpdate));
Since the “name” properties of the ranges correspond to the values we want to update on the video, we can simply do ->
function handleRangeUpdate() {
  video[this.name] = this.value;
}
Progress Bar
The bar should move with the video duration. Also, if you click and drag it, it should move the video forward.
First ->
Create function called handleProgress and we are going to make a percentage because how it will work is we will check the progress field and see the flex basis value, we will just be updating that ->

So knowing that 0 is the start and 100% is the end, we need to check the video length, see where we are in the video and calculate the current percentage.
function handleProgress() {
  const percent = (video.currentTime / video.duration) * 100;
  progressBar.style.flexBasis = `${percent}%`;
}
It doesn’t work yet because we have just created the progress, but we want it to run every so often. SO what do we do? Do we put it in a timeout or interval and run it every second? NO. We wait for the video to emit an event called time update and when that happens we will run handleProgress
video.addEventListener(“timeupdate”, handleProgress);
(There is also an event called progress and wes is not clear on the difference between the two)
The last thing is the scrub (dragging the progress bar).
How it will work is we will listen for a click on the video bar, and wherever we have clicked, it will say you have clicked at “320px” for example. We know that the entire bar is 640px, so we should scrub the video 50% of it’s duration.
progress.addEventListener(“click”, scrub);
If you console log the event, you will have access to offSetX. That tells us that we have clicked x pixels into that bar, because the bar is position relative. We can use progress.offsetWidth to grab the width of the bar.
Given that knowledge, we can do a bit of math.
const scrubTime = (e.offsetX / progress.offsetWidth) * video.duration
That will give a percentage like 50.5%; Then you multiply it by the video’s duration.
So if it’s a 60 second clip, and you’re halfway through, you’re telling it that you should scrub it up to 30 seconds. Then we simply update the video.
That works now.
Next we want to handle the dragging and dropping of the progress bar. We don’t just want to listen for when someone moves it, we want to listen for when someone clicsk and moves it around.
progress.addEventListener(“mousemove”, scrub); ->
However, we can’t just use scrub as is, because we want to ensure the person is clicking down.
We are going to do what we did in the canvas video… set a flag variable, set it to false and the new you clicked we set it to true.
let mousedown = false;
Is the person currently click or has their mouse down? No. When someone mouses down, we want to set it to true. We add another two event listeners for mousedown and mouseup
progress.addEventListener("mousedown", () => (mousedown = true));
progress.addEventListener("mouseup", () => (mousedown = false));
For the scrub, when someone wants to move their mouse, what we want to do essentially is we would run a function here that says “if mouse down, we want to scrub.
Original ->
progress.addEventListener(“mousemove”, scrub);
There is a trick, we can run the function inline and we’ll say mousedown && scrub.
Modified ->
progress.addEventListener(“mousemove”, e => mousedown && scrub(e));
When someone moves their mouse, we say mousedown && scrub. what that does is it first checks this variabl (scrub) and if it’s true, it moves onto scrub. If it’s false, it will return false and do nothing. We are sort of hijacking the fact that we can use && and if this is true, it will run the scrub, if it’s false it won’t.
Because our “scrub” function requires the initial event of what happened on the mouse move, we need to pass it as a param.
Challenge : make the video go full screen.
12 - Key Sequence Detection (KONAMI CODE)
When someone enters a sequence of keys, something needs to happen.
On the window, listen to the key up event.
      window.addEventListener("keyup", e => {
        console.log(e.key);
      });
Now, whenever someone presses one of those items, we are going to push it into an array.
		const pressed = [];
		const secretCode = 'wesbos';
      window.addEventListener("keyup", e => {
        console.log(e.key);
			pressed.push(e.key);
		console.log(pressed)
      });
That will give us a huge array if the user keeps pressing keys. What we want to do is trim it to only be as long as the secret code (wesbos).
We have a budget of six letters, and we want to trim from the beginning of the array to preserve the last 6 keys typed.
pressed.splice(-secretCode.length -1, pressed.length - secretCode.length)->
Next we want to check whether the secret code has been pressed like so ->
        if (pressed.join(“”).includes(secretCode)) {
          console.log(“DING DING”);
        }
We have imported cornily into the html file
<script type=“text/javascript” src=“http://www.cornify.com/js/cornify.js”></script>
And now we can do cornify_add() to make unicorns come up once the secret code has been pressed.

13 - Slide in on Scroll
We are adding this functionality ->
First thing we need to do is select all the images we will be listening for.
Wes has already added the debounce method which we can ignore for now.
When you open the starter file, all the images are hidden. Wes has translated them off screen a littlest and translated them x offscreen a little but and scaled them down. ->
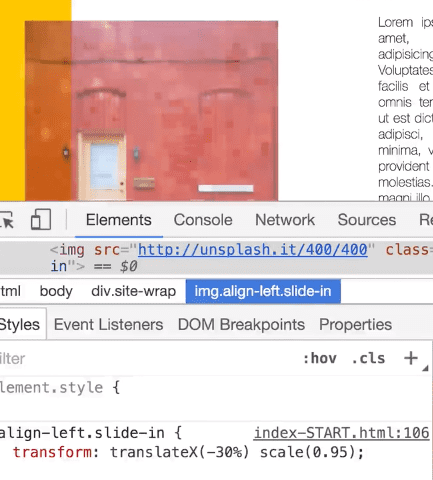
When they are scrolled into view, we will apply a class called active which will display it and scale it normally and put the x axis back.
Add the following code ->
      const sliderImages = document.querySelectorAll(".slide-in");

      function checkSlide(e) {
        console.log(e);
      }

      window.addEventListener("scroll", checkSlide);
This will log an event every time we scroll. That can be a performance issue.
What we want to do is “debounce it”. This means we will only run this function at most, however many seconds.
There is a debounce in lodash btw.
You pass it a function, it will run debounce all the time when we scroll but it will actually only run the function once every 20 milliseconds or 100milliseconds which gives you control and improves performance.
Modify to -> window.addEventListener("scroll", debounce(checkSlide));
Now it runs less often.
Anytime you are doing scroll stuff you might want to think about debounce for performance.
Now we are going to do the work inside of checkSlide.
We are going to loop over every image and figure out where the image needs to then go.
Once the image is speaking (when it’s 50% peaking out) that’s when the image should be on the page at least 50% of it’s high, we want to animate it in.
For each of those few will need to do a bunch of math to decide whether its on the page or not.
We need to figure out how far the window is scrolled down. We can use window.scrollY for that.
However that tells us how much we are scrolled down from the very top our our window but we want to know where we are at the very bottom of our window (the viewport we have here).
We can do that like so -> (window.scrollY + window.innerHeight)
That will give just he pixel level for where you currently are at the bottom. It will tell us how far down we are scrolled.
But we don’t want to slide in at the bottom, we want to slide in halfway through the image. We want to minus the sliderImage.height from the slideInAt value like so ->
 function checkSlide(e) {
        sliderImages.forEach(sliderImage => {
          const slideInAt =
            window.scrollY + window.innerHeight - slideImage.height / 2;
          console.log(slideInAt);
        });
      }
We recalculate this each time because if someone was to click a share button or something it could slide the content down the page and we would need to recalculate where the image lies on the page.
Now we need to figure out where the bottom of the image is because when we are past it, we want to move it off screen (the scroll in animation works when you scroll up and when you scroll down).
Add ->
const imageBottom = sliderImage.offsetTop;offSetTop will tell us the top of the image is how far from the top of the window. It will give us a pixel level of where the image actually is.
We want to know not where the top of the image is, we want to know where the bottom is ->
const imageBottom = sliderImage.offsetTop + sliderImage.height;Next ->
Figure out is the image half shown? And if we’re not scrolled past it.
const isHalfShown = slideInAt > sliderImage.offsetTop
That will make sure our slide in at value is greater than the top of where the actual image is..
const isNotScrolledPast = window.scrollY < imageBottom; ->
We want to make sure we are not scrolled all the way past the image, because if we are, then we need to slide it out again.
Finally, we have our if statement ->
   if (isHalfShown && isNotScrolledPast) {
            sliderImage.classList.add("active");
          } else {
            sliderImage.classList.remove("active");
          }
-> so if the image is half shown on the page, and we are not scrolled past it, then we are going to take that image and we are going to grab the class list and add active or else we remove it because that means we are either scrolled past it or have not gotten to it yet.
14 - Objects and Arrays - Reference VS Copy
Fundamental to understanding how referencing works. Cause of a lot of bugs in javascript.
Strings and Numbers
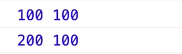
    let age = 100;
    let age2 = age;
    console.log(age, age2);
    age = 200;
    console.log(age, age2);
->
      let name = “Wes”;
      let name2 = name;
      console.log(name, name2);
      name = “Wesley”;
      console.log(name, name2);
->
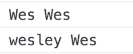
In both cases, since we assigned the original variable to another “2” variable, if we change the original it’s not going to change the “2” variable.
Array
Let’s say we have an array, and we want to make a copy of the array.
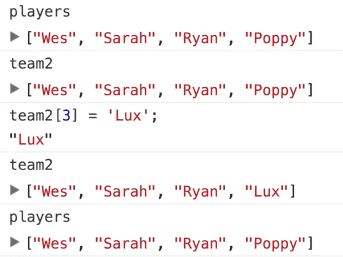
      const players = [“Wes”, “Sarah”, “Ryan”, “Poppy”];
      const team = players;
      console.log(players, team);
->

If you do team[3] = “Lux”; and console log team, Lux will be the last value. ->
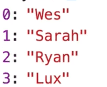
However, if we console.log(players) ->
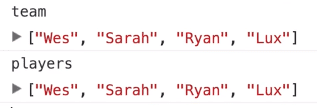
What happened there? We updated team. But team is not the array. Team if just a reference to the original array, which is players. So when you update any of the arrays, it will always go back to the reference, which is NOT the same as copying.
If you want to actually COPY AN ARRAY, there are a few ways to do it.
- Slice
const team2 = players.slice();-> It will make a copy of the actual array if you pass slice nothing.
-
Concatenate to Blank Array
const teams3 = [].concat(players);You take a blank array, and you concatenate in the existing array and that will add all the items from the players array into the team array. -
ES6 Spread
const team4 = […players]; -
Array.from()
const team5 = Array.from(players)
Objects Assigning an object to another variable also only makes a reference, not a copy.
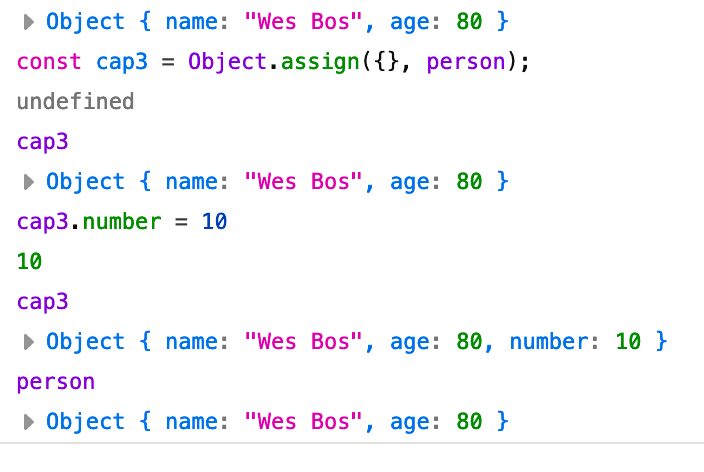
const person = {
        name: “Wes Bos”,
        age: 80
      };
      const captain = person;
      captain.number = 99;
->

It will update the “person” object as well.
How to copy?
- Object.assign() You start with a blank object, and you pass it the object you want to copy, and then you fold in your new properties that you wish to change.
const cap2 = Object.assign({}, person, { number: 99 });
console.log(cap2);
->

Hopefully soon there will be an object spread.
However this is a shallow copy.
 const wes = {
        name: “Wes”,
        age: 100,
        social: {
          twitter: “@wesbos”,
          facebook: “wesbos.developer”
        }
      };

      console.clear();
      console.log(wes);

      const dev = Object.assign({}, wes);
->
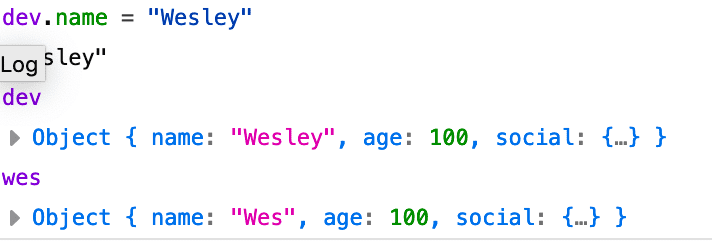
However, if we update dev.social.twitter ->
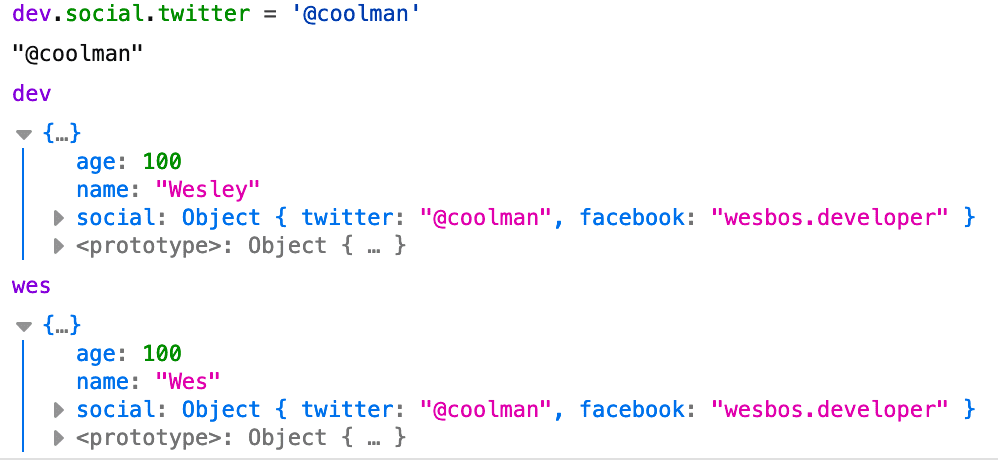
When you use object.assign() it only does one level deep.
If you need to do a clone, you have to get out a function called “cloneDeep” and that will clone every level as deep as you want. HOWEVER before you do that you should ask yourself should I do this because it’s rare that you need to clone an object that deep.
The poor man’s deep clone ->
const dev2 = JSON.parse(JSON.stringify(wes)); ->

Not sure as the performance for that .
15 - LocalStorage and Event Delegation
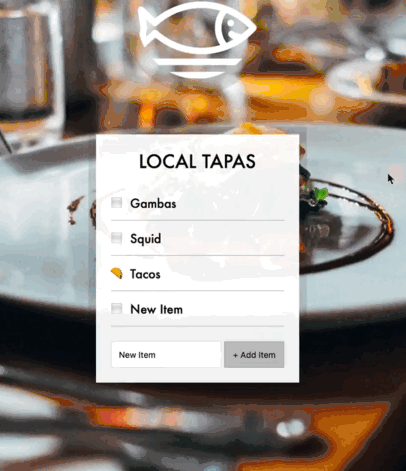
We will be persisting our state with local storage.
We will be using event delegation to make a new menu item immediately “taco-able”. If you add an event listener on something that doesn’t exist, in the future it own’t be clicked. We are going to look at that error and use event delegation to fix it.
Starter code ->
 <div class=“wrapper”>
    <h2>LOCAL TAPAS</h2>
    <p></p>
    <ul class=“plates”>
      <li>Loading Tapas…</li>
    </ul>
    <form class=“add-items”>
      <input type=“text” name=“item” placeholder=“Item Name” required>
      <input type=“submit” value=“+ Add Item”>
    </form>
</div><script>
const addItems = document.querySelector(‘.add-items’);
const itemsList = document.querySelector(‘.plates’);
const items = [];
</script>We have grabbed the form, which we will use to add an item and the list of class plates where we will load the tapas dishes.
We are going to storing all of our data in an array, which will have the name of the item and it’s status (whether it is tacoed or not).
We want to listen for the submit event on the form, not a click on the button. You want submit because it can be when the user hits enter, when the user clicks or something external that causes the form to submit.
 function addItem(e) {
		//prevent form from submitting
        e.preventDefault;
      }
      addItems.addEventListener("submit", addItem);
Next we want to get the text from this box and put it into an object.
First we create the object, with two properties. The first is the text property and the next is the done property.
const item = {
          text: "Item Name",
          done: false
        };
How do we get the text here? ->
const text = this.querySelector(“[name=item]”).value;
You can use this because this is the form, and we want to look inside of the form.
Modify to ->
const text = this.querySelector(“[name=item]”).value;
const item = {
          text
          done: false
 };
Next we want to clear the input using this.reset()
Now we want to push that item into the array like so items.push(item);
We are going to create a second function called populateList which will generate the actual HTML necessary. We are going to pass it a param called plates which is set by default to an empty array.
The reason we are doing that is if we for some reason forget to pass in something ,it won’t break the javascript it will just map over an array of nothing.
We need a plate to put the HTML and that’s called platesList, and we are going to pass in our items list.
function populateList(plates = {}, platesList){

      }
Why are we doing it like this, and not reaching outside and grabbing the list of items? We want it to be more resilient. We can add it any array of plates, and any destination HTML element and it will work. If in the future we decide to have two different lists or two different menus, that would be fine, we could use this same function.
Next we are going to map over the “plates” aka items and return HTML (use back ticks). In front of plates.map, we need to either stick this into a variable or directly into the html.
 function populateList(plates = {}, platesList) {
       platesList.innerHTML = plates.map((plate, i) => {
          return `
          `;
        })
      }
We are going to loop through every single item in our array, (the items are objects) and map through them. Map will take an array of raw data and return an array of some other data. We are going to take in an object, and return a string.
    platesList.innerHTML = plates
          .map((plate, i) => {
            return `
          <li>
           <label for="">${plate.text}</label>
              </li>
          `;
          })
          .join('');
In the addItem method, after we push the item into the array, we are going to call populateList like so -> populateList(items, itemsList);
We use join to make the array items into one long string.
Now the tapas list can be populated.
Everytime we add an item, we are calling the populateList function, which will then create the list item with a label inside of it.
Right now, everytime we add an item, we are repopulating the entire list. If you are worried about performance, you would want to look at how to update just that list item instead of them all. React/Angular is useful for that.
We are going to add an input above the label in the html we return to make a checkbox and we are going to add data-index attribute.
<input type=“checkbox” data-index=${i} id=“item${i}”/>
<label for=“item${i}”>${plate.text}</label>
id=“item${i}” this will give item1 item0 item2 etc.
On the label we add the value for the for attribute, to hook that id up. That is how when you click the label, the input will check itself (that’s how you link the to). The ID and the “for” are exactly the same thing.
Next we need to know whether the items are going to checked or not. When we re-render it, if it’s already checked, it it has a done status, we need to put the checked attribute.
For <input checked /> you cannot do checked=false so we need to only add that attribute if it is checked.
We will create a ternary operator -> <input type=“checkbox” data-index=${I} id=“item${I}” ${plate.done? ‘checked’ : ‘’}/>
You return an empty string in the false. Don’t put null because the word null will actually show up in your HTML>
To add the taco instead of the checkbox, Wes has used this HTML ->

When we refresh the page, the list is not persisting.
How localStorage works is you have this object in your browser called local storage. If you open that up, you will see a list of things that have been saved to this domain.
 This is a computer to computer, browser to browser, website to website basis.
When you reload the page, you can still access the values saved.
This is a computer to computer, browser to browser, website to website basis.
When you reload the page, you can still access the values saved.
How to access in dev tools ->
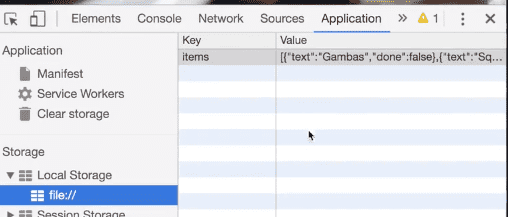
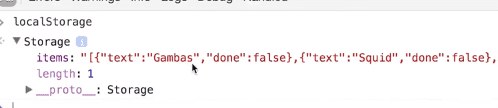
How do we save to local storage? When we populate the list, we need to set this items array into local storage.
localStorage has .setItem() .getItem() .removeItem()
In addItem we will add localStorage.setItem(‘items’, )
The first parameter is the key.
For the second parameter, we pass it the value. However we cannot just pass it “items” or we will get ->

The issue is localStorage only uses strings.
If you call items.toString() you will get [object Object] ->
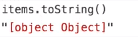
What we need to do is stringily it before we pass it.
JSON.stringify() converts item to json string equivalent.
localStorage.setItem(“items”, JSON.stringify(items));
->

However, what you can do is wrap that in a JSON.parse() which will then convert it back to whatever it was from the string.
What we need to do is on page load, we at the end call populateList(items, itemsList); However, initially items is an empty array. So we need to modify where we declare the items value to the following ->
const items = JSON.parse(localStorage.getItem(‘items)) || [];
->
That will try to get it from local storage, and if it isn’t there, it will fall back into a local array.
Recap: When we add an item, we put it into local storage and update your local storage every single time. On page load, we check to see if something is in local storage, and we fall back to an empty array.
You can clear local storage in the dev tools by finding local storage and trashing it.
Next, we need to persist the toggling.
Create a new function ->
 toggleDone(e){
}
Where does this function run? You think that you would select a checkbox and then listen to a change on click event on those check boxes. Then when that happens, you will perform something.

https://cl.ly/f2fc990c9581
If you grab all the input and add event listeners like so ->

That will work for some inputs but no the list items. Why? -> When our event listener runs, the list items don’t exist yet.
The whole idea about event delegation is that rather than listening for a click or change on these checkboxes directly, we look for somebody who is going to be on the page at the time of listening.
If we look at our html, the ul does exist. So we are going to listen for a click on that plates, and then figure out did they actually mean to click one of the inputs inside of it?
Wes likes to think of event delegation as responsible parents and negligent children who don’t necessarily hear any instructions from the parent.
“Hey UL, when your children inputs get clicked, can you please pass this click on to them? Rather than you handling the click directly, we’re telling you because you’re the only one responsible. I don’t know if they are going to be your current children or if you make more in the future, make sure to tell them to handle this“
 function toggleDone(e) {
        console.log(e);
      }

      itemsList.addEventListener(“click”, toggleDone);
Now when you click on a list item, you get two mouse events. ->

If you look at the target -> console.log(e.target)
One is for the label, one is for the checkbox. As you click different items, the target is different.
We want to check if the target is an input, if it’s not we return. ->
if !e.target.matches(input)) return;
Now that works. Next -> We want to go to the items array, find the one that was checked and set the done to true/false. We need to get the index, which is why we gave each input a data-index value so we can use it.
 function toggleDone(e) {
        if !e.target.matches(input)) return; //skip unless input
        const el = e.target;
        const index = el.dataset.index;
        items[index].done=  !items[index].done
 localStorage.setItem("items", JSON.stringify(items));
     populateList(items, itemsList);
      }
We grab the array and set it to the opposite of itself.
We run populateList once more which will update the actual visibility part.
Everytime we make a change, we are going to mirror it to local storage and then rerender the list.
16 - Css Text Shadow Mouse Move Effect
Insert GIF From video
What we are going to do is listen for a mouse move on our hero. Based on the mouse movement, we will decide where and how far to put our text shadow.
Grab the hero, and the h1 within the hero which has content editable set too true.
On hero, add an event listener on the mouse move event.
First we need the width and height of the thing we have hovered over (the hero). We also need the information about where the person’s cursor was, which we grab off the event.
 const hero = document.querySelector(".hero");
      const text = hero.querySelector("h1");

      function shadow(e) {
        const { offsetWidth: width, offsetHeight: height } = hero;
      let {offsetX:x, offsetY: y} = e;
      }

      hero.addEventListener("mousemove", shadow);
If you console.log(x, y) you will see the coordinates changing as you move your mouse.
Although we only are listening on the mouse move on the hero, if there are children elements inside of the hero, it’s going to give us the x and the y of the element we actually hovered which is a pain.
We need to normalize to say if the thing we are hovering on is the h1 instead of the hero, then modify the x and y values so it’s consistent across them.
 if(this !== e.target){

        }
-> if you console.log(e.target) you will see ->

This is the hero, and e.target is what it got triggered on. If they are not exactly the same, do this ->
if (this !== e.target) {
          x = x + e.target.offsetLeft;
          y = y + e.target.offsetTop;
        }
erm… What that will do is add the pixels from the element we are hovering on at that moment to how far over from the left and the top.
Now we need to figure out how far the text shadow should go, which we will refer to as the “walk”.
 const xWalk = (x / width) * walk - walk / 2;
        const yWalk = (y / height) * walk - walk / 2;
        console.log(xWalk, yWalk);
If 100 is our walk, then -50 is as low as we should go and 50 is as high as we should go. That is what the math above is doing.
We can add Math.round()like so
const yWalk = Math.round((y / height) * walk - walk / 2);
17 - Sorting Band Names without articles
In this exercise we will sort an array of band names without their articles like “A” “An” “The”.
Wes’ approach ->
const bands = [‘The Plot in You’, ‘The Devil Wears Prada’, ‘Pierce the Veil’, ‘Norma Jean’, ‘The Bled’, ‘Say Anything’, ‘The Midway State’, ‘We Came as Romans’, ‘Counterparts’, ‘Oh, Sleeper’, ‘A Skylit Drive’, ‘Anywhere But Here’, ‘An Old Dog’];
First sort the bands. Takes in two parameters, a & b. A is the first thing it passes us, and b is the second. It compares them and puts on above the other based on some condition. In this case the condition will be alphabetical.
const sortedBands = bands.sort(function(a,b){
if(a>b){
return 1;
}
else {
return -1;
However it is still taking the articles into account.
We need to create another function called strip which will strip the articles out of the band name. We are going to use a regular expression to strip all three words at once.
function strip(bandName) {
  return bandName.replace(/^(a |the |an )/i, ‘’).trim();
}
The ^ says when it starts with.
Use /i to make it insensitive.
const sortedBands = bands.sort((a, b) =>
{
if(strip(a) > strip(b)){
return 1 }
else { return -1};
});
However can refactor it like so ->
const sortedBands = bands.sort((a, b) => strip(a) > strip(b) ? 1 : -1);
Next we add it to the html ->
document.querySelector(‘#bands').innerHTML =
  sortedBands
    .map(band => `<li>${band}</li>`)
    .join(‘’’’)
18 - Tallying String Times with Reduce
We want to add the total number of minutes, hours and seconds. If you have a bunch of list items with a time string like in this example, how do we tally them all up to get the total hours, minutes and seconds of the combined videos.
We are going to be using reduce.
First we will do it with map and reduce, and then with just reduce.
First we want to grab anything with a data-time attribute ->
const timeNodes = document.querySelectorAll(“[data-time]”);
Now we want to make timeNodes an Array instead of a NodeList.
const seconds = timeNode.map(node => node.dataset.time);
Now we want to turn that into just seconds. TO do that, We want to chain onto this map and split the minutes & seconds from each item which look like ->

We can use ES6 destructuring like so ->
 .map(timeCode => {
          const [mins, secs] = timeCode.split(“:”);
          console.log(mins, secs);
        });
One issue is the values are all still strings and you cannot perform math with strings.
We want to chain on a .map(parseFloat) to the split method. What that will do is run the parseFloat function against every item in the array.
Which is equivalent to ->

  .map(timeCode => {
          const [mins, secs] = timeCode.split(“:”).map(parseFloat);
          return mins * 60 + secs;
          console.log(mins, secs);
        });
Now we want to add all the items together.
Map takes in an array and returns an array. Reduce takes in an array and return anything you want (number, string or object). We are going to reduce them into one big number for our case.
 const timeNodes = Array.from(document.querySelectorAll("[data-time]"));

      const seconds = timeNodes
        .map(node => node.dataset.time)
        .map(timeCode => {
          const [mins, secs] = timeCode.split(":").map(parseFloat);
          return mins * 60 + secs;
          console.log(mins, secs);
        })
        .reduce((total, vidSeconds) => {
          return total + vidSeconds;
        });
      console.log(seconds);
Now we want to split that value up into hours, minutes and seconds.
Normally for hours we would do something like
const hours = secondsLet / 3600 ->
But we don’t care about the .98 because that will be counted in the minutes and seconds.
Modify to ->
const hours = Math.floor(secondsLet / 3600) ->

How do we figure out the seconds?
secondsLeft = secondsLeft % 3600;
We are going to use mod .
What does mod do? It says how many are left after they’ve been individually distributed.


     let secondsLeft = seconds;
      const hours = Math.floor(secondsLeft / 3600);
      secondsLeft = secondsLeft % 3600;
-> console.log(secondsLeft) ->

For minutes we will do
 const mins = Math.floor(secondsLeft / 60);
      secondsLeft = secondsLeft % 60;
19 - Unreal Webcam Fun
We have our video pipped in from webcam, and then video is pipped into canvas.
Before we get started, we need to get a server up and running. We need to feed index.html.
Wes has added browser-sync file which will allow us to live reload.
We start with the following elements ->
 <canvas class=“photo”></canvas>
    <video class=“player”></video>
    <div class=“strip”></div>
Every few milliseconds, we will dump the video onto the canvas. The strip is where we will put the images on. We also have an audio track playing every time we take a picture.
const video = document.querySelector('.player');
const canvas = document.querySelector('.photo');
const ctx = canvas.getContext('2d');
const strip = document.querySelector('.strip');
const snap = document.querySelector('.snap');
The way you get a video, from webcam is like so ->
 navigator.mediaDevices
    .getUserMedia({ video: true, audio: false })
    .then(localMediaStream => {
      console.log(localMediaStream);

      //  DEPRECIATION :
      //       The following has been depreceated by major browsers as of Chrome and Firefox.
      //       video.src = window.URL.createObjectURL(localMediaStream);
      //       Please refer to these:
      //       Depreceated  - https://developer.mozilla.org/en-US/docs/Web/API/URL/createObjectURL
      //       Newer Syntax - https://developer.mozilla.org/en-US/docs/Web/API/HTMLMediaElement/srcObject

      video.srcObject = localMediaStream;
      video.play();
    })
    .catch(err => {
      console.error(`Oh noooo!`, err);
    });
}


getVideo();
We need to grab the width and height of the video so we can make the canvas the same width and height.
function paintToCanvas() {
  const width = video.videoWidth;
  const height = video.videoHeight;
  canvas.width = width;
  canvas.height = height;
}

Next we are going to paint the video onto the canvas at an interval (every 16 miliseconds). Add this code to paintToCanvas() ->
  setInterval(() => {
    ctx.drawImage(video, 0, 0, width, height);
  }, 16);
For the draw image method, we pass in the video element, then start it at 0, 0 which is the top left hand corner of the canvas, and then paint the width and the height.
Wes likes to return the interval so if we ever need to stop painting, we have access to the interval and we can call stop interval on it.
Now we will work on the take photo function.
function takePhoto() {
  snap.currentTime = 0;
  snap.play();
}
In the console, run paintToCanvas() and takePhoto() and you should hear the snap audio of the photo being taken.
Instead of having to constantly do that in the canvas, at the bottom of the js script, we will listen to an event listener on the video called “canplay”.
video.addEventListener(‘canplay’, paintToCanvas);
Once the video is playing, it will call the canplay event and the canvas will say we now need to start painting.
Now, how do we take a photo? We need to take the data out of the canvas.
  const data = canvas.toDataURL(“image/jpeg”);
  console.log(data);
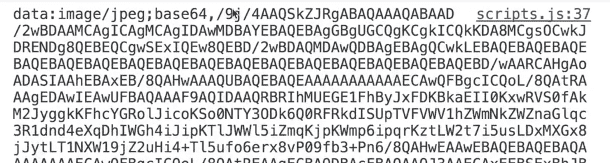 It gives you a base64 representation of the image.
Now we are going to put a link and an image into our strip. You need to make a proper link (you can’t use backticks).
function takePhoto() {
  snap.currentTime = 0;
  snap.play();

  const data = canvas.toDataURL("image/jpeg");
  console.log(data);
  const link = document.createElement("a");
  link.href = data;
  link.setAttribute("download", "handsome");
  link.textContent = "Download Image";
  strip.insertBefore(link, strip.firstChild);
}
When you run takePhoto() in the console, it will take the photo and add a link like so ->
If you open that in a new tab, you will see an image!

If you click the download link, it will save the file using the filename “handsome”.
Now we want to show the photo in the strip.
Remove the textContent and use innerHTML like so ->
link.innerHTML = `<img src=“${data}” alt=“Handsome Lady”/>`;And you will see an image in the strip instead of the download link.

You can also use the “take photo” button which calls takePhoto() on click.
Now we want to add filters. The way a filter works is you get the pixels out of the canvas and you mess with them (change the RGB values) and put them back.
Add this line to setInterval() ->
const pixels = ctx.getImageData(0, 0, width, height);
If you console.log them you get the following ->
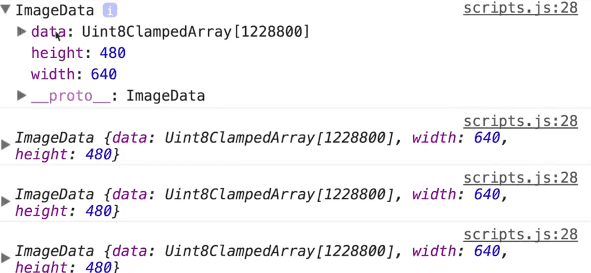
This is a special kind of array that is meant for very very large numbers.
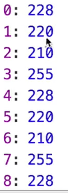
0 is going to be r, 1 is g 2 is b 3 is alpha.
Its a huge array of numbers. The first pie lis red, green blue apple, red, green, blue, alpha. For every 1 pixel of the picture, there are 4 entries in the array that describe the red , green, blue, alpha.
We need to take the pixels, and pass it to a method we will call redEffect().
We need to loop through each pixel. We can’t use .map() because it’s a special kind of array it doesn’t have the regular array methods we are used to working with.
function redEffect(pixels) {
  for (let i = 0; i < pixels.data.length; i += 4) {
    pixels.data[i + 0] = pixels.data[i + 0] + 100; //r
    pixels.data[i + 1] = pixels.data[i + 1] - 50; //g
    pixels.data[i + 2] = pixels.data[i + 2] * 0.5; //b
  }
  return pixels;
}
We increment by 4 each loop.
Update setInterval like so ->
return setInterval(() => {
    ctx.drawImage(video, 0, 0, width, height);

    //take the pixels out
    let pixels = ctx.getImageData(0, 0, width, height);
    //mess with them
    pixels = redEffect(pixels);
    //put them back;
    ctx.putImageData(pixels, 0, 0);
  }, 16);

Next we are going to an RGB split.
Instead of changing each individual one (r,g,b), we are going to the red, and change the one that is 150 back to be the current color, take the green and take the pixel that is 150 pixels forward and set it to the current color, and the same thing for blue. We are pulling apart the different red,green,blues and moving them to either side.
function rgbSplit(pixels) {
  for (let I = 0; I < pixels.data.length; I += 4) {
    pixels.data[I - 150] = pixels.data[I + 0]; // RED
    pixels.data[I + 100] = pixels.data[I + 1]; // GREEN
    pixels.data[I - 150] = pixels.data[I + 2]; // Blue
  }
  return pixels;
}
If you add -> ctx.globalAlpha = 0.1;
It will write the actual one we have, but the ones underneath it will show up for 10 more frames because we are putting a transparency of 10% of the current image and then stacking and stacking.
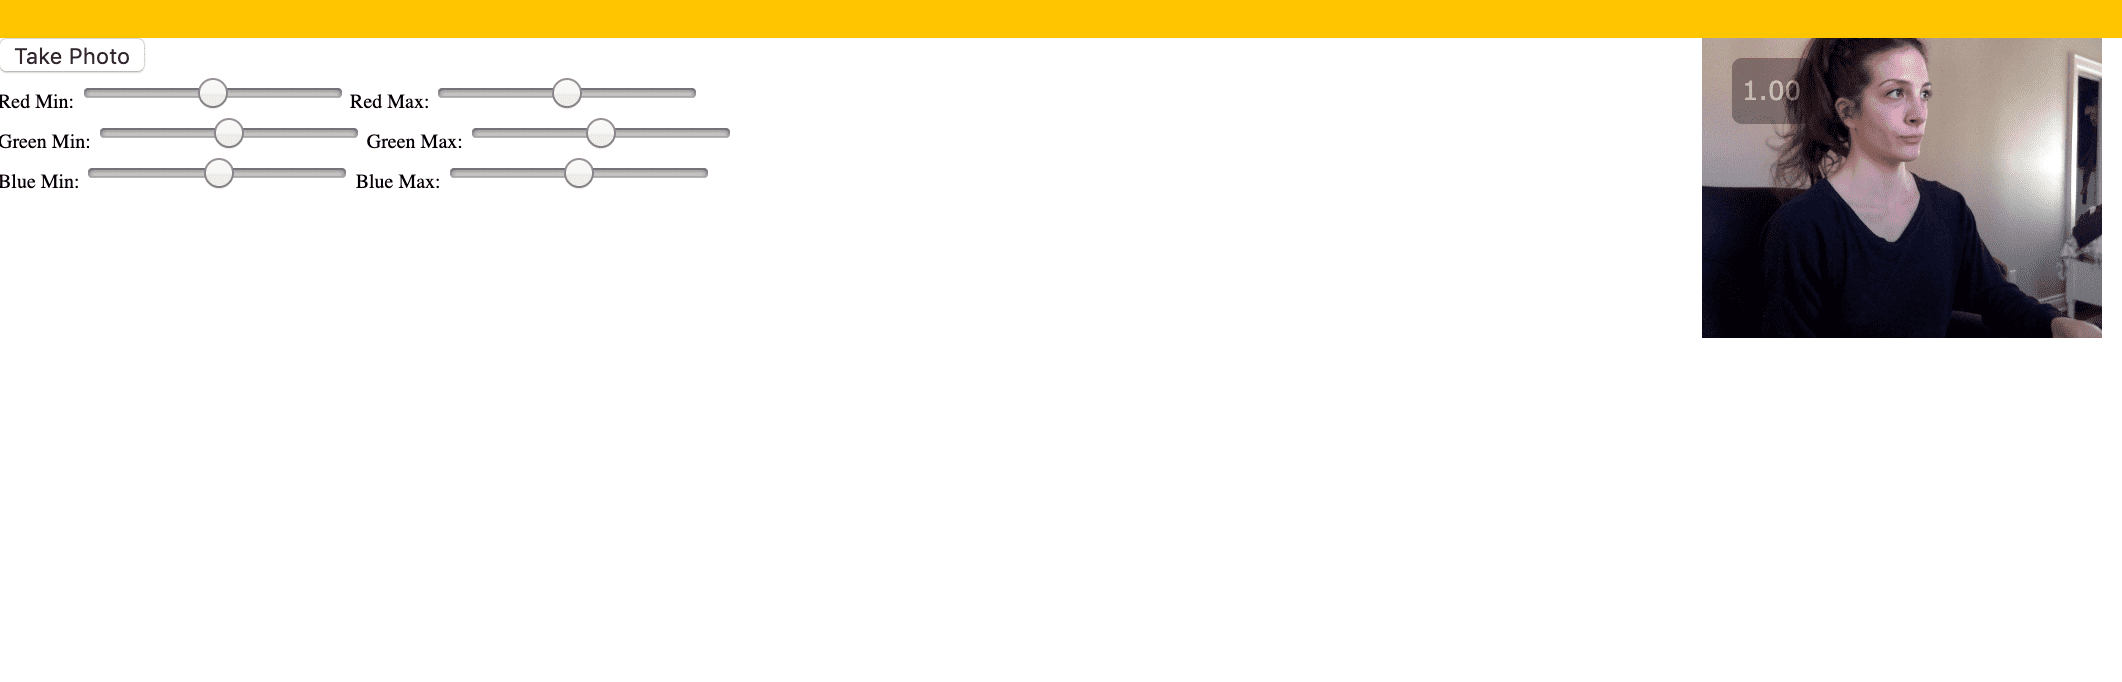
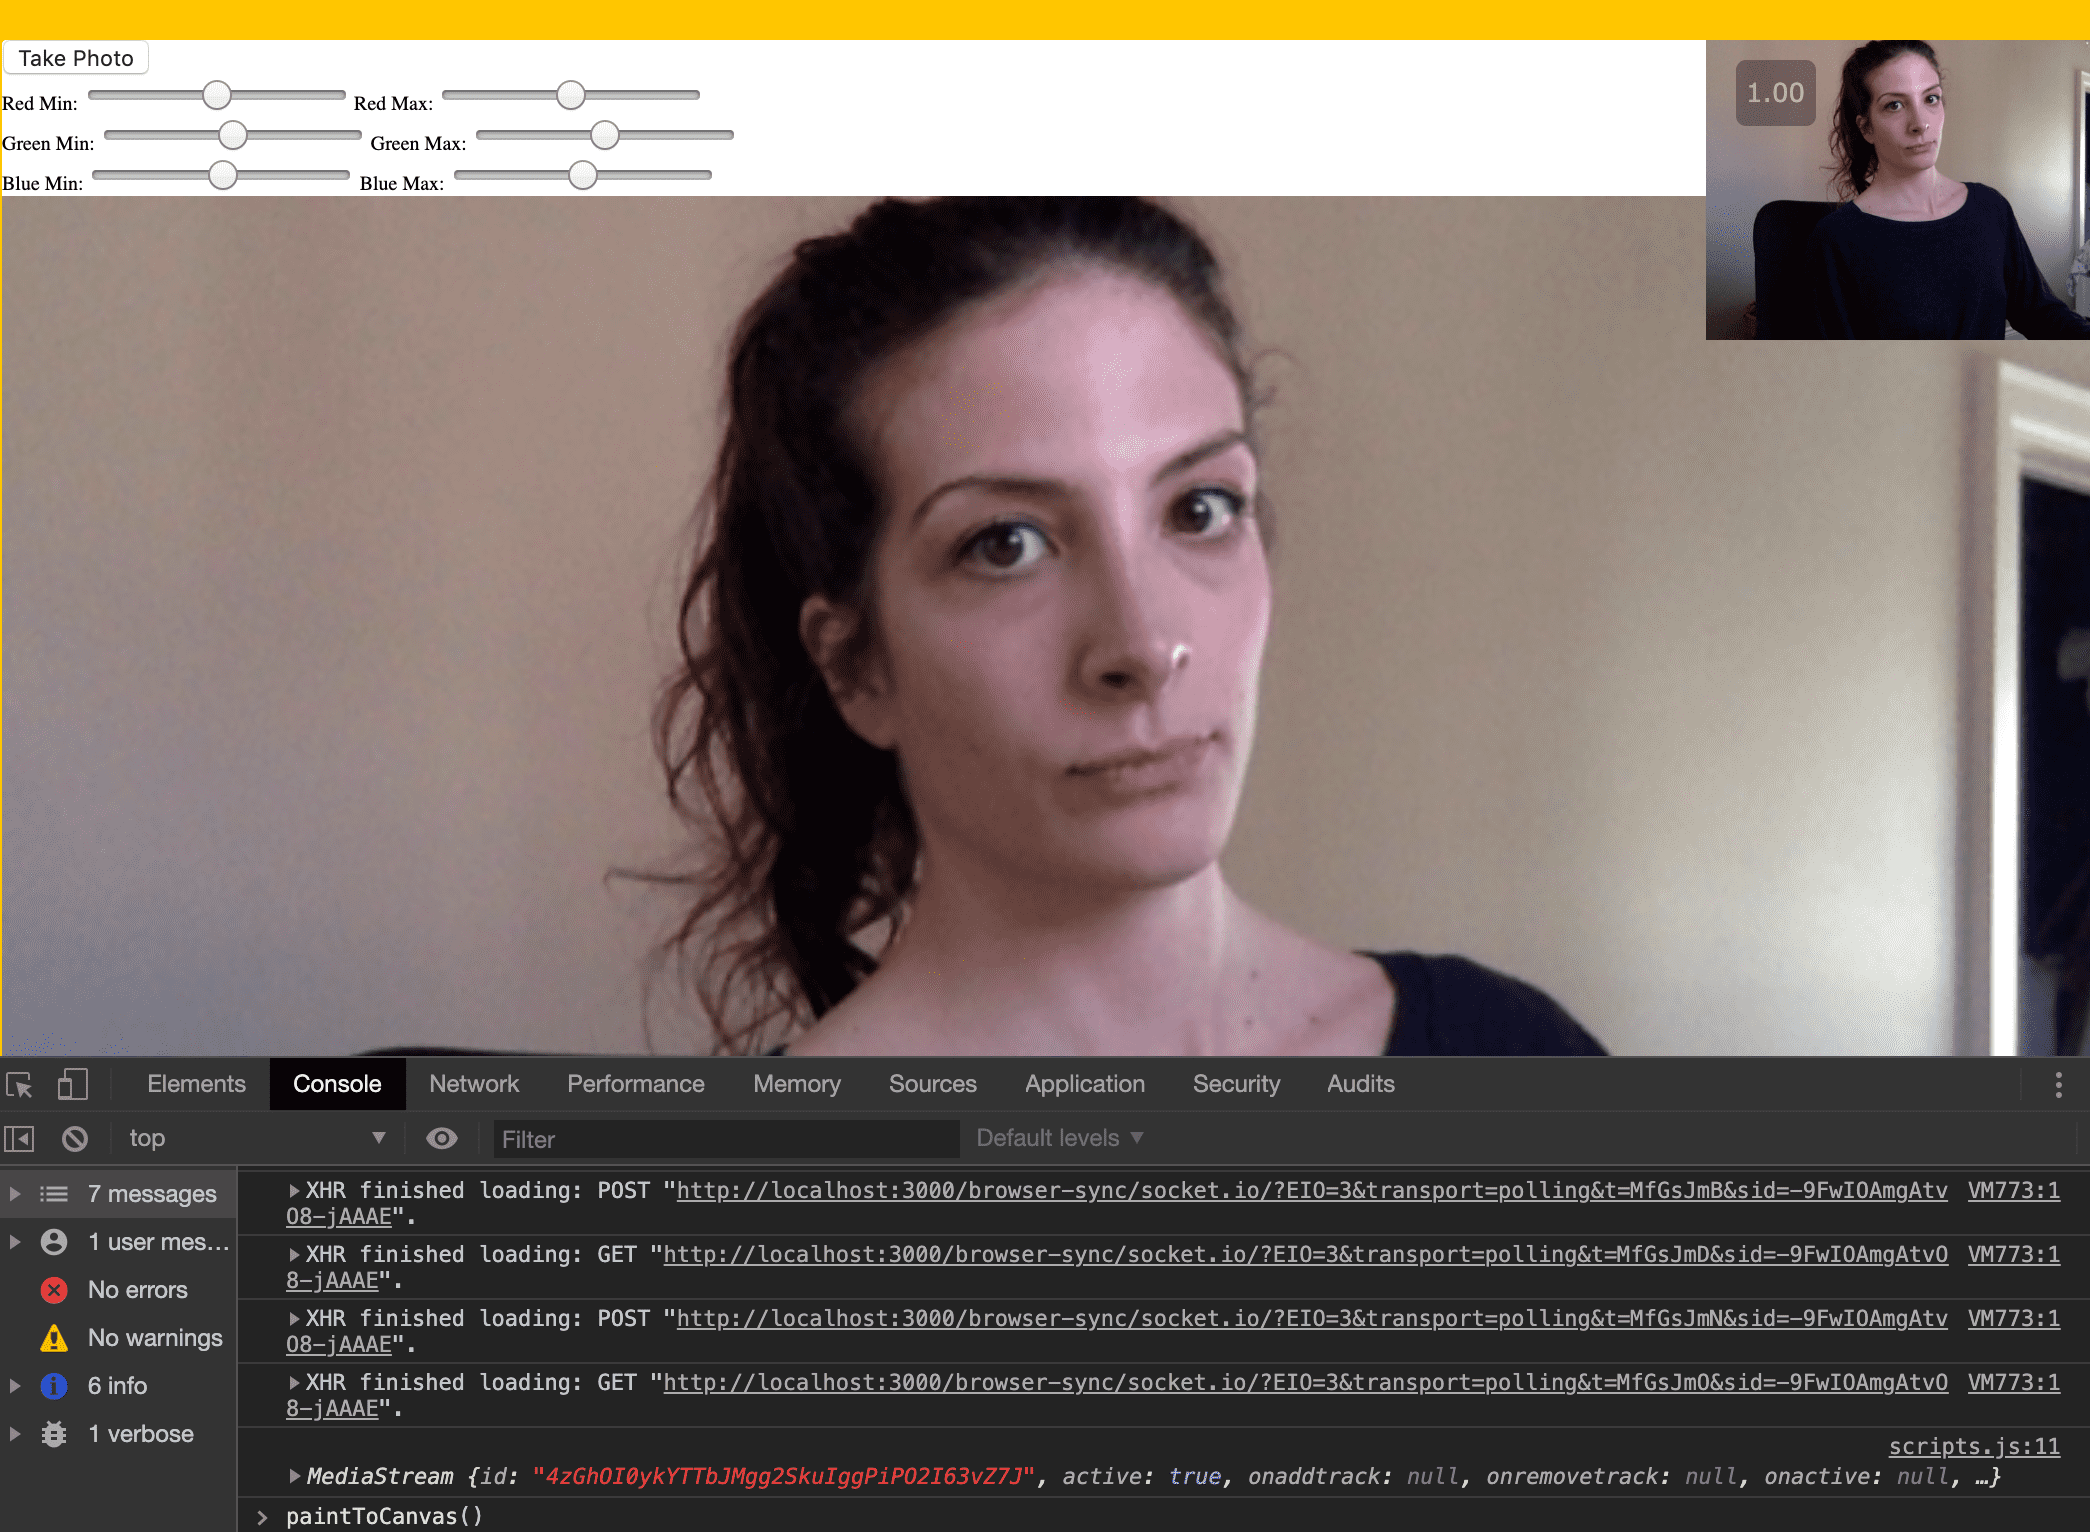
Next we will do the greenScreen();
function greenScreen(pixels) {
  const levels = {};

  document.querySelectorAll('.rgb input').forEach((input) => {
    levels[input.name] = input.value;
  });

  for (i = 0; i < pixels.data.length; i = i + 4) {
    red = pixels.data[i + 0];
    green = pixels.data[i + 1];
    blue = pixels.data[i + 2];
    alpha = pixels.data[i + 3];

    if (red >= levels.rmin
      && green >= levels.gmin
      && blue >= levels.bmin
      && red <= levels.rmax
      && green <= levels.gmax
      && blue <= levels.bmax) {
      // take it out!
      pixels.data[i + 3] = 0;
    }
  }

  return pixels;
}
The levels object is going to hold our minimum and maximum green. The way that green screen works if you say give me all the colours in-between this RGB value and take them out.
Then we grab every single RGB input (the sliders) and we set the red min, red max to be in the level object.
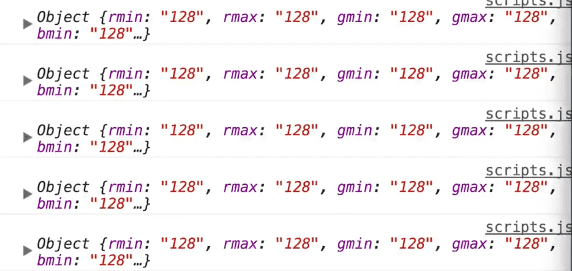
Then we have a huge for loop, loop through each pixel and figure out what the red the blue and the green and the alpha are, and we say if the red, g, b, if it’s anywhere in-between those values, we take it out. The 4th pixel is the alpha, which is the transparency pixel. If you set it to 0 which will be totally transparent.
If you give that a save now, the sliders can change the min / max.

20 - Native Speech Detection
Today we are going to learn about speech recognition in the browser. You can do that without any libraries or external apis.
We have speech recognition which is a global variable that lives in the browser.
window.SpeechRecognition = window.SpeechRecognition || window.webkitSpeechRecognition;
(Chrome uses webkitSpeechRecognition, in the above code we are setting them to both equal SpeechRecognition)
   const recognition = new SpeechRecognition();
      recognition.interimResults = true;
Without recognition.interimResults = true; it will wait until you finish speaking to output the results.
Next we need to create a paragraph. How this will work is that while we are speaking, we will update the last paragraph. Once we are done speaking, we will create a new paragraph.
The browser will tell us once we have finished processing the speech.
let p = document.createElement("p");
      const words = document.querySelector(".words");
      words.appendChild(p);
^ we will put the p in the dom.
Now we need to add an event listener on the recognition, we listen for a “result” rather than a “click”.
recognition.addEventListener("result", e => {
        console.log(e.results);
      });

      recognition.start();
That will give a list of results (not an array),
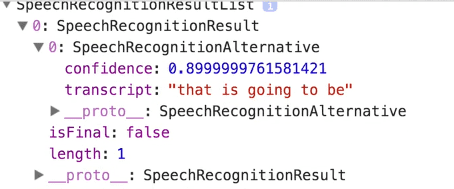
It will tell you what was said, and the confidence level. There is an isFinal boolean which tells us if the user has stopped speaking the sentence.
We need to go through the nested results and create a plain old string. We are going to map over it and take the first thing that we have there.
  recognition.addEventListener(“result”, e => {
        console.log(e.results);
        const transcript = Array.from(e.results).map(result => result[0]);
        console.log(transcript);
      });
Some of them will be two things.
Now we need to map over them once more and return the transcript.
  recognition.addEventListener(“result”, e => {
        // console.log(e.results);
        const transcript = Array.from(e.results)
          .map(result => result[0])
          .map(result => result.transcript)
          .join(“”);
        console.log(transcript);
      });
Will give you ->
One issue is if you stop speaking, and then start speaking again, it doesn’t listen. That is because it is listening for the result, but once the result is finished, it unbinds itself. What we need to do is add a second event listener for the end event.
recognition.addEventListener(“end”, recognition.start); ->
This tells it when it ends, run the function for us (recognition.start). We do recognition.start not recognition.start() because the latter would run on page load.
Now we need to put the transcript in the paragraph.
p.textContent = transcript;
However, when we start talking again, it overwrites it.
What we need to do is check if the result is final. If it is, we create a new p element using the same variable so it overwrites it and append the new p to words.
  if (e.results[0].isFinal) {
          p = document.createElement(“p”);
          words.appendChild(p);
        }
One thing you could do is check if the transcript includes a word to make a hands off application that could go fetch the weather on command for example.
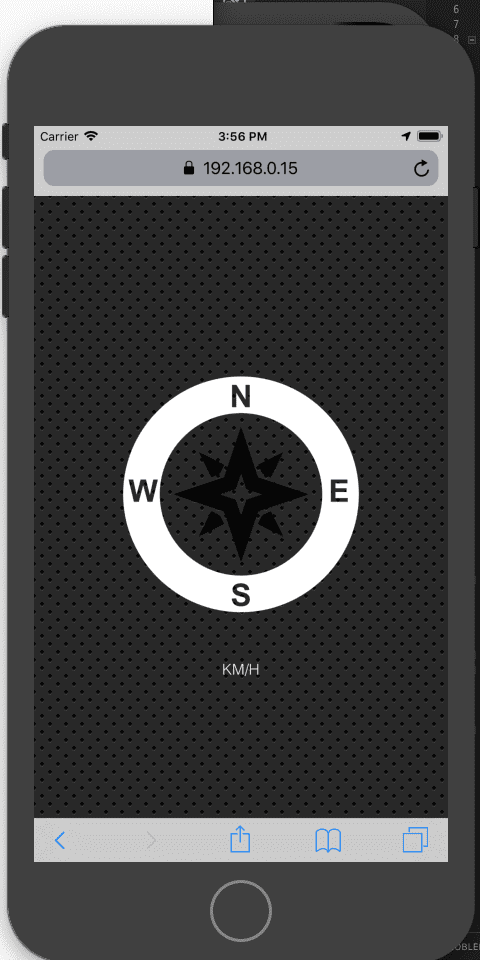
21 - GeoLocation
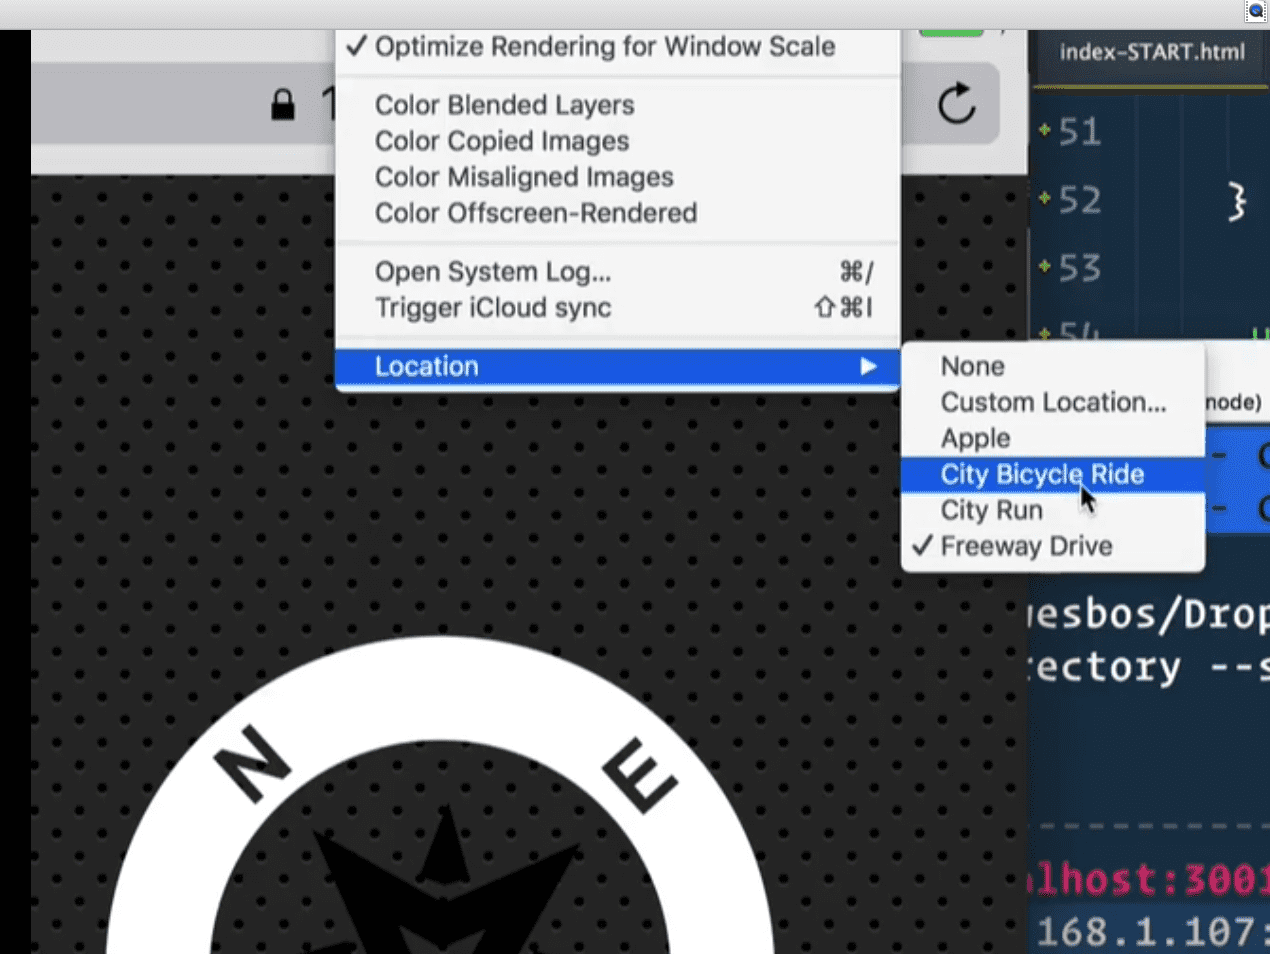
We are not just learning about getting Lat & LNG with geolocation, but there is also info that comes along with it which is Heading, which tells you how many degrees of north someone is at and the speed at which someone is running. In chrome, we can fake coordinates but we cannot fake speed or heading.
The only way to do this so far is with the iOS Simulator.
We open up Xcode -> Menu -> Open Dev Tools -> Simulator
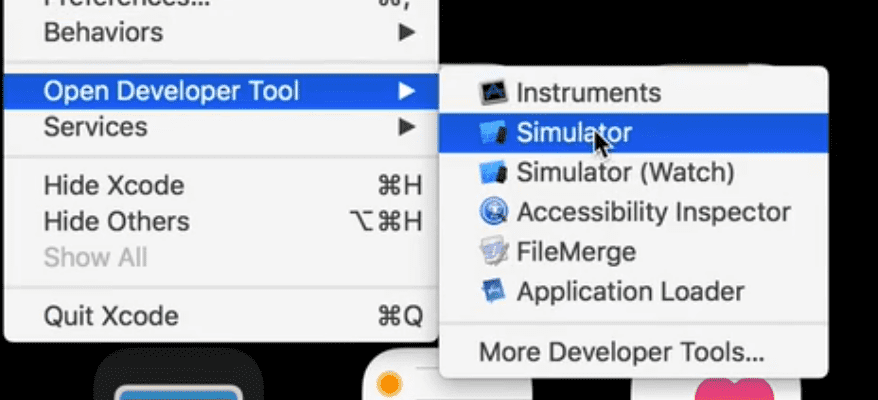
From there ,you can change the hardware to iOS 7 Plus.
You cannot access geo location unless you are on a secure origin.
That hasn’t been a problem for us so far, because we have been doing nom install and npm start which will open it on localhost which is a secure origin.
However, we want to open it on a different device, it’ll give us an external address.

Browser sync ships with a self-sign certificate which allows you to have https on your computer. You will still see this error ->

And you have to go to advanced and proceed.
In the simulator, we want to open up safari and navigate to the external url. https://192.168.0.15:3000
You have to go through security again trying to access the url on the simulator.
Next you go to index-finished and it will ask if it can use your current location and you say yes.
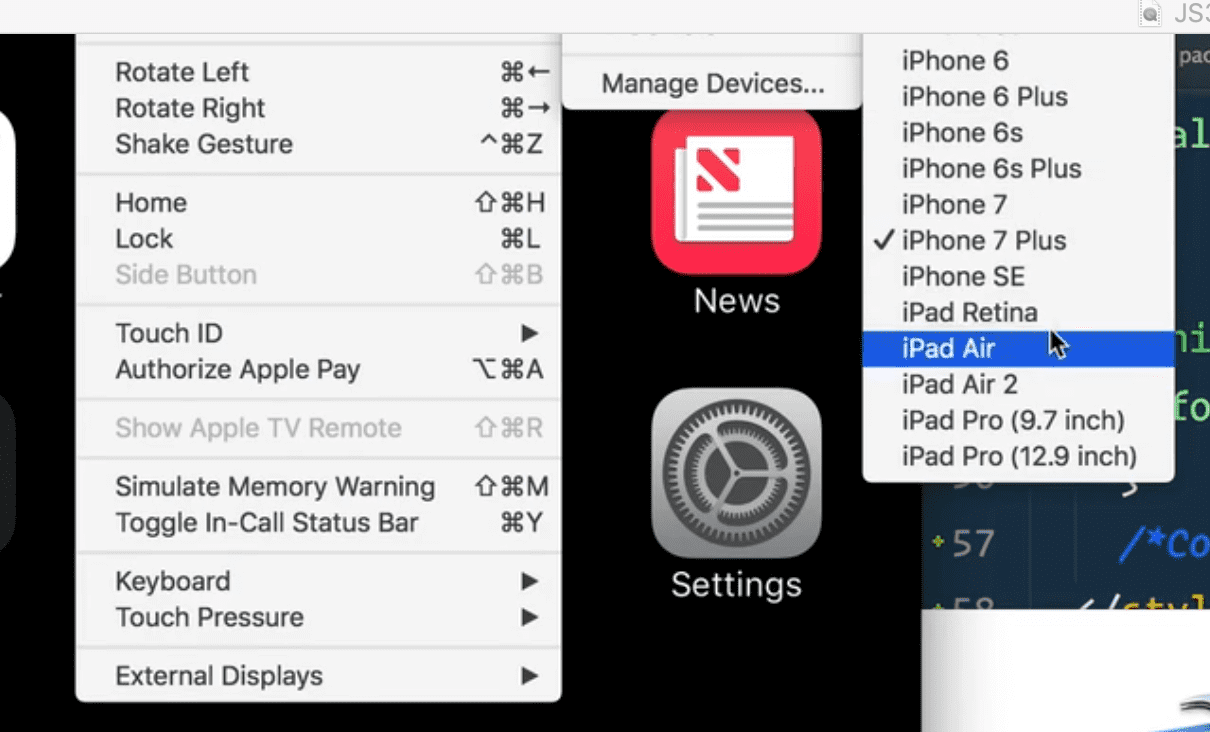
In the simulator, you can select different simulations of walking, running, biking.
Go back to your index-start.html on the simulator.
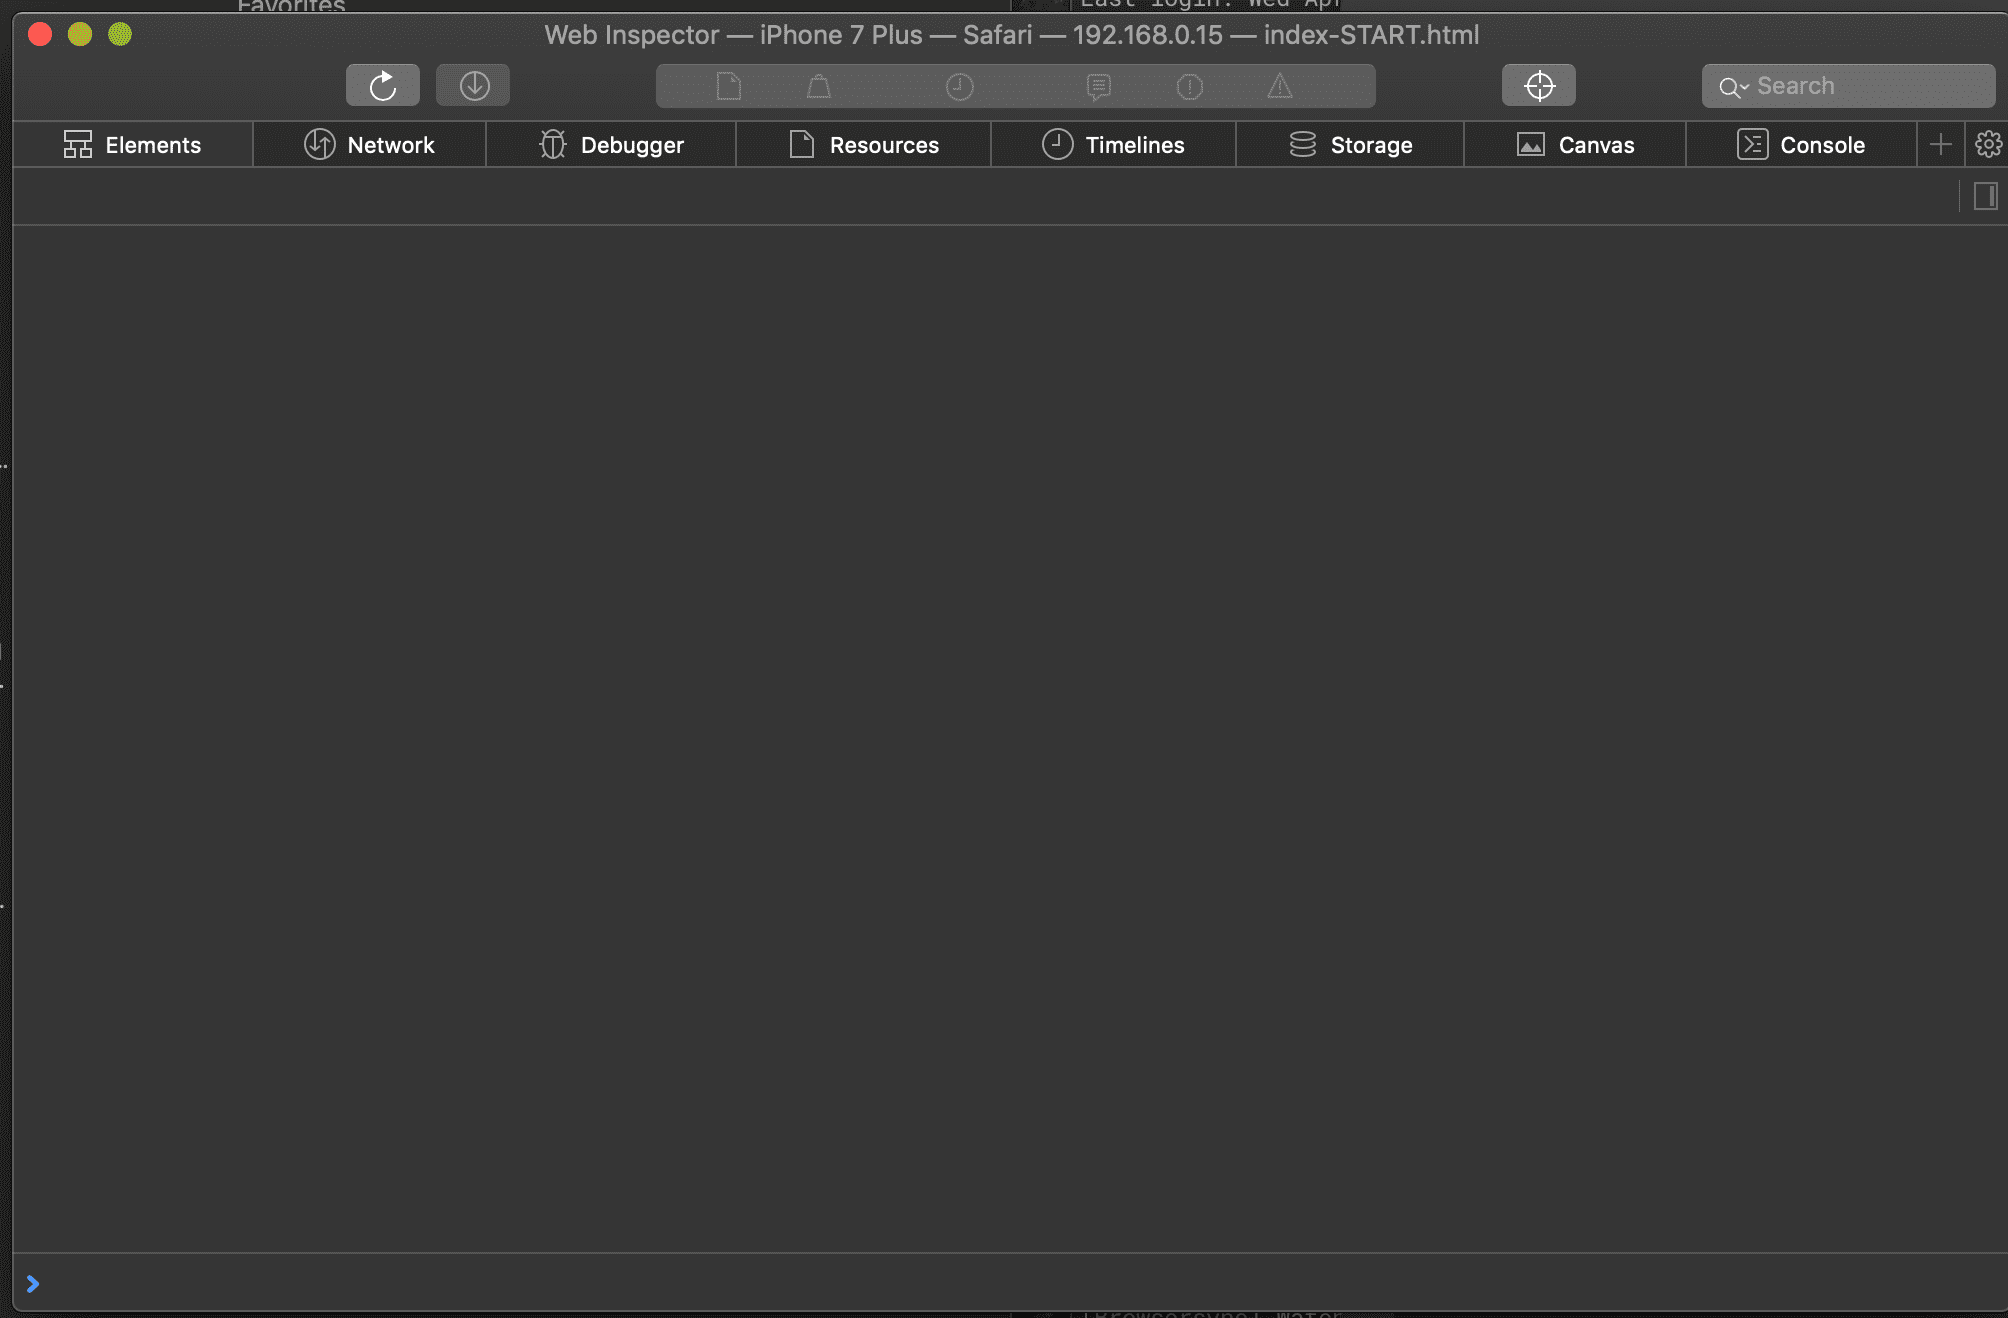
You need to open Safari, and you can go to develop and access simulator there and open the dev tools for it. ->
Firs thing we need to do is select both the arrow and the kms per hour that we are running on.
 <script>
      const arrow = document.querySelector(".arrow");
      const speed = document.querySelector(".speed-value");
    </script>
Now we want to listen on the users position.
navigator.geolocation.watchPosition((data) => {
console.log(data)});
The simulator will ask you for your location access again. Now if you open up safari dev tools, you can see the data streaming in.
THIS IS NOT WORKING FOR ME
You should be able to see data streaming in.
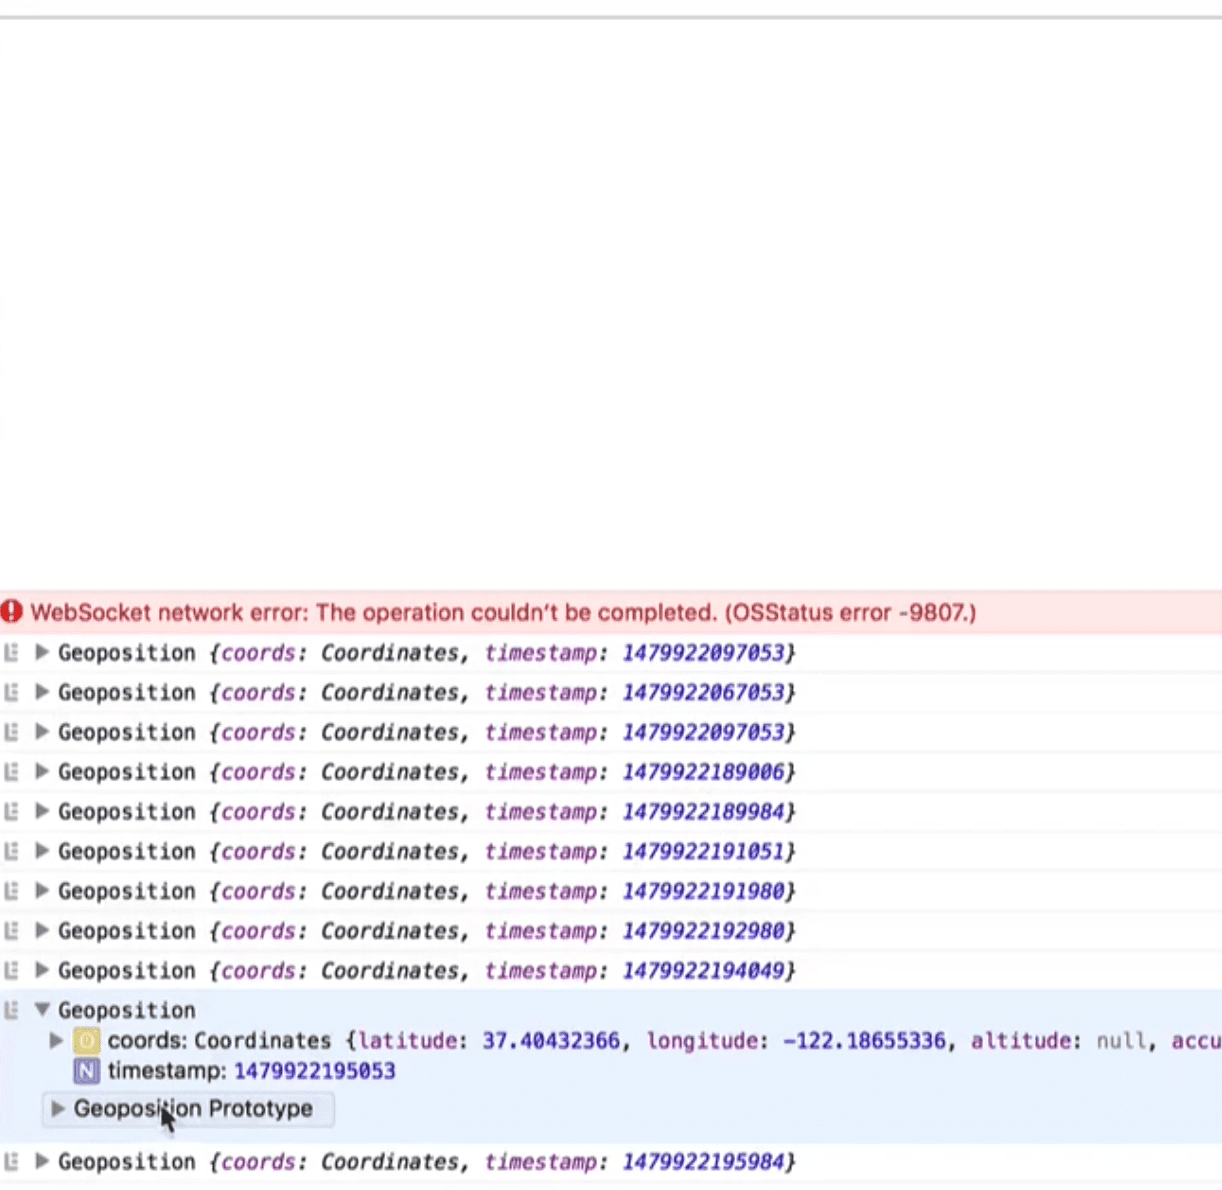
Which gives us geolocation with a timestamp and coordinates. We have heading, which is the number of degrees relative to north that we are and lat and lng and speed.
  <script>
      const arrow = document.querySelector(".arrow");
      const speed = document.querySelector(".speed-value");

      navigator.geolocation.watchPosition(data => {
        console.log(data);
        speed.textContent = data.coords.speed;
      });
    </script>

Next we want to rotate the arrow on the compass.
arrow.style.transform = `rotate(${data.coords.heading}deg)`;data.coords.heading is the number of degrees relative to north and it is 360 based so we don’t need to do math.
Finally we have to handle someone denying access to location with an error handler.
22 - Follow Along Links
What we are creating -> https://cl.ly/f813cb4ee69a When you however over any links, it wraps them with a pill style that resizes based on the text size of the link.
The starting point is an unordered list, with a few lis each containing a link tag, and a div with paragraphs that contain text and links.
First thing we need to do is get all the “triggers” which are the things that will be hovered that need a background behind it.
Next we need to create a highlight.
How this actually works is if you inspect the final code, you will see that there is a span with a class of highlight that Wes has just tacked on.

When you highlight over something, it will figure out the width, the height and where on the page that actual item is. Because there are CSS transitions on this element, it will just transition itself from place to place to place.
First we will make the highlight ourselves in js.
 const triggers = document.querySelectorAll("a");
 const highlight = document.createElement("span");
 highlight.classList.add("highlight");
 document.body.append(highlight);
Now we need to listen for someone to enter into a Link.
We will create a function called highlightLink and then listen for a mouseover event on each of our triggers.
Now we need to figure out how big is the element that we hovered (width and height), and where on the page is that element. We are going to use a method called getBoundingClientRect.
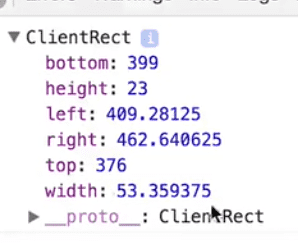
const linkCoords = this.getBoundingClientRect();
Or
We can use these values to set the width and height of the elements.
 highlight.style.width = `${linkCoords.width}px`;
 highlight.style.height = `${linkCoords.height}px`;
Now if you however over the links, you will see the highlight element changing width and height in the top left corner based on the link width and height. Right now it is transitioning smoothly because we have added a CSS transition to it. Without that, it would change immediately and be pretty choppy.
We will be positioning this element using the transform css property. How transform works is you give it an x and a y such as transform: translate(100px, 100px).
highlight.style.transform = `translate(${linkCoords.left}px, ${linkCoords.top}px)`;Now the highlighter will follow the link that is being highlighted.
However, if you open the dev tools and scroll down a bit, you will see that it messes everything up. There are a few ways to fix this. In this example, we will take how far a person has scrolled down, and take that away from our actual item.
We will fix this by making our own coords.
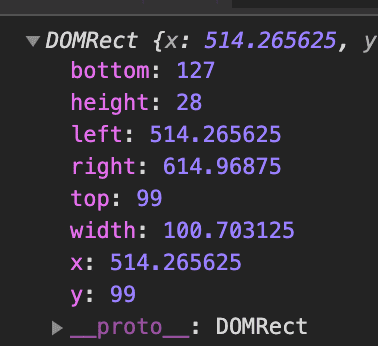
function highlightLink() {
        const linkCoords = this.getBoundingClientRect();
        console.log(linkCoords);
        const coords = {
          width: linkCoords.width,
          height: linkCoords.height,
          top: linkCoords.top + window.scrollY,
          left: linkCoords.left + window.scrollX
        };
        highlight.style.width = `${coords.width}px`;
        highlight.style.height = `${coords.height}px`;
        highlight.style.transform = `translate(${coords.left}px, ${
          coords.top
        }px)`;
      }
23 - Speech Synthesis
Goal ->
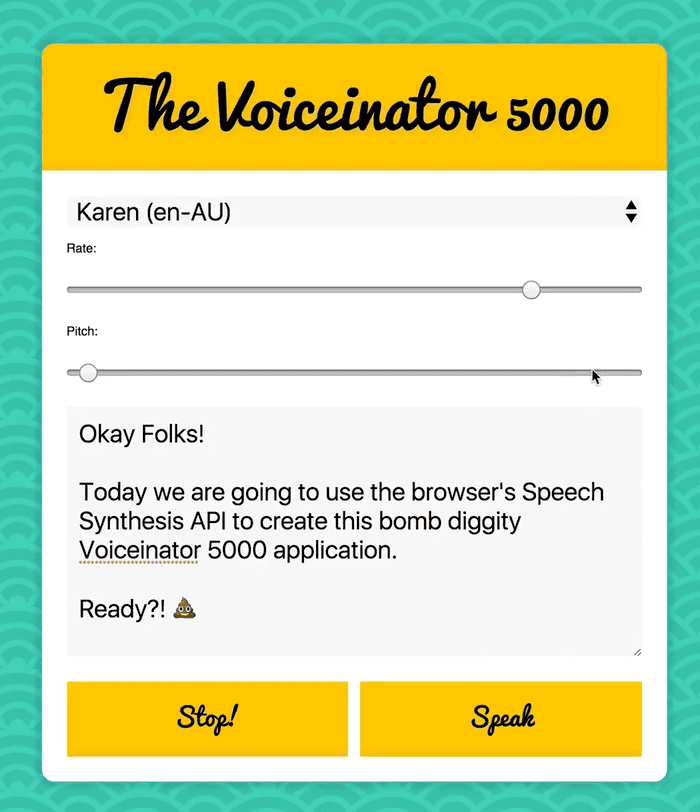
Starting ->
<body>

    <div class=“voiceinator”>

      <h1>The Voiceinator 5000</h1>

      <select name=“voice” id=“voices”>
        <option value=“”>Select A Voice</option>
      </select>

      <label for=“rate”>Rate:</label>
      <input name=“rate” type=“range” min=“0” max=“3” value=“1” step=“0.1”>

      <label for=“pitch”>Pitch:</label>

      <input name=“pitch” type=“range” min=“0” max=“2” step=“0.1”>
      <textarea name=“text”>Hello! I love JavaScript 👍</textarea>
      <button id=“stop”>Stop!</button>
      <button id=“speak”>Speak</button>

    </div>
<script>
//a new speech utterance instance, which we will apply speech, rate and the text that it will be speaking
  const msg = new SpeechSynthesisUtterance();
//this will be what we put the voices for the select into
  let voices = [];
  const voicesDropdown = document.querySelector(‘[name=“voice”]’);
  const options = document.querySelectorAll(‘[type=“range”], [name=“text”]’);
  const speakButton = document.querySelector(‘#speak');
  const stopButton = document.querySelector('‘stop');
</script>
We are going to be doing text to voice using the speechSynthesis API that comes in most modern browsers.
We will have a dropdown of voices, an input that speeds up the voice and an input that determines the pitch. We have a text area that determines what the person says. We also have start and stop buttons.
The names of the inputs are important because they correspond to the utterance property.

const msg = new SpeechSynthesisUtterance();
//a new speech utterance instance, which we will apply speech, rate and the text that it will be speaking
let voices = [];
//this will be empty array which the voices will be dumped into
//selected the dropdown
const voicesDropdown = document.querySelector(‘[name=“voice”]’);
//selected the rate, the pitch and the text area all in one go.
const options = document.querySelectorAll(‘[type=“range”], [name=“text”]’);
//start button
const speakButton = document.querySelector(‘#speak');
//stop button
const stopButton = document.querySelector('‘stop');
What we now need to do, on page load is whatever is in the text area, we want to set as the default.
Add msg.text = document.querySelector('[name="text"]').value;
Now if you refresh the page, and type msg in the console, it will show the speechSynthesisUtterance.
 A
A SpeechSynthesisUtterance is like one thing a person might say.
Next we want to populate the the voices dropdown.
There is another global variable called speechSynthesis

What that will do is you can call .speak() on it and pass it an utterance, it doesn’t work because there is no voice.
What we can do is take the speechSynthesis variable and add an eventListener on the ‘voiceschanged` and call populateVoices
function populateVoices() {
        voices = this.getVoices();
        console.log(voices);
      }
      speechSynthesis.addEventListener(“voiceschanged”, populateVoices);
You can’t fire populateVoices() on page load because you need speechSynthesis to load and trigger voices changed in order to populate them.
You should see something like

Now we want to loop over all the speech voice and add them to our dropdown.
voicesDropdown.innerHTML = voices
          .map(
            voice =>
              `<option value=“${voice.name}”>${voice.name}(${
                voice.lang
              }</option>`
          )
          .join(“”);
If we take a look at our msg variable now in the console, it will still be null but it will default to Alex which is the default. We can now call speechSyntehsis.speak(msg).
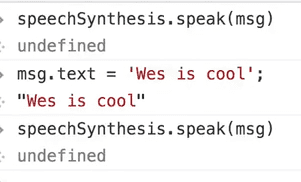
And it will speak!
We want to be able to choose the voice from the dropdown so we will make another method called setVoice.
We will add an eventListener on voicesDropdown and listen for the “change” event.
voicesDropdown.addEventListener(“change”, setVoice);
Now every time you change the dropdown, the voice will change. What we want to do is use find the voice that lines up with the value. You cannot just pass “Alex” you have to find the correspond SpeechSynthesisVoice.
    function setVoice() {
        console.log(“Changing voice”);
        msg.voice = voices.find(voice => voice.name === this.value);
      }
What that will do is it will loop over every single one of the voices in the array and find one where the name attribute matches the dropdown selection value.
At this point, if you select a voice from the dropdown and call speechSynthesis.speak(msg) it will say it in the voice you have chosen.
Now every time we change one of the inputs, we want to restart it. We will call that toggle, and pass in an argument called startOver which is set to true by default. What toggle will do is cancel what is currently being said and call speak again. Or it will just cancel what is being said if startOver is not true.
    function toggle(startOver = true) {
        speechSynthesis.cancel();
        if (startOver) {
          speechSynthesis.speak(msg);
        }
      }
Next we want to work on our rate and pitch and text area.
We will take each of our options and loop over it and add an event listener on the “change” event.
    function setOption() {
        console.log(this.name, this.value);
      }
options.forEach(option=>option.addEventListener(‘change’, setOption))`

Now we will know when any option is changed, which one was changed, and what it was changed to.
So we need to take our message and set what property changed (this.name) to this.value.
  function setOption() {
        console.log(this.name, this.value);
        msg[this.name] = this.value;
        toggle();
      }
Now we are going to make the “speak” button work.
speakButton.addEventListener(“click”, toggle);
Now we want to do the same for stopButton. However we need to pass in the argument false, but if we do toggle(false) it will run on page load.
There are a few ways to do it
stopButton.addEventListener(“click”, function(){toggle(false)})
Or
stopButton.addEventListener(“click”,toggle.bind(null, false));
or
stopButton.addEventListener(“click”, () => toggle(false));
Last thing we want to do is filter for English voices.
Add
 voices = this.getVoices();
        const voiceOptions = voices
          .filter(voice => voice.lang.includes("en"))
          .map(
            voice =>
...
24 - Sticky Nav
Goal -> Once you start scrolling and the nav hits the top of the browser, it sticks but you can scroll the content underneath and do some stuff like scroll out the logo.
Starting code ->
<nav id="main">
    <ul>
      <li class="logo"><a href="#">LOST.</a></li>
      <li><a href="#">Home</a></li>
      <li><a href="#">About</a></li>
      <li><a href="#">Images</a></li>
      <li><a href="#">Locations</a></li>
      <li><a href="#">Maps</a></li>
    </ul>
  </nav>
First thing we want to do is grab the nav.
const nav = document.querySelector(‘#main’)
Then we want to make a function called fixNav which is going to run every single page scroll.
      function fixNav() {}

      window.addEventListener(“s“roll”,”fixNav);
What this is going to do is we are going to figure out where the top of this navigation black bar is.
Lets say its 500px from the top. When we scroll, we are going to figure out how far are we scrolled. Lets say we are 400px scrolled here ->
But as soon as we hit that threshold of scrolling more than the nav is (in this example 501 pixels) ->
The nav bar is going to say “Oh now I’m off screen, I need to now fix myself.”
What we need to do on page load is grab wherever the top of that nav actually lives. const topOfNav = nav.offsetTop;
If you console log that in the fixNav function, we will get 542px or something similar.

If you also console.log window.scrollY as well, you will see that the value is how far we have scrolled down ->
 Once we are scrolled to the top of the nav, we want to make it stick.
Now we can say ->
 if (window.scrollY >= topOfNav) {
        }
If that is true, we want to add a class to our body. You could also apply the class directly on the nav, however then you cannot target any element. If you put it on the body, you can easily target any of the children when in fixed nav state.
  if (window.scrollY >= topOfNav) {
          document.body.classList.add(“fixed-nav”);
        } else {
          document.body.classList.remove(“fixed-nav”);
        }
Now that class will be added or removed based on the scroll position ->
Next we have to go to our style-start.css file and find our nav. Add the following styles ->
.fixed-nav nav {
  position: fixed;
  box-shadow: 0 5px rgba(0, 0, 0, 0.1);
}
Now the nav is sticking, however it doesn’t seem smooth. When we hit that point, the content jumps up. Why is that happening? That is because when you make the nav fixed, it is no longer taking up space in the document.
That causes a re-flow on the page. So what we need to do is offset that amount by adding some padding to our body. So as we make the nav fixed, we have to offset that amount to not make a jerky jump.
document.body.style.paddingTop = nav.offsetHeight;
nav.offsetHeight is going to give us the height of the nav.
What we will also do, is on the opposite end, set the padding top to be zero.
   if (window.scrollY >= topOfNav) {
          document.body.style.paddingTop = nav.offsetHeight;
          document.body.classList.add(“fixed-nav”);
        } else {
          document.body.style.paddingTop = 0;
          document.body.classList.remove(“fixed-nav”);
        }
There are a few more things we can do here. The nav has an li with class of logo.
It is being hidden right now.
What we want to say is when the body has a class of fixed, give the li.logo a max-width of something bigger than it is ever going to be such as 500px.
.fixed-nav li.logo {
  max-width: 500px;
}
Now when we scroll, it will slide in (we have the transition on the li.logo making it smooth).
Quick aside: Why use max-width rather than width? Because you cannot animate the width of something to be 0 to auto. You need to use max-with for the transition.
Another thing we have done is given the .site-wrap element a scale of .98. (transform:scale(0.98);).
Add
.fixed-nav .site-wrap {
transform: scale(1);
}
And now it enlarges a little.
25 - Event Capture, Propagation, Bubbling and Once
Starting point ->
<body class="bod">

  <div class="one">
    <div class="two">
      <div class="three">
      </div>
    </div>
  </div>

<style>
  html {
    box-sizing: border-box;
  }

  *, *:before, *:after {
    box-sizing: inherit;
  }

  div {
    width: 100%;
    padding: 100px;
  }

  .one {
    background: thistle;
  }

  .two {
    background: mistyrose;
  }

  .three {
    background: coral;
  }
</style>

<button></button>
<script>

</script>
We want to listen for clicks on all of the divs. For now we just want to log when each is clicked.
  const divs = document.querySelectorAll(“div”);

      function logText(e) {
        console.log(this.classList.value);
      }

      divs.forEach(div => div.addEventListener(“click”, logText));
When you click the orange box, it logs ->

What is happening is that because one div is wrapped in the other, when we click to orange div we are also clicking the other divs and the body and the html document etc etc.
That is the concept of bubbling. The browser will figure out what you clicked on but it will also trigger clicks up the document. You don’t normally notice because you usually aren’t listening for a click on all the elements like we are in this case (we are listening on all three divs).
The way this works in modern browsers is the browser will first do something called a capture which means when you first click on the element, it will ripple down. It’ll say you clicked on the body, then one, then two then three.
It goes from the top down and then it captures all of those events. And then it starts from the bottom, and it starts doing something called a bubble.
The captures happen from top down and the events haven’t fired yet, it just captured where you clicked and is storing them . And then it starts to bubble up, triggers the events as you are going up.
If you add this option to the event listener ->
      divs.forEach(div =>
        div.addEventListener(“click”, logText, { capture: true })
      );
It will run on the capture down not the bubble up.
Another option we have is called stopPropagation.
       function logText(e) {
        console.log(this.classList.value);
        e.stopPropagation();
      }
What that does is it stops the bubbling and will no longer trigger the event on the parents on the way up. You can use that in combination with capture: true.
There is something really new in the browser called “once”.
div.addEventListener(“click”, logText, { capture: false, once:true })
What that will do is it will listen for a click and then it will unbind itself. Unbinding itself is the same as div.removeEventListener(‘click’, logText);
button.addEventListener(‘click’, () => {
console.log(‘Click!!!’);
}, {
once:true});
That is useful in store checkouts, where you only want someone to use the checkout button once.
26 - Stripe Follow Along Nav
Goal ->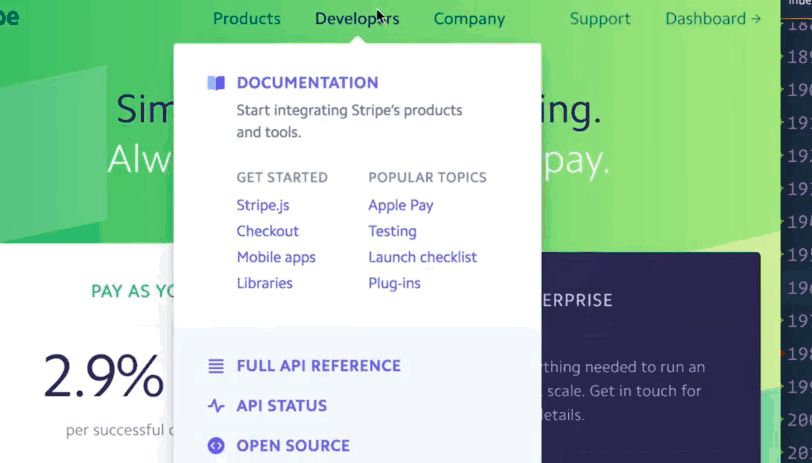
Starter Code ->
<nav class=“top”>
    <div class=“dropdownBackground”>
      <span class=“arrow”></span>
    </div>

    <ul class=“cool”>
      <li>
        <a href=“#">About Me</a>
        <div class="d“opdown dropdown1">”          <div class="b“o">”            <img src="h“tps://logo.clearbit.com/wesbos.com">”            <p>Wes Bos sure does love web development. He teaches things like JavaScript, CSS and BBQ. Wait. BBQ isn't’part of web development. It should be though!</p>
          </div>
        </div>
      </li>
      <li>
        <a href="“">Courses</a>
        <ul class="dro“down courses">
 ”        <li>
            <span class="cod“">RF”</span>
            <a href="htt“s://ReactForBeginners.com">Re”ct For Beginners</a>
          </li>
          <li>
            <span class="cod“">ES”</span>
            <a href="htt“s://ES6.io">ES” For Everyone</a>
          </li>
          <li>
            <span class="cod“">NO”E</span>
            <a href="htt“s://LearnNode.com">Le”rn Node</a>
          </li>
          <li>
            <span class="cod“">ST”U</span>
            <a href="htt“s://SublimeTextBook.com">Su”lime Text Power User</a>
          </li>
          <li>
            <span class="cod“">WT”</span>
            <a href="htt“://Flexbox.io">Wh”t The Flexbox?!</a>
          </li>
          <li>
            <span class="cod“">GR”D</span>
            <a href="htt“s://CSSGrid.io">CS” Grid</a>
          </li>
          <li>
            <span class="cod“">LR”</span>
            <a href="htt“://LearnRedux.com">Le”rn Redux</a>
          </li>
          <li>
            <span class="cod“">CL”U</span>
            <a href="htt“://CommandLinePowerUser.com">Co”mand Line Power User</a>
          </li>
          <li>
            <span class="cod“">MM”</span>
            <a href="htt“://MasteringMarkdown.com">Ma”tering Markdown</a>
          </li>
        </ul>
      </li>
      <li>
        <a href="#"“Other Links</a>
        <ul class="dro“down dropdown3">
         <li><a class="but“on" hr”f="htt“://twitter.com/wesbos">Tw”tter</a></li>
          <li><a class="but“on" hr”f="htt“://facebook.com/wesbos.developer">Fa”ebook</a></li>
          <li><a class="but“on" hr”f="htt“://wesbos.com">Bl”g</a></li>
          <li><a class=“but“on” hr”f=“htt“://wesbos.com/courses”>Co”rse Catalog</a></li>
        </ul>
      </li>
    </ul>
  </nav>
The white background is this div, which is going to follow along our hover ->
<div class=“dropdownBackground”>
      <span class=“arrow”></span>
    </div>
A lot of the starter CSS is just for styling.
These starter styles are important ->
  .cool > li {
    position: relative;
    display: flex;
    justify-content: center;
  }
  .dropdown {
    opacity: 0;
    position: absolute;
    overflow: hidden;
    padding: 20px;
    top: -20px;
    border-radius: 2px;
    transition: all 0.5s;
    transform: translateY(100px);
    will-change: opacity;
    display: none;
  }
We have 3 lis, which will be our triggers, the things that are hovered. The reason we are using the li’s is because you should still be able to hover over the children like a tags without hovering off. So even if you are hovered over a child element, you are still within the li.
First we need the triggers
const triggers = document.querySelectorAll(“.cool > li”);
const background = document.querySelector(“.dropdownBackground”);
const nav = document.querySelector(“.top”);
Next we want to listen to hover in, hover out, mouse in, mouse out on all the triggers.
 function handleEnter() {
        console.log("handle enter");
      }

      function handleLeave() {
        console.log("handle leave!");

      }
      triggers.forEach(trigger =>
        trigger.addEventListener("mouseenter", handleEnter)
      );
      triggers.forEach(trigger =>
        trigger.addEventListener("mouseleave", handleLeave)
      );
Next we want to get the contents showing. If we hover over the last <li> it’s children should become visible.
Whenever we hover over the
.dropdown class inside of it and display it.
The way that will work is we will be adding and removing classes and leaning on our CSS to do that for us.
In the handleEnter function, we will grab the list item, and put a class on it.
this.classList.add(“trigger-enter”);
Then we want to add another class after 150miliseconds called .trigger-enter-active
function handleEnter() {
        this.classList.add("trigger-enter");
        setTimeout(() => this.classList.add("trigger-enter-active"), 150);
      }
If you go to the dropdown css, you will see the way it is being hidden is with opacity:0 and display:none;
The reason why is because you cannot go from opacity 0 to 1 as well as display:none to display:block.
What we will do is we will step it.
When we have .trigger-enter our dropdown will be display:block.
After 150miliseconds when the class .trigger-enter-active .dropdown is applied, we will set opacity to 1.
     .trigger-enter .dropdown {
        display: block;
      }

      .trigger-enter-active .dropdown {
        opacity: 1;
      }
This is how animations and transitions work in React / Angular frameworks.
Now we need to go into our leave and remove the classes. We won’t animate the leave, we will do it all in one shot.
    function handleLeave() {
        this.classList.remove(“trigger-enter”, “trigger-enter-active”);
      }
The next piece is we will figure out how big the ul is with the class of .dropdown and how do we get the white background behind it.
First thing we need to do is get that white things on the page.
In handleEnter() add background.classList.add(“open”);
And add the opposite (remove) in handleLeave()

Now we will add some CSS.
      .dropdownBackground.open {
        opacity: 1;
      }
Now when you hover over an <li> the white background will show up.

Next we have to do the heavy lifting to figure out how to position it and how wide and how high on the page it needs to live.
Inside of the enter function, we need to figure out exactly what that dropdown is.
const dropdown = this.querySelector(‘.dropdown’)
We do this within the function because we want the dropdown of the currently hovered item.
Now we can take the coordinates from the dropdown.
const dropdownCoords = dropdown.getBoundingClientRect();
That gives us these values which gives us the information regarding where on the page the element is along with it’s height and width.
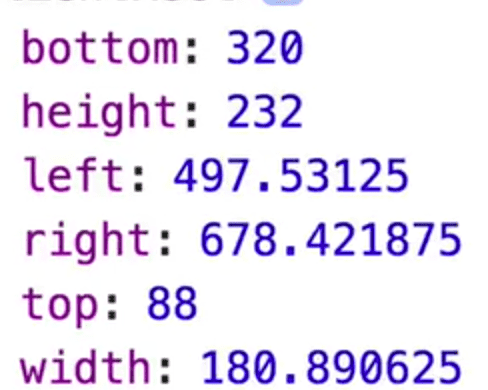
The next thing is we need to get info about where the Nav is. There might be some content that will cause the nav to be bumped down, which we need to account for.
So we need to grab the coordinates for the nav as well.
const navCoords = nav.getBoundingClientRect();
Now what we need to figure out is where are the coords for everything, by putting the two coords that we got together.
That gives you ->
Now we know how tall and wide the background needs to be. That is also why we do the displaying of the li in two steps, because we need to have it display:block so we can get the coordinates. If it is hidden, you can’t get the width and the height of the element.
The reason it is animating is we have this style on .dropdownBackground transition: all 0.3s, opacity 0.1s, transform 0.2s;
Now we will add the top and the left values.
 const coords = {
          height: dropdownCoords.height,
          width: dropdownCoords.width,
          top: dropdownCoords.top,
          left: dropdownCoords.left
        };

        background.style.setProperty(“width”, `${coords.width}px`);
        background.style.setProperty(“height”, `${coords.height}px`);
        background.style.setProperty(
          “transform”,
          `translate(${coords.left}px, ${coords.top}px)`
        );
However that will still be off al little bit if we have an extra element pushing the content down the page like so ->
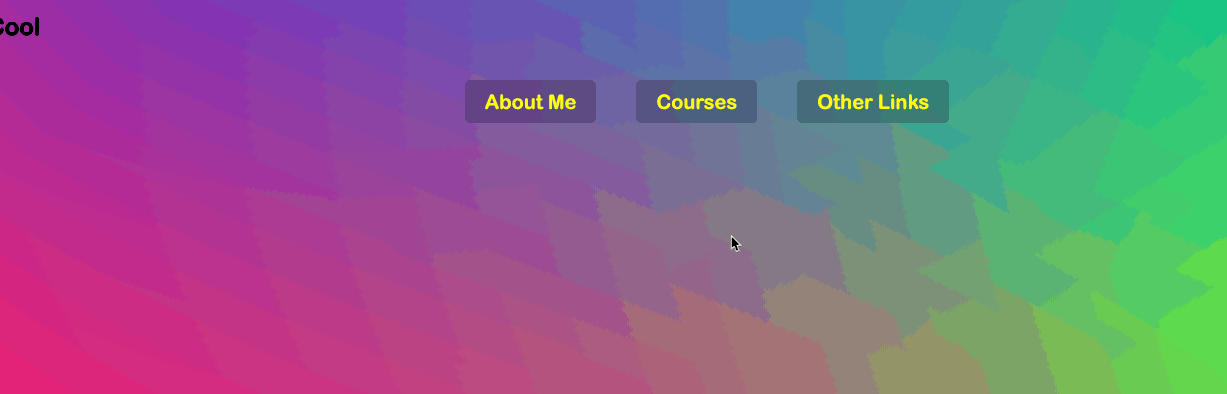
You can’t always assume everything will be anchored to the top of the page.
Modify the top coords to be ->
top: dropdownCoords.top - navCoords.top,
And do the same for the left values ->
left: dropdownCoords.left - navCoords.left
That works now but you’ll notice if you hover really quickly, you will sometimes see the content showing up and flickering.
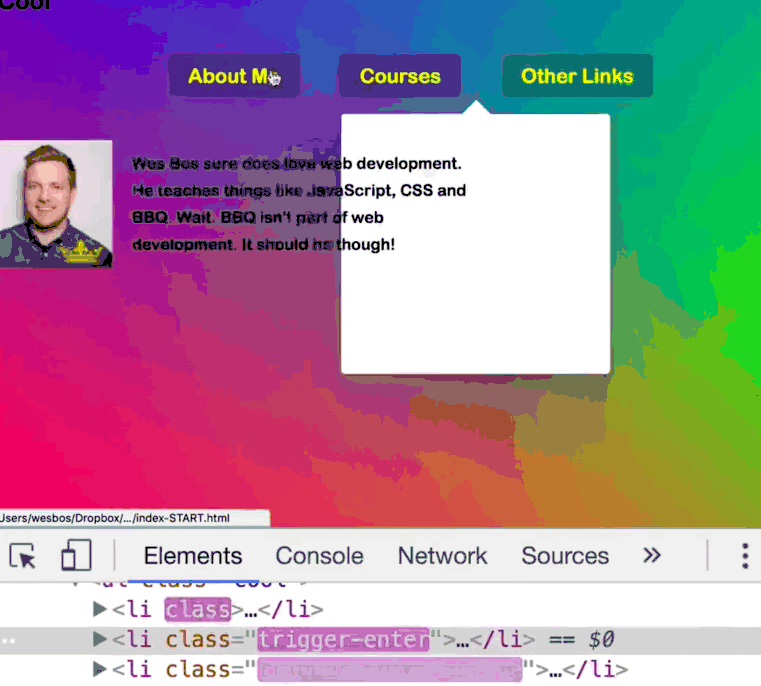
What is happening is the setTimeout. Immediately when we enter we add class of .trigger-enter and then when we hover out we have .trigger-enter-active
But sometimes we are already hovering off before that active class is added.
So what we want to do is modify the timeout function on the enter.
setTimeout(() => {
          if (this.classList.contains(“trigger-enter”)) {
            this.classList.add(“trigger-enter-active”);
          }
        }, 150);
You can also re-write it like so ->
    setTimeout(
          () =>
            this.classList.contains(“trigger-enter”) &&
            this.classList.add(“trigger-enter-active”),
          150
        );
27 - Click & Drag to Scroll
Starting code ->
<body>
  <div class=“items”>
    <div class=“item item1”>01</div>
    <div class=“item item2”>02</div>
    <div class=“item item3”>03</div>
    <div class=“item item4”>04</div>
    <div class=“item item5”>05</div>
    <div class=“item item6”>06</div>
    <div class=“item item7”>07</div>
    <div class=“item item8”>08</div>
    <div class=“item item9”>09</div>
...
</div>
<script>
</script>
Today we will learn how to do click and drag from scratch.
[Take GIF]

When you click drag you mouse and go somewhere, you want the window to come along with it.
The style.css has some classes like active when you click it it will bring it up a little bit and then there is a rotate y and perspective applied on it so when you move it things come in and out of focus kinda, nothing to do with the javascript.
What we want to be doing is selecting the .items which is the white box. Then we will listen for a number of different events.
When we first click down, we will add a class of .active and figure out where did we click down, then when we move the mouse to the left or right, we will figure out if you click right here (which is 500px), if you scroll to the left 20px, we know that we should scroll the div 20px. If you scroll the div to the right 20px, we know that we should scroll the div 20px that way. That is how it will work.
Anchor down when you click, and then depending on how far either way we scroll, that is how much we will be scrolling the div, or we can do it a multiple of that. Combo of mouse down, mouse leave, mouse out and up and mouse move.
First lets grab the slider.
 const slider = document.querySelector(“.items”);
      let isDown = false;
isDown is a flag (true or false) that specifies whether the mouse is clicked down or not.
We also need one called startX and scrollLeft;
 let startX;
let scrollLeft;
We will be working with a whole bunch of event listeners. Mouse up, mouse down, mouse leave and mouse move. We will listen for an event on each of them.
We will write the code inline of the event listener but you should refactor later to move them to their own separate functions.
Add ->
 slider.addEventListener(“mousedown”, () => {});
      slider.addEventListener(“mouseleave”, () => {});
      slider.addEventListener(“mouseup”, () => {});
      slider.addEventListener(“mousemove”, () => {});
First we will handle the “is down”. When that is triggered, set flag isDown too true.
For mouselave and mouse, set to false.
In mouse move, is the flag isDown is not true, return. In mousedown, set the slider class to be “.active”.
In Mouselave and mouse, remove the “active” class from slider.
When we have class of “active” we add the following ->
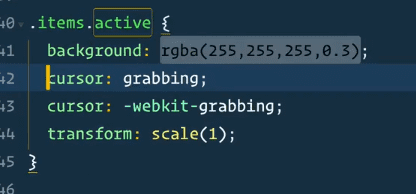
When you click and drag to the left or right, we need to know where that anchor point is. We need to know where that initial click down is. When someone clicks down, before they start moving to the left or right we need to log in the startX variable where they clicked down.
We will be adding that in the mousedown event listener.
If you log e.pageX it will tell you exactly where on the x coordinates you clicked. However, we need to know where inside of the .items container they clicked, not the page.
We need to subtract the offsetLeft value like so ->
startX = e.pageX - slider.offsetLeft
Another thing we need to log at the time of click is the scroll. Because if we have already scrolled, and then we click again, we need to know where the other scroll is.
scrollLeft = slider.scrollLeft;
The reason we put it in a variable is because it’s going to move. But we always need to go back to that initial state when it was click down.
Next we need to figure out where the cursor is when they moved it to left or right.
To mouse move event listener add the following ->
const x = e.pageX - slider.offsetLeft;
If you log that, you will see that the startX value is static but the x variable is changing with the scroll.

Next we calculate walk which will tell us how much we have deviated from that initial state.
const walk = x - startX;
If, from where you first clicked, you go to the right, it will give you a positive number and to the left it will give you a negative number.
Next what you need to do is change the div to scroll. You do that with the scrollLeft property.
slider.scrollLeft = walk;
It’s really jumpy however, because we are recalculating the scroll left every time.
The reason why we captured the scrollLeft value when we did that initial click was so we can reference it in the mouse move function.
Modify to ->
slider.scrollLeft = scrollLeft - walk;
If you want it to be easier to scroll, you can modify the method to calculate the walk like so ->
const walk = (x - startX) * 3;
28 - Video Speed Controller UI
Experiment with a new input that would control video speed. Instead of clicking, you can sort of DJ it.
Starting code ->
 <div class=“wrapper”>
    <video class=“flex” width=“765” height=“430” src=“http://clips.vorwaerts-gmbh.de/VfE_html5.mp4” loop controls></video>
    <div class=“speed”>
      <div class=“speed-bar”>1×</div>
    </div>
  </div>
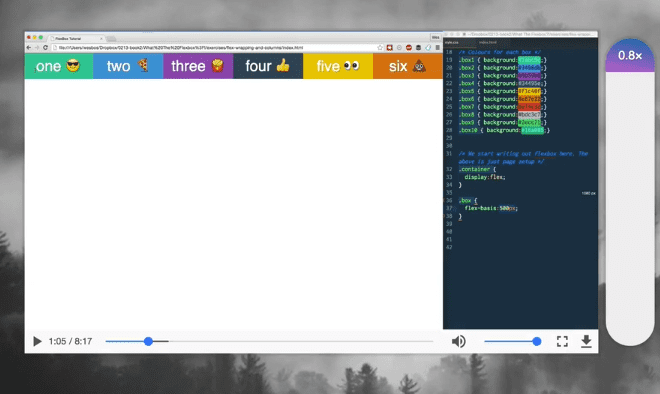
 const speed = document.querySelector(".speed");
      const bar = speed.querySelector(".speed-bar");
      const video = document.querySelector(".flex");
First thing we need to do is take our speed and add it to the event listener “mouse move”.
When that happens, we have a function (proper function because we need access to “this”). In that function, pass yourself the event.
Now when you hover over the speedbar, it will trigger the event. We need to grab how high on the element we are hovering.
const y = e.pageY - this.offsetTop
At the top of the element it should be 0 and the bottom it will be how higher pixel value.
Next we want to calculate the percent ->
const percent = y / this.offsetHeight;
Next we need a min and a max.
		 const min = 0.4;
        const max = 4;
        const height = Math.round(percent * 100) + "%";
The height value will give us a full percent rather than decimals.
Next, we take our bar, and give it the height value of the height variable.
const height = Math.round(percent * 100) + ‘%’;
For the playback rate, we have to respect the min and max because we never want speed to be 0 and we don’t want the max to be 100.
toFixed sets how many percentage decimal places it will be.
const playbackRate = percent * (max - min) + min;
bar.textContent = playbackRate.toFixed(2);
Next we need to take the playback rate and apply it to our video.
video.playbackRate = playbackRate;29 - Countdown Clock
Starting code ->
 <div class=“timer”>
    <div class=“timer__controls”>
      <button data-time=“20” class=“timer__button”>20 Secs</button>
      <button data-time=“300” class=“timer__button”>Work 5</button>
      <button data-time=“900” class=“timer__button”>Quick 15</button>
      <button data-time=“1200” class=“timer__button”>Snack 20</button>
      <button data-time=“3600” class=“timer__button”>Lunch Break</button>
      <form name=“customForm” id=“custom”>
        <input type=“text” name=“minutes” placeholder=“Enter Minutes”>
      </form>
    </div>
    <div class=“display”>
      <h1 class=“display__time-left”></h1>
      <p class=“display__end-time”></p>
    </div>
  </div>

Goal ->
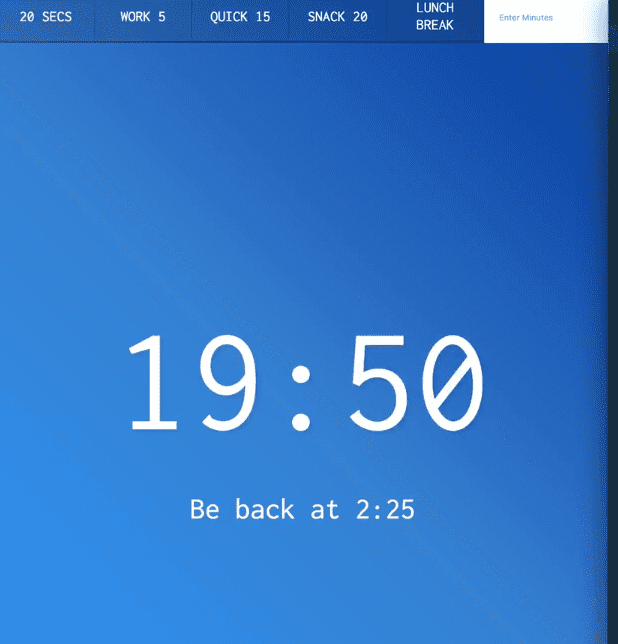
We are creating a downtime timer that shows you how much time is left in each task.
We will make a function called timer and work in the console to start.
The timer will take in the number of seconds you wish for the time to be in.
Timers.. how do they work? You have the amount of time that you wish for it to have, and then you simply elapse that time over however many seconds it is.
If you use “setInterval”, sometimes it doesn’t work if you leave the tab for too long for example. On IOS, when you are scrolling it pauses your intervals We will still use an interval, but in a different way.
We want to figure out when the timer started.
function timer(seconds){
const now = Date.now();
We also want to figure out when the timer should go off by adding now and seconds. However, now is in miliseconds and seconds is obviously in seconds so we need to change that.
Add const then = now + seconds * 1000;
Next, every single second, we need to display the amount of time left. This is where we set an interval. It is okay to use an interval here because we are not worried about it not running every seconds. If it skips a second, it will just display the appropriate time when it does run since it’s not responsible for keeping track of the time, it is only responsible for display the time
We want to calculate how many seconds left. We can do that like so ->
setInterval(()=>{
const secondsLeft = Math.round((then - Date.now())/1000));
},1000);
Intervals don’t know they should stop themselves, so we need to perform a check for whether we should stop the interval or else it will show negative numbers.
How do you stop running an interval?
If you do return; from within the interval, that won’t actually stop it, it will just stop showing it. What we need to do is assign setInterval to a variable, so we can then call clearInterval();
let countdown;

function timer(seconds) {
  const now = Date.new();
  const then = now + seconds;

  countdown = setInterval(() => {
    const secondsLeft = Math.round((then - Date.now()) / 1000);
    if (secondsLeft < 0) {
      clearInterval(countdown);
      return;
    }
    console.log(secondsLeft);
  }, 1000);
}
Another issue we are having is that for the first second in the timer, setInterval does not run. It has to wait until a second has elapsed.
What we want to do is create a second function called displayTImeleft(seconds)
Now immediately when the timer function runs, we want to run displayTimeLeft(seconds). We also want to display it every second in the interval. Modify code like so ->
let countdown;

function timer(seconds) {
  const now = Date.new();
  const then = now + seconds;
  displayTimeLeft(seconds);

  countdown = setInterval(() => {
    const secondsLeft = Math.round((then - Date.now()) / 1000);
    if (secondsLeft < 0) {
      clearInterval(countdown);
      return;
    }
    displayTimeLeft(secondsLeft);
  }, 1000);
}
Now we want to work on converting displayTimeLeft to minutes and seconds.
 const minutes = Math.floor(seconds / 60);
  const remainderSeconds = seconds % 60;
Now we can start working with our HTML.
const timerDisplay = document.querySelector(‘.display__time-left’);
If you add the following ->
 const display = `${minutes}: ${remainderSeconds }`;
 timerDisplay.textContent = display;
However if there is less than 10 seconds, we want to append a zero or else the time will show as 2:2 instead of 2:02
Modify to ->
const display = `${minutes}: ${remainderSeconds < 10 ? '0' : ''}${remainderSeconds}`;Next we are going to update the tab on our browser.
document.title = display;
Now we want to display the end time, so if you are using the timer to say “be back by 2:30” you can display that. It only needs to be done once so we don’t need to add it to our interval, we just want to display it when the time is done.
const endTime = document.querySelector(".display__end-time");

function displayEndTime(timestamp) {
  const end = new Date(timestamp);
  const hour = end.getHours();
  const minutes = end.getMinutes();
  endTime.textContent = `Be back at ${hour > 12 ? hour - 12 : hour}:${minutes}`;
}
The issue with the above is it will display 15:11 instead of 3:11 for example.
Modify the line as follows:
endTime.textContent = `Be back at ${hour > 12 ? hour - 12 : hour}:${minutes < 10 ? '0" : ''}`;However if the end time was 3:07, the code would display the end time as 3:7.
Next we need to hook it up to all of the buttons and the minute input
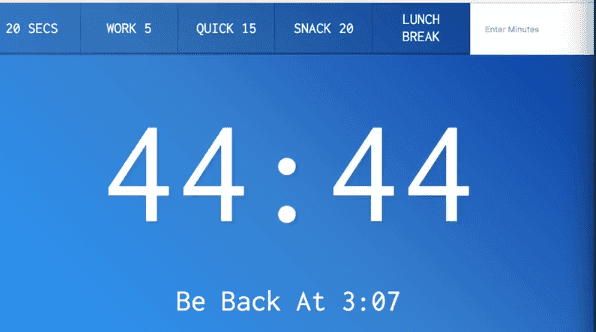
If you look at the HTML ->

You will see that each of the buttons have a data-time with the number of seconds we wish to run on it, and then we have a form that has a minute input.
First we will tackle the buttons. Grab all the buttons like so (this will select anything with a data-time)
const buttons = document.querySelectorAll("[data-time]");
function startTimer() {
  console.log(this.dataset.time);
}
buttons.forEach(button => button.addEventListener(“click”, startTimer));
Console logs this ->
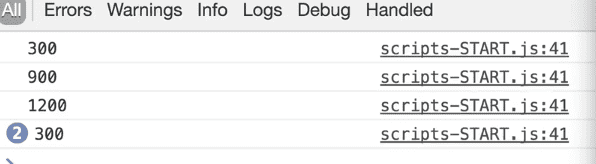
Now we want to assign the dataset.time to a variable and parseInt on it to turn it into a number.
const seconds = parseInt(this.dataset.time);
timer(seconds);
Now when you click a button, the time begins working, however if you click another button the following happens ->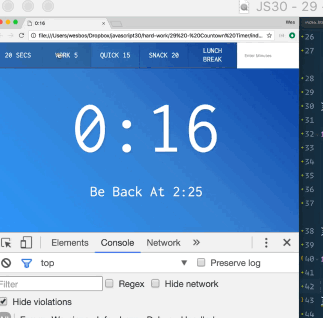
The issue there is there is no way for the timers to cancel themselves out unless seconds is zero.
What we will do instead is when we start our timer, we will clear any existing timers.
function timer(seconds) {
//clear any existing time
  clearInterval(countdown);
Last we want to handle the minute inputs.
If your element has a name attribute on it, you can access it with the following syntax ->
document.nameAttribute for example the form element has a name attribute of customForm. We could grab it using document.customForm.
If your input also has name, it will just nest itself
document.customForm.name for example.
document.customForm.addEventListener("submit", function(e) {
  e.preventDefault();
  const mins = this.minutes.value;
  timer(minutes * 60);
  this.reset();
});
30 - Whack a Mole Game
Starting code ->
  <h1>Whack-a-mole! <span class=“score”>0</span></h1>
  <button onClick=“startGame()”>Start!</button>

  <div class=“game”>
    <div class=“hole hole1”>
      <div class=“mole”></div>
    </div>
    <div class=“hole hole2”>
      <div class=“mole”></div>
    </div>
    <div class=“hole hole3”>
      <div class=“mole”></div>
    </div>
    <div class=“hole hole4”>
      <div class=“mole”></div>
    </div>
    <div class=“hole hole5”>
      <div class=“mole”></div>
    </div>
    <div class=“hole hole6”>
      <div class=“mole”></div>
    </div>
  </div>

<script>
  const holes = document.querySelectorAll(‘.hole’);
  const scoreBoard = document.querySelector(‘.score’);
  const moles = document.querySelectorAll(‘.mole’);

</script>
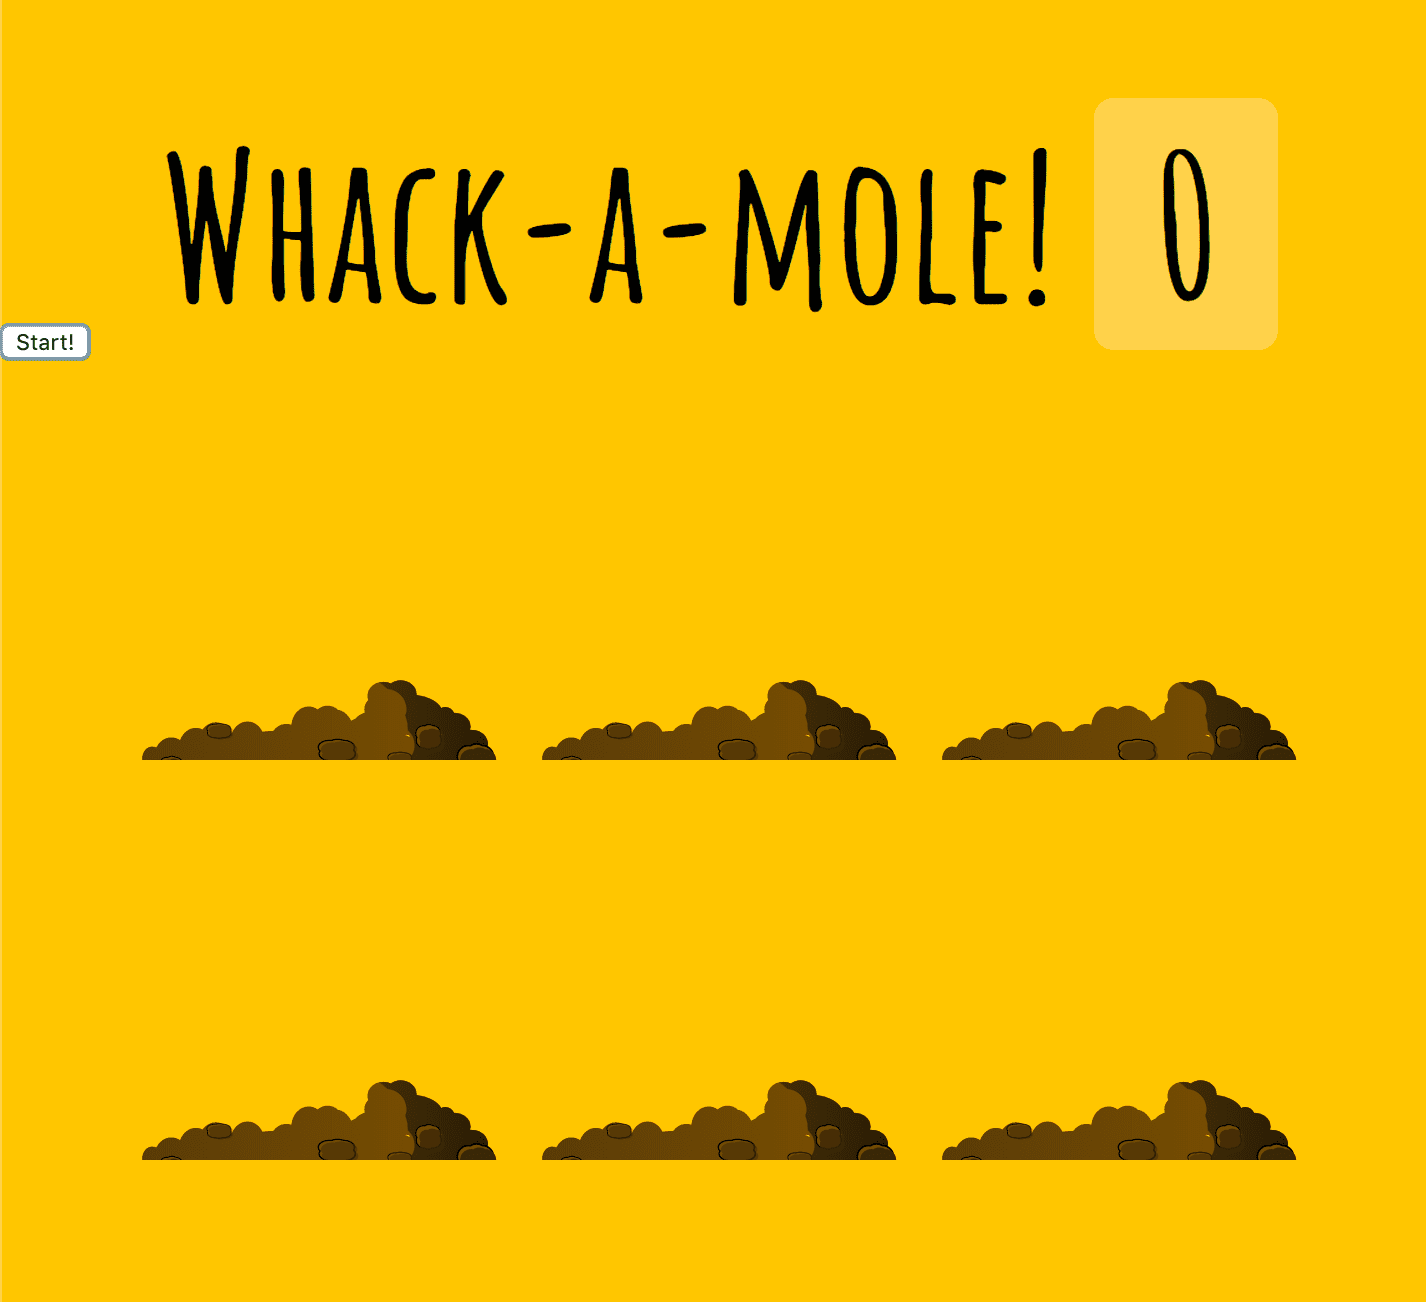
What we are building is Whack-A-Mole and what happens is when you run the game, the moles will start popping up in random holes at random amounts of time. When you click them, you get a point.
The game itself is going to be 10 seconds long. But which hole the mole pops up from and for how long is totally random (200miliseconds and a seconds). The mole hill is totally random.
The starting code includes javascript where we have selected all the holes, the score and the moles.
We need a function that will give us a random amount of time between our minimum and maximum.
 function randTime(min, max) {
        return Math.random() * (max - min) + min;
      }
That will give us ->
We want to round that value so we get a nice number of milliseconds back.
return Math.round(Math.random() * (max - min) + min);Now we want to make a function that will pick a random hole from which the mole will pop up in. It will basically be get me a random DOM element function
function randomHole(holes){

}
Holes is a node list of all our holes DOM elements, so we need grab a value between 0 and holes.length - 1;
function randomHoles(holes) {
        const idx = Math.floor(Math.random() * holes.length);
        const hole = holes[idx];
        console.log(hole);
      }
However, the problem we are running into is sometimes we get the same one, since it’s a 1 in 6 chance.
What we are going to do is create a variable
let lastHole;
We will use this value to compare the previously selected hole with the current hole and only use that hole if it doesn’t match what was previously used.
 function randomHoles(holes) {
        const idx = Math.floor(Math.random() * holes.length);
        const hole = holes[idx];
        console.log(hole);

        if (hole === lastHole) {
          console.log("that's the same hole");
        }

        lastHole = hole;
      }
We have some recursion going on here
function randomHoles(holes) {
        const idx = Math.floor(Math.random() * holes.length);
        const hole = holes[idx];
        console.log(hole);

        if (hole === lastHole) {
          console.log(“that’s the same hole”);
          return randomHole(hole);
        }

        lastHole = hole;
        return hole;
      }
Next what we actually need to do is get the moles popping up.
function peep() {
        const time = randomTime(200, 1000);
        const hole = randomHole(holes);
        console.log(time, hole);
      }
Inside the peep method, we will add a class of “up” to the mole that should currently be peeping up.
Here is the CSS that will be applied:
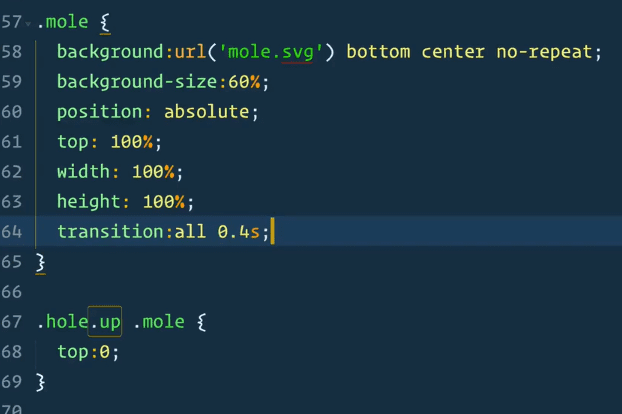
Next we need to remove the class after the time is up. We will use setTimeout.
 function peep() {
        const time = randomTime(200, 1000);
        const hole = randomHole(holes);
        console.log(time, hole);
        hole.classList.add("up");
        setTimeout(() => {
          hole.classList.remove("up");
          peep();
        }, time);
We call peep again after the timeout is done to make the next mole pop up.
We need to go to the top and create a variable called let timeUp = false;
Modify the above method with
if!timeUp).peep();Now when the timeUp variable is set too true, it won’t start again.
Next we need to make a function called startGame.
function startGame(){
scoreBoard.textContent = 0;
timeUp = false;
peep();
}
That will make the game start on the start button press. But what we want to do is set timeUp to true after 10 seconds.
The first thing we need to do is reset the scoreboard.
scoreBoard.textContent = 0
Next we want to set timeUp = true after 10 seconds to stop the game.
setTimeout(()=> timeUp = true, 10000);
The last piece we need is when you click a mole, to increment the score.
Add the following ->
function bonk(e) {
        console.log(e);
      }

      moles.forEach(mole => mole.addEventListener("click", bonk));
One every click event, there is a property called isTrusted
If you fake clicking something with javascript, that would be false. Add if !e.isTrusted) return; //is a cheater
Next we need to keep track of the score. Add a variable let score = 0;
In startGame function, reset the score to zero.
Within the bonk() function, increment score and also remove the class of ‘up’. Next we take our scoreboard and update the value to match the score.
  function bonk(e) {
        if !e.isTrusted) return; //cheater;
        score++;
        this.classList.remove("up");
        scoreBoard.textContent = score;
        console.log(e);
      }