- React For Beginners Course
- 1 - Introduction, Tooling and Editor Setup
- 2 - Thinking and Understanding React Components
- 3 - Creating our First Component
- 4 - Writing HTML with JSX
- 5 - Loading CSS into our React Applications
- 6 - Creating out Application Layout with Components
- 7 - Passing Dynamic Data with Props
- 8 - Stateless Functional Components
- 9 - React Router Step
- 10 - Helper Functions
- 11 - Events
- 12 - Handling Events
- 13 - Understanding State
- 14 - Loading Data into State onClick
- 15 - Displaying State with JSX
- 16 - Updating Order State
- 17 - Displaying Order State With JSX
- 18 - Persisting our State with Firebase
- 19 - Persisting Order State with localstorage
- 20 - Bi-directional Data Flow and Live State Editing
- 21 - Removing Items from State
- 22 - Animating React Components
- 23 - Component Validation with PropTypes
- 24 - Authentication
- Locking Firebase Down With Some Rules
- Other
- 8 - Stateless Functional Components (video 8, 1:40 seconds into it)
- 10 - Helper & Utility Functions
- 11 - Events
- Binding In React
- 12 - Handling Events
- Firebase
- LocalStorage
- 25 - Building For Production
- 26 - Deploying to Now
- 27 - Deploying to Netlify
- 28 - Deploying to an Apache Server
- 29 - Ejecting from Create-React-App
React For Beginners Course
demo: View Live Demo
GitHub: https://github.com/anjagusev/Catch-Of-The-Day local: repos/React-For-Beginners-Start-Files
NTS:
Found solution: removed package-lock.json and run rm -rf node_modules && npm i.
1 - Introduction, Tooling and Editor Setup
You need Node.js installed for tooling to develop locally. Install React dev tools. Make sure you are using the Javascript(babel) highlighter if you are using sublime text.
We will be working out of /catch-of-the-day directory which has only a /src and /public directory with a package.json file and a few more files.
TIP: If you have terminal open, and in finger you have your directory, you can drop it into terminal to get the path.
Packages.json - Contains dev dependencies needed to locally run our application . React-scripts does all of the compiling and transpiling under the hood. It takes the complexity out of setting up the dev environment and sweeps it under the rug. If we want access, we will eject which will give us the full control.
In the catch of day directory run npm install
To start run npm start
If you want to test it on your phone, if you are on the same wifi you can use the network address.

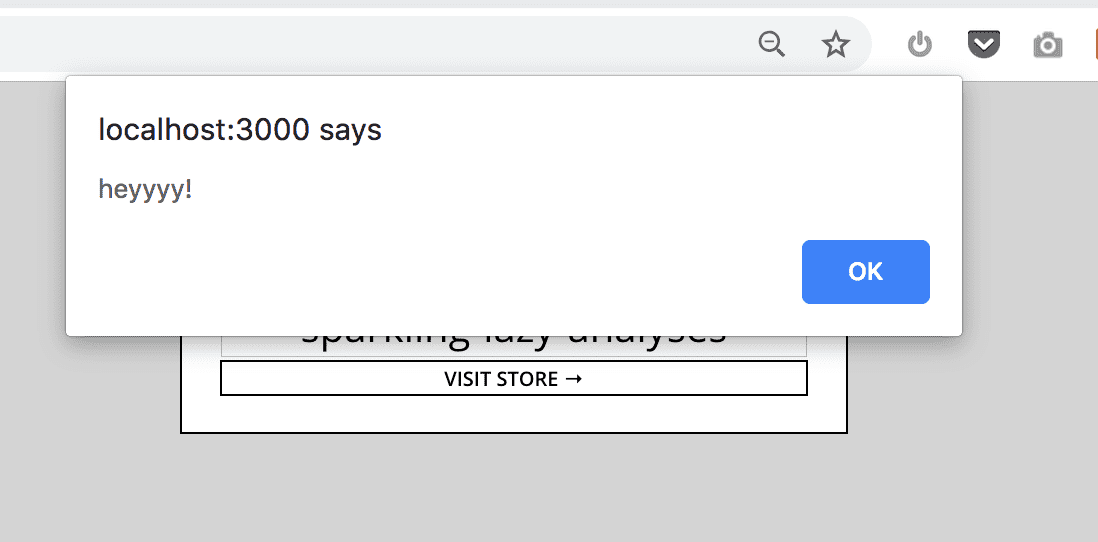
Go to /src/index.js and add alert(‘hey') and see if it shows up.
2 - Thinking and Understanding React Components
Everything in React is a component, they are reusable pieces of code. Use React Dev tools to explore.
3 - Creating our First Component
When we created the alert(‘hey”) web pack bundles everything in the index.js file into this static/js/bundle.js
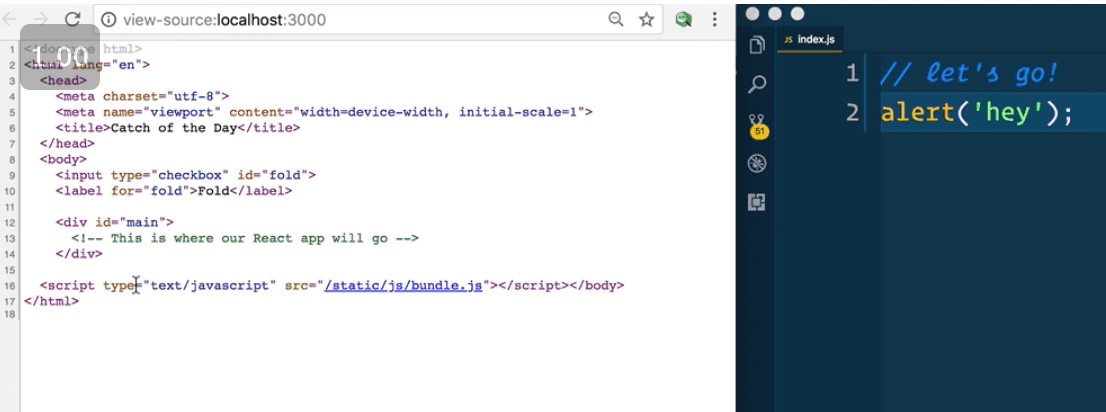
The /public/index.html file is the entry point where we will mount React.
In the /src/index.js you actually mount React wit something like
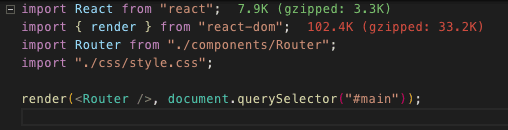
Or
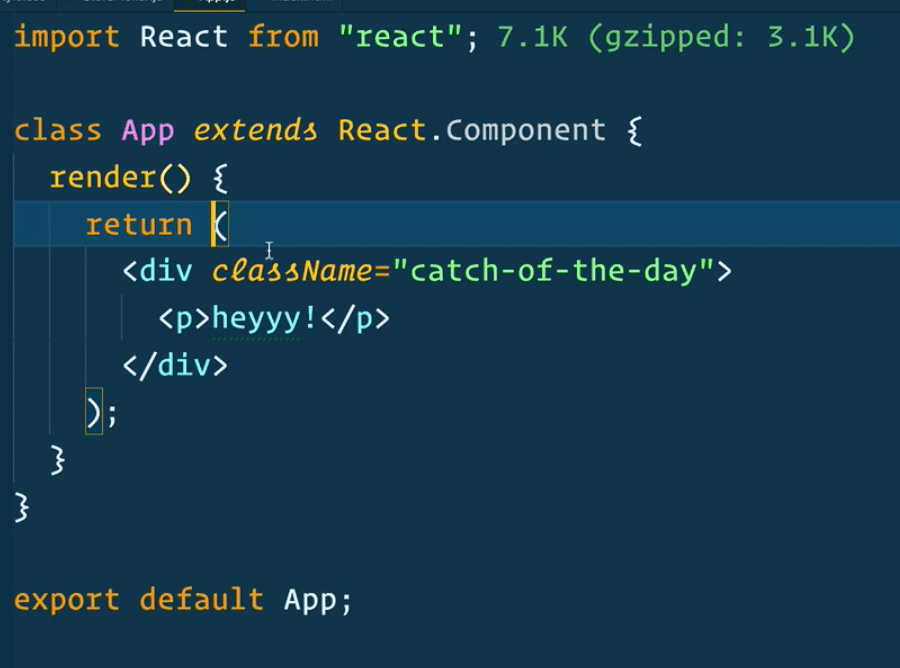
In the /components/ directory create a file called StorePicker.js and move the store picker component to there.
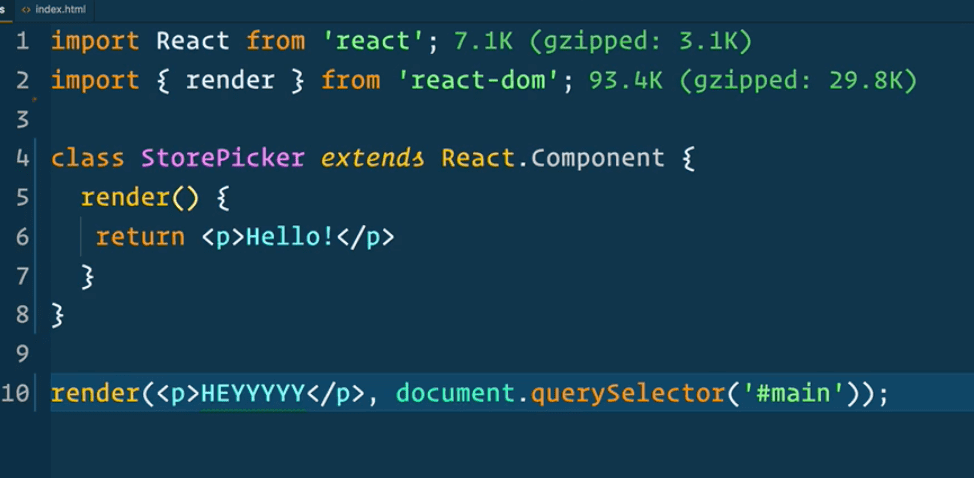
import React from “react”;
class StorePicker extends React.Component {
render() {
return <p>Hello!</p>
}
}
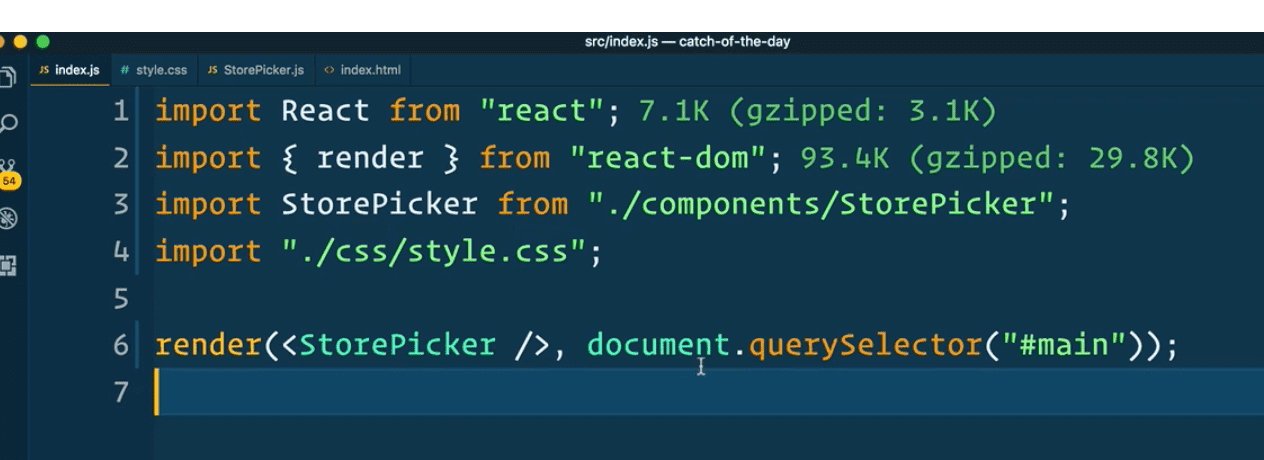
export default StorePicker;Now in src/index.js we import it and out it like so:
import React from "react"
import { render } from "react-dom"
import StorePicker from "./components/StorePicker"

render(<StorePicker />, document.querySelector("#main"))
4 - Writing HTML with JSX
You can do
import React from ‘react’;
class StorePicker extends React.Component{}
But you can also just import part of React like
import { Component } from ‘react’;
class StorePicker extends Component {}
You need to use className instead of class.
Render determines which Dom elements we render out to the page
Javascript way of writing HTML:

React uses JSX instead to write Html in react components. An alternative to JSX is React.createElement(‘p’, { className: ‘hey’ }, React.createElement());
If you have multi-lined html you need to wrap it around parenthesis
  return (
       <form className=“store-selector”>
        <h2>Please Enter A Store</h2>
       </form>
       )
You cannot have sibling elements You can only return one element from a return statement
If you are using flex box or css grid where you need to return 6 or 7 children with no wrapper, you can wrap them in a <React.Fragment> tag.
<React.Fragment />This is new in React.16.2.
Commenting in JSX
-use curly brackets
{/* test */}
-Comments cannot be sibling, must be children
5 - Loading CSS into our React Applications
Many different approaches to CSS with React.
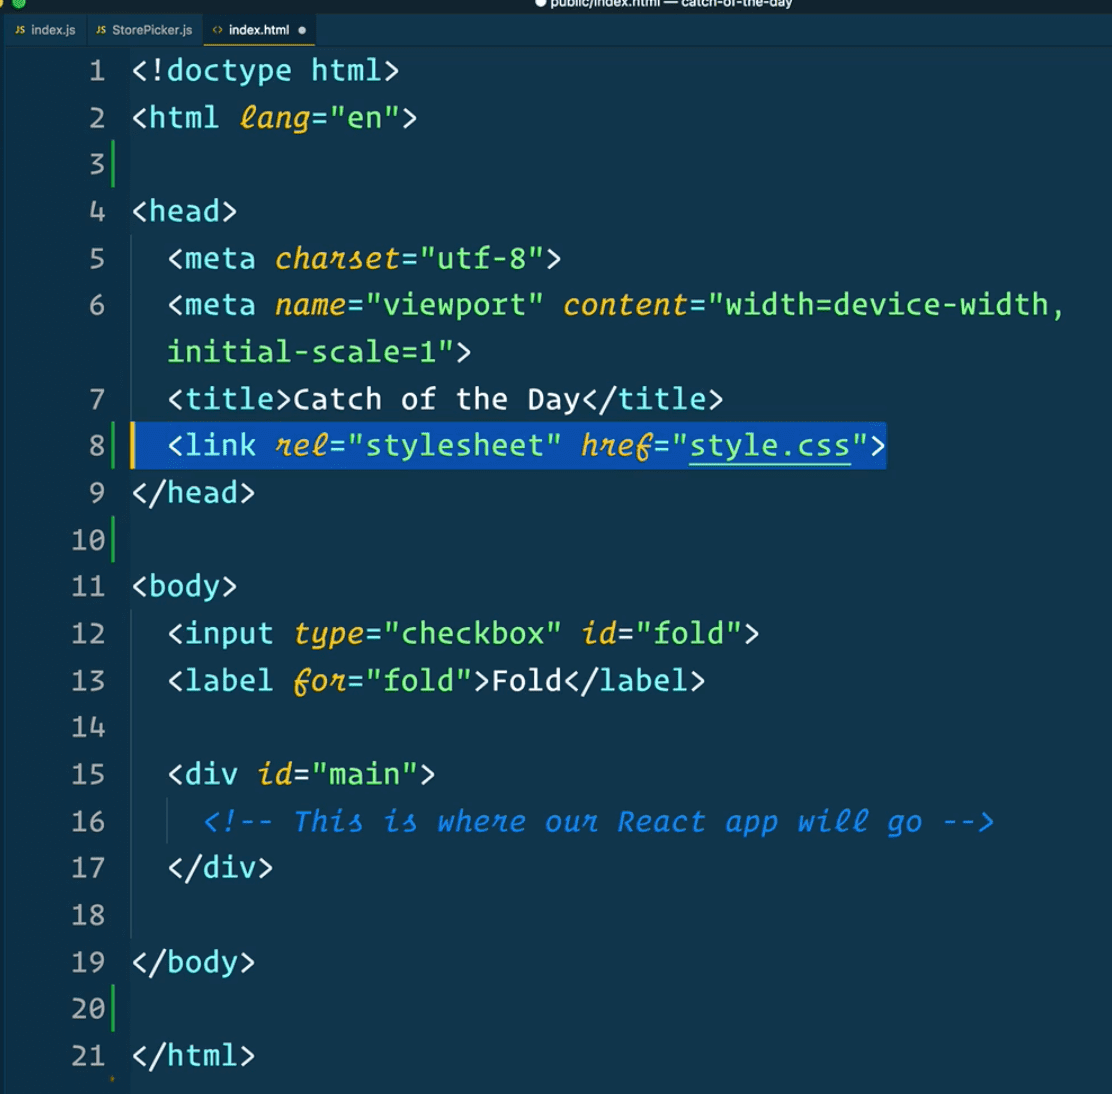
You may already have existing css build process. What you can do is open the index.html mounting point and just load the css via a link tag as usual like so:
Componentized CSS -import css that only applies to that component -tightly coupled css and the component
You can also import the css directly into the src/index.js file.
Webpack will know this is a CSS file so it will load the css, stick it in a style tag, and then anytime we make a change it will hot reload.
When we are deploying, we will kick out a separate .css file.
We are going to talk about compiling from SASS in the animation video.
6 - Creating out Application Layout with Components
We are going to create an App component which will be the parent component.
All the other components will be sibling components which will allow us to share data.

7 - Passing Dynamic Data with Props
Props - the way we get data into a component
State -where the data lives
State is where the data lives and props is how it gets to where it needs to go.
In App.js (container app which has


-this.props.tagline … this refers to component instance
To pass anything other than a string as a prop you use {}
If in React dev tools you click on a component, you can then reference it in the console using $r and it will show you


NON REACT: If you select an item on the elements dev tools, and then go to the console and type $0, it will show that element.
8 - Stateless Functional Components
If there is no dynamic data, there is no need for it to be an entire component, it’s essentially just a render function which renders out some HTML. (If only render method and prop types, it is a stateless functional component).
Stateless functional component does not have “this”, instead pass props as a parameter to the function and then instead of {this.props.tagline} you would use {props.tagline}
function Header(props){}
can be rewritten as an arrow function like so:
const Header = (props) => {}
Implicit return:
const Header = props => ()
rather than
const Header = props => { return()};
If more than two params you can do
const Header = (props, i) => ();
if only one param, do not need to include ()
Another way to pass props:
const Header = ({ tagline, age }) => ()
then you can just reference { tagline } in c ode.
9 - React Router Step
Routing is not baked into React
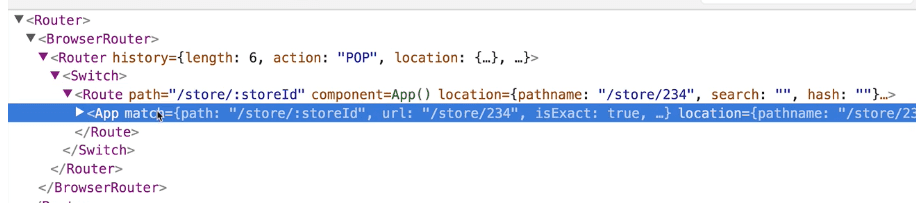
<Switch/> the way the switch tag works is that it’s going to try the first route, then the second route and then fallback to not found
<Route exact path="/" component={StorePicker} />^ When the path exactly matches “/“ load the component storepicker
If the path is equal to forward slash store forward slash anything, /store/:storeId .. works as a catchall for the store name
How including the routing component looks in React Dev Tools..
10 - Helper Functions
Just plain javascript, not React.
You can export functions from Helper.js.
import { getFunName } from '../helpers";
difference between value and defaultValue in React. If you put value=“hello” on an input, react will yell at you. Values of inputs have to be attached to state.
For default text in a React Input use the attribute defaultValue.
To use exported method you can do as follows:
<input type="text" required placeholder="Store Name" defaultValue={getFunName()}/>11 - Events
Exactly the same as vanilla js except React wraps your events in a Synthetic Event which ensures the events work cross browser and cross device.
Events are done inline in React.
<button onClick={this.handleClick} > Click me! </button>

Golden rule in React: don’t touch the DOM!
A ref allows us to actually reference an actual Dom node on the page
There are a few ways to add refs
ref="myInput" DEPRECATED
ref={(myInput) => this.myInput = myINput} confusing but works
You can create a ref by doing this…
class StorePicker extends React.Component{
myInput = React.createRef();

render(){
return(....
<input
ref={this.myInput}
...
}
If above the render method you have a function like
goToStore(event){
console.log(this.myInput);
console.log(this);
}
You will get an error, this is undefined. If you use it within the render method, this works.
This is because of how binding works in React.
React has built in lifecycle events and methods like render();
componentDidMount you can use the “this” keyword inside of it because its a built in method that comes with React, and they are in the React.Component parent. We make our own component that extends that (like StorePicker) and any methods that we then add ontop are not bound by default.
It’s hard to reference the component within one of it’s own methods which is a problem.
Solution: bind our own methods as well
Because es6 classes are new, no standard way to do that however there is a proposal on how to do it with funky syntax
Constructor
You would bind them using a constructor() method, method that runs before store picker component is created .
in constructor you must call super(); Super runs the component that we are extending first. (React.Component)
Next inside the constructor you bind all the methods.
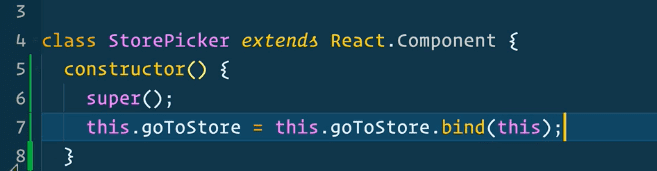
What that does is it overwrites the method on it, and it will attach a binding to, (it will reference “this” inside of the goToStore within the store picker instance.
Instead of using the constructor, you can declare a property which is set to an arrow function.

goToStore is a property on the component (just like myInput is a property of the component). Then we set it to an arrow function, which will allow us to bind the value of this to the store picker component.
With an arrow function you can access {this} without binding in the constructor.
If you need to access “this” within a custom method you must use the arrow function syntax or do the whole constructor song and dance.
12 - Handling Events
Step 3 Change page to /store/whatever-name
We don’t actually want to refresh page, just change the url with “push state”.
It allows us to change the url without having to refresh the page or lose anything that we have in memory.
No way to pass something from a high level to a low level without passing it as props in react, so if the component was a few layers deep it would be difficult.
Since store picker is a child of the router, we have access to all the methods we need.
myInput = React.createRef()
goToStore = event => {
  //1. Stop form from submitting
  event.preventDefault()
  //2. get the text from that input
  const storeName = this.myInput.current.value
  //3. Change the page to /store/whatever-the-store-name
  this.props.history.push(`/store/${storeName}`)
}
The reason it is so fast is that we are no reloading anything or loading other pages. The router instead if say oh, this no longer matches, but this route does, so load the associated component.
13 - Understanding State
Is an object that lives inside of a component that stores all of the data /holds data that itself and it’s children may need.
React, reacts to changes in states and re-renders
Add Fish Form
We need to turn the inputs into an actual fish object that has the values and properties on it.
To do that we add onSubmit to the form.
There are two ways we can pull the values out of the inputs. One is refs, giving a ref to every single input. Or we could listen to a keyup event, and mirror the data to state.
-to each input, add ref={this.statusRef} and then in function above capture those ref values and set them to a const, like so:
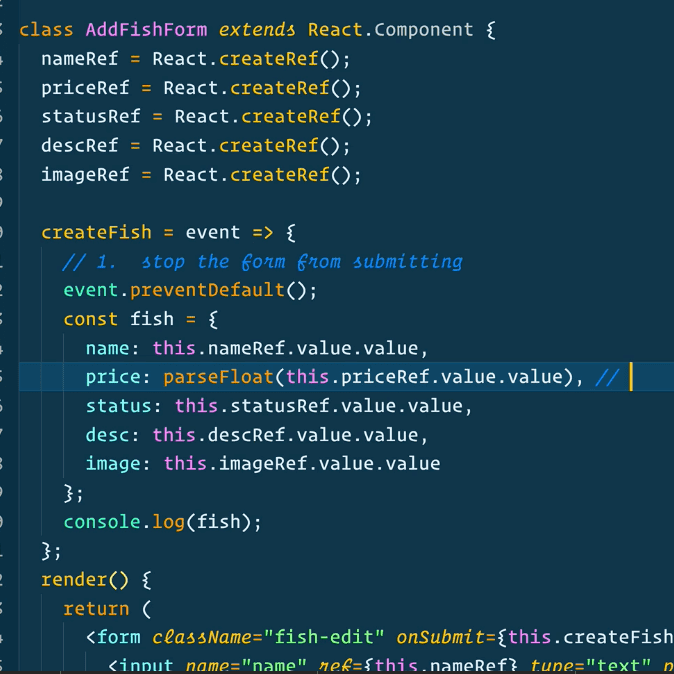
Now we have the fish, but how do we get it into state, and also where does state live?
It is often the case where you have a parent state on one of the components and you pass it to the children.
Right now, the fish const is limited to the add fish form component. We want to give it to inventory, order and menu. There is no way to share that data with those other components, unless that data lives at a higher level .
You cannot pass data up, but you can pass it down.
First you have to set the initial state or empty state. This is what the component looks like when it initially mounts before we have had a chance to add items to our state.
Load a component first with an empty state and then do an Ajax request for example.
How do we get an item into state? You cannot actually update it directly from the AddFishForm because the methods that update state and the actual state always need to live in the exact same component.
How do you get a function that lives in App, down to a lower component? The answer is: props (how does anything get into a component).

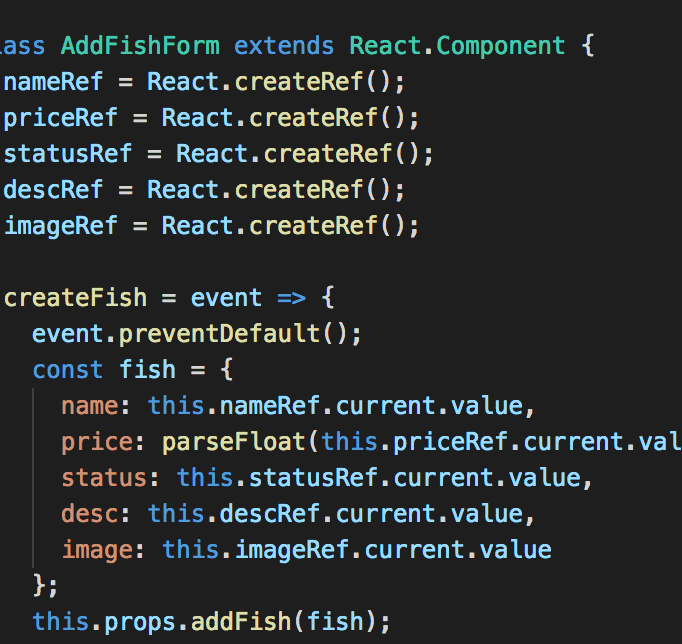
In order to update state, you need to use Reacts set state API or else it’s not going to work.
Two steps to setting state:
- Take a copy of the existing state (because you never want to reach into state and actually modify it directly, that is what is called a mutation in JS.
const fishes = { ...this.state.fishes};object spread is a nice clean way to copy Object spread operator An alternative approach is to use the object spread syntax recently added to the JavaScript specification. It lets you use the spread (…) operator to copy enumerable properties from one object to another in a more succinct way. - Add new object to state variable (or add fish to fishes variable)
fishes[fish${Date.now()}] = fish; - Set new fishes object to state
this.setState({
fishes:fishes
});
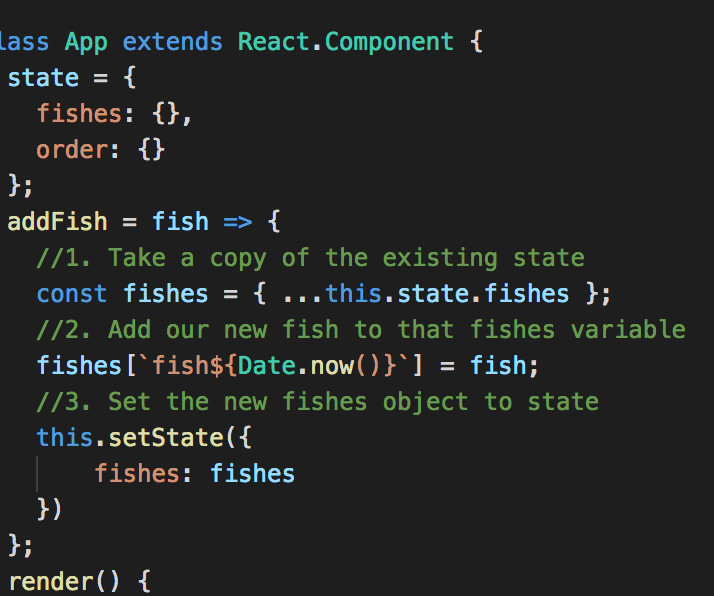
HINT: In ES6 if your property and value are the same, you don’t need to do fishes:fishes, you can just do this.setState({fishes});
14 - Loading Data into State onClick
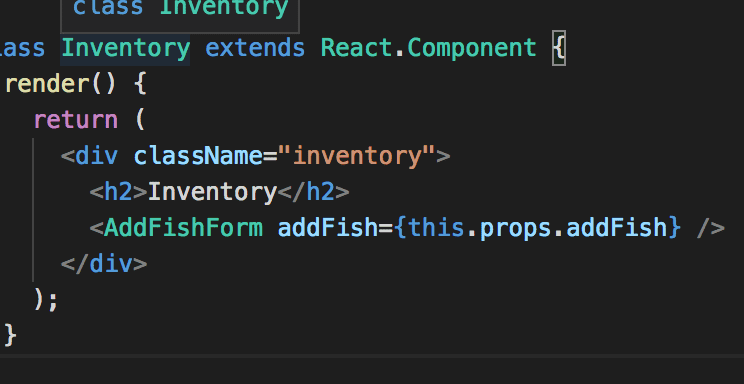
Load Samples Button, we need to add it to the inventory component so when you click a button, it loads the samples
Where do we put that function? In App.js not Inventory.js Why?? Because we have created custom functions which update state, and any custom function which updates state needs to live in the same component where our state lives.
How do you get a function from one component into another? Props! That’s how anything gets anywhere.
In child component that is using the function from another component, you need to use props to access it. this.props.loadSampleFishes
15 - Displaying State with JSX
JSX doesn’t have conditionals or loops of ifs, so you have to use plain javascript for that.
State is an object and you cannot map over an object, a map is for an array.
When you use {} in JSX it’s telling JSX that it’s JS
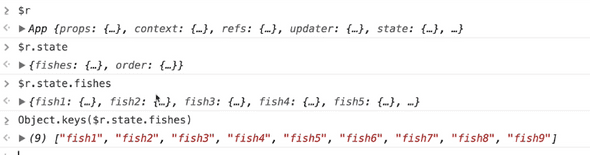
{Object.keys(this.state.fishes)}
Object.keys() - JavaScript | MDN
It will loop over fishes and grab the keys for each object, which we can use to loop over every single fish we have.
ERROR: index.js:1446 Warning: Each child in an array or iterator should have a unique “key” prop.
REASON: each  SOLUTION: Give property called key and give a key of anything that is unique
In a component, if you don’t want to keep typing out this.props you can assign the props to variables right underneath the render() method.
ES6 Destructuring.
Instead of
    const image = this.props.details.image;
    const name = this.props.details.name;
You can do
const {image, name} = this.props.details;
16 - Updating Order State
 This code will check if order.fish1 exists, if it does it will increment it by 1 if not it will return 1
There is a way to test a function without a click event.
In Chrome, go to React tools and find App.js or state component.
Then in console you can reference it using $r
You can then use $r to call the function like so:
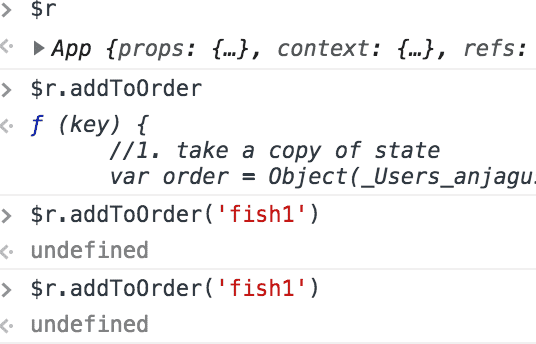
And then in React tools, can you look at the App component, and the state, and the change should be reflected there
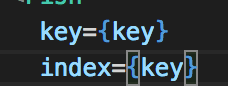
Add to order needs to be clicked inside of the fish, so in order to expose the functionality we need to pass it as props.
If you need access to the key, you have to pass it to props as something other then key, such as:
How to Handle Add to Order Click on Button
In Fish, we can do
<button onClick={this.handleClick}/>
And then at top above render() the code would be:
handleClick = () =>{
this.props.addToOrder(this.props.index);
}
Javascript to display conditional text:
{isAvailable? "Add to Order"? "Sold out"}
Javascript to reset a form:
event.currentTarget.reset();
17 - Displaying Order State With JSX
Order right now doesn’t have any information. In order to pass it information, we need to pass it props. We need to pass it at least 2 props: order, and fishes. Both of those props come from state.
Object spread in React …
<Order {…this.state } />
That will spread everything from state into Order.
Avoid passing entire state, because components are modular and may be reused. What if you add to state later?
Javascript 30.com, Array Cardio Day 1 and 4 Map, filter, reduce
As soon as you have too much code in your render function, that probably means you are doing too much in one component and you can probably shell of some of that complexity to a separate component.. but sometimes it doesn’t warrant an entire new component
Wesbos likes to do is make separate render functions inside of a single component.
 import React from “react”;
import { formatPrice } from “../helpers”;
class Order extends React.Component {
  render() {
    const orderIds = Object.keys(this.props.order);
    const total = orderIds.reduce((prevTotal, key) => {
      const fish = this.props.fishes[key];
      const count = this.props.order[key];
      const isAvailable = fish && fish.status === “available”;
      if (isAvailable) {
        return prevTotal + count * fish.price;
      }
      return prevTotal;
    }, 0);
    return (
      <div className=“order-wrap”>
        <h2>Order</h2>
        <ul>
          {orderIds.map(key => (
            <li>{key}</li>
          ))}
        </ul>
        <div className=“total”>
          <strong>{formatPrice(total)}</strong>
        </div>
      </div>
    );
  }
}

export default Order;
Instead he will break up render() like so:
class Order extends React.Component {
  renderOrder = key => {
    return <li>{key}</li>;
  };
  render() {
    const orderIds = Object.keys(this.props.order);
    const total = orderIds.reduce((prevTotal, key) => {
      const fish = this.props.fishes[key];
      const count = this.props.order[key];
      const isAvailable = fish && fish.status === “available”;
      if (isAvailable) {
        return prevTotal + count * fish.price;
      }
      return prevTotal;
    }, 0);
    return (
      <div className=“order-wrap”>
        <h2>Order</h2>
        <ul>{orderIds.map(this.renderOrder)}</ul>
        <div className=“total”>
          <strong>{formatPrice(total)}</strong>
        </div>
      </div>
    );
  }
}
Before we return list item in renderOrder method, we need to check first if the fish is available.
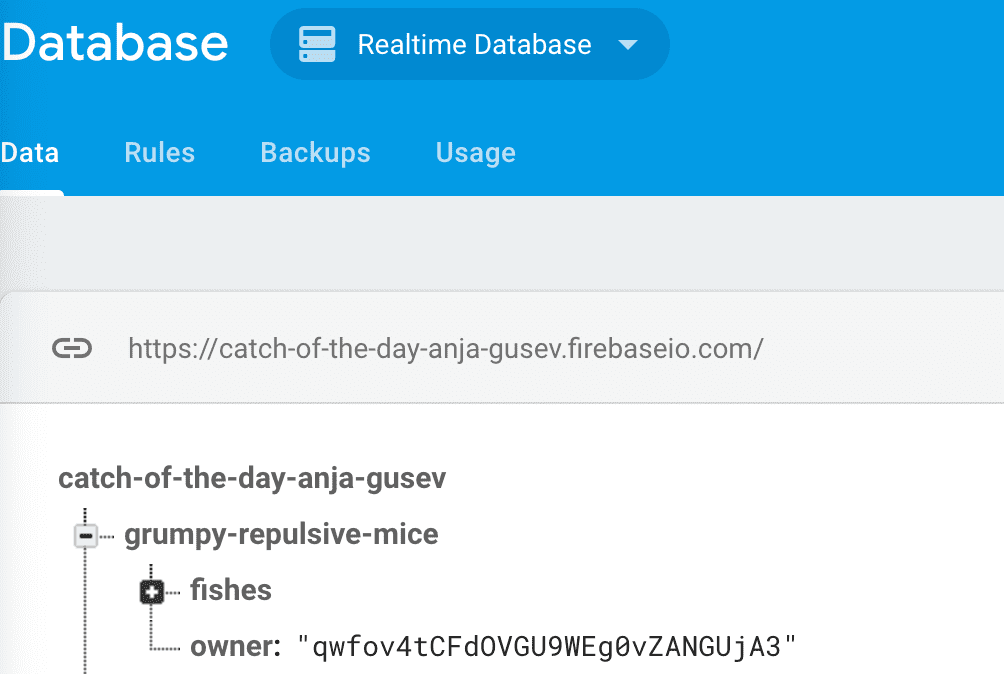
18 - Persisting our State with Firebase
We want to save to a database so when we come back to it later, that data needs to be available to them.
Go to firebase.google.com and create a new project.
Go to product and in src/ folder, create a new file called base.js and import Rebase which is a package that allows React and firebase to work together to mirror state to the firebase changes.
Also import firebase package from firebase, and we use that for everything that is no mirroring to state.
We turned off authentication temporarily on the database, and then went to project overview -> chose the code option -> copied the values for var config.
We have created our firebase app and rebase bindings, and now we have to export them.
Next we need to go to App.js and mirror our fish state into our firebase. But in order to do that we need to wait until the app component is on the page and then we sync them up.
Lifecycle Methods
componentDidMount - is like a hook into the very first possible second that the application is loaded onto the page.
this.ref is a firebase command
 componentDidMount() {
    const { params } = this.props.match;
    this.ref = base.syncState(`${params.storeId}/fishes`, {
      context: this,
      state: “fishes”
    });
  }
Memory leak is possible if we are always listening to changes, and not unlisteninh.
When component is unmounted, we want to stop listening.
  componentWillUnmount() {
    base.removeBinding(this.ref);
  }
19 - Persisting Order State with localstorage
A different way to persist state without a database but within the browser.
Local storage works with key value storage You can pull that data back into the application.
componentDidUpdate() Is called immediately after updating occurs, and is not called on the initial render. As soon as it’s loaded and as soon as someone modifies their order, we want to update our local storage showing this is exactly what they added to their order.
console.log(wes) = [object Object]
JSON.stringify(wes) = {“name”:”wes”}
JSON.parse(localStorageRef) this will switch it back to an object.
20 - Bi-directional Data Flow and Live State Editing
Added fishes={this.state.fishes} to Inventory component from App.js
Added same inputs as AddFishForm.
We need to pass individual fish down to the EditFishForm using following js:
{Object.keys(this.props.fishes).map(key => (
          <EditFishForm fish={this.props.fishes[key]} />
        ))}
WARNING: index.js:1446 Warning: Each child in an array or iterator should have a unique “key” prop. FIX: Add key= prop to EditFIshForm like so:
<EditFishForm key={key} fish={this.props.fishes[key]} />WARNING: index.js:1446 Warning: Failed prop type: You provided a value prop to a form field without an onChange handler. This will render a read-only field. If the field should be mutable use defaultValue. Otherwise, set either onChange or readOnly.
React doesn’t like you putting state in an editable area without having a plan to update it. WHY? Because as soon as you put state into a textbox, you have state in two spots. It’s spread across two different areas.
So we add on onChange={} attribute to the inputs in the fish form, like so:
        <input
          type=“text”
          name=“name”
          onChange={this.handleChange}
          value={this.props.fish.name}
        />
Now we need to create an updated fish object and somehow swim upstream from edit fish form to inventory and then to app. We need to get that updated fish back into our state.
What if you want to change the price? It doesn’t work! (It updates name instead) Why? It doesn’t know which property to update
console.log(event.currentTarget.name) tells us which property name was updated
ES6 Computed Property Names
const updatedFish = {
      …this.props.fish,
      [event.currentTarget.name]: event.currentTarget.value
    };
How do we get updated fish to swim upstream?
Go back to where our state is (our app component).
Below AddFish function we add updateFish property (function).
updateFish = (key, updatedFish) => {
    //1. take a copy of the current state
    const fishes = { ...this.state.fishes };
    //2. update that state
    fishes[key] = updatedFish;
    //3. set that to state
    this.setState({ fishes });
  };
Go into Inventory and pass it one step further via props.
In EditFishForm, use that prop in the handleChange function where we call this.props.updateFish(key, updatedFish). Problem is we do not know the key. Although in React dev tools you see the key like so:

You cannot access the key when we are inside of the component so if we need it for whatever reason we have to pass it down ourselves.
In inventory we added:
<EditFishForm
            key={key}
            index={key}
            fish={this.props.fishes[key]}
            updateFish={this.props.updateFish}
          />
21 - Removing Items from State
We will be deleting items from our inventory and from our order.
//takes key of which fish we would like to delete
  deleteFish = key => {
    //1. take a copy of state
    const fishes = { …this.state.fishes };
    //2. update the state
    //if this was an array I would filter using this.state.fishes.filter() and return the new amount of fishes that I want.
    //because it’s an object, we first take a copy of it, and we set the fish that we don’t want to null.
    fishes[key] = null;
    //3. update state
    this.setState({ fishes });
  };
Before hooking it up, we can test it in the console. React dev tools, find App component and select it.
Then in console we can do $r.deleteFish(‘fish1’); and it will disappear from the menu and from the inventory.
We need to get deleteFish function down to the EditFishForm button component.
It is going to work exactly the same as the rest of them did. Add deleteFish as prop to Inventory in App. Then in inventory pass it down as a property for the EditFishForm. Within EditFishForm, on the button we will add an onClick. We can do it inline
<button onClick={() => this.props.deleteFish(this.props.index)}>
          Remove Fish
        </button>
22 - Animating React Components
In order, we imported TransitionGroup and CSSTransition from “react-transition-groups”.
We replaced the ul element with
CSSTransition element needs property classNames, key and timeout
Stylst, like SASS but works with indentation
React is giving us these states as CSS classes and we can go ahead and use those CSS classes to add animation
If you need to reuse a transition group, you can put it in a variable.
If you want to put the transition options in a separate file because you are using the transition in many components, you can export it from that file and import it into this file and use it.
23 - Component Validation with PropTypes
With Proptypes we can validate the data that is being passed to ensure we are passing the right kind of data.
Example:
Header.propTypes = {
  tagline: PropTypes.string.isRequired
};
Typechecking With PropTypes – React
Header is a stateless functional component so we need to add PropTypes after, like so.
Fish is a regular React component so we can declare PropTypes as a variable. Since the proptypes are the same for all Fish components, we declare it as static so it lives on the momma component and we are not unnecessarily copying the proptypes to every single instance.
How to find props in the component? Search for this.props.
When you have a PropType that is an object, you could do PropType.object but then any object can work. Instead, if you know the properties of the object that you are expecting you can use
fish: PropTypes.shape({
      image: PropTypes.string,
      name: PropTypes.string,
      desc: PropTypes.string,
      status: PropTypes.string,
      price: PropTypes.number
    }),
24 - Authentication
In firebase, go to authentication and add Facebook authentication. Follow steps on Facebook apps to get app id, secret and past the auth url to the app config.
Stopped at 14:04
Import named and default export:
import base, { firebaseApp } from "../base";
If we want to put the store into the variable and not the promise into the variable we put await in front of it.
storeId={this.props.match.params.storeId}
await base.post(${this.props.storeId}/owner, {
This will create a new field called owner if it does not already exist
Whenever anybody logs into a store, we are going to figure out who is the currently logged in user and who is the owner of the store? If they are the same people, we will let them manage or we will display the error message.
We set state on Inventory. Sometimes you don’t need state on any other component so what you do is create state that is local to that component.
If we refresh, everything is gone.
Lets look at how we can show the inventory rendering out and how to persist that so when you refresh the page it will automatically log the user in.
Go to the render method of Inventory.js, we want to perform a check instead of returning inventory all the time.
 //1. check if they are logged in
    if (!this.state.uid)
Checks if state contains a userid. If not, return Login button or otherwise render inventory.
Try to login, it sets state, and then inventory is rendered out.
We only want to show that just if the currently logged in user is also the owner of that store.
Check whether currently logged in user matches the owner of the store:
//2. check if they are not the owner of the store
    if (this.state.uid !== this.state.owner) {
      return (
        <div>
          <p>Sorry you are not the owner!</p>
        </div>
      );
    }
We want logout button in two places: 1) if they are not the owner and 2) if they are managing the inventory
We need to add a logout button and we need to check it on page load.
Since we need it in two places, we will put it in a variable so we can reuse it.
const logout = <button onClick={this.logout}>Log Out!</button>;
Then use it like {logout} within render method.
Then add logout method.
To actually log them out, we make it an async method because we want to first wait for them to first logout of firebase, and clear state.
  logout = async () => {
    console.log(“Logging out!”);
    await firebase.auth().signOut();
    this.setState({ uid: null });
  };
Logout of firebase:
await firebase.auth().signOut();
Update state to set uid to null.
When we refresh, we should recheck if we are logged in.
Listen for the componentDidMount() like so:
componentDidMount() {
    firebase.auth().onAuthStateChanged(user => {
      if (user) {
        this.authHandler({ user });
      }
    });
  }
But for a split second it does show the login screen. If you wanted to skip that, you could have a loading screen.
Locking Firebase Down With Some Rules
In firebase, go to Authentication tab.
Go to our database tab, and go to rules, you will see
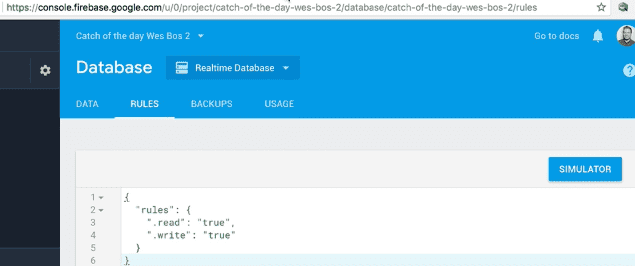
Firebase uses javascript to handle the rules. If you open securityRules.json.
// These are your firebase security rules - put them in the “Security & Rules” tab of your database
{
  “rules”: {
    // won’t let people delete an existing room
    “.write”: “!data.exists()”,
    “.read”: true,
    “$room”: {
      // only the store owner can edit the data
      “.write”:
        “auth != null && (!data.exists() || data.child(‘owner’).val() === auth.uid)”,
      “.read”: true
    }
  }
}
Explained: -for writing, we make sure that the data actually exists which won’t allow people to exist existing room. (They can write to it if the data does not exist). -there are nested rules -so the top level of the entire database is the write rules -someone can only write to a specific store if the data does not exist, if the store already exists they cannot create the store for a second time. -everybody can read that
-then we go one level deep into our actually stores. In this case he uses the variable called $room which is a wildcard which will match up against anything that is a second level deep. It can be named $store
“$room”: {
      // only the store owner can edit the data
      “.write”:
        “auth != null && (!data.exists() || data.child(‘owner’).val() === auth.uid)”,
      “.read”: true
    }
These rules above apply to second level deep.
Who can then write at a second level?
First we make sure that the authentication does not equal null (that auth variable comes from firebase since we are using their built in auth). Then we check if the data doesn’t exist AND that the owner is equal to the actual person that is logging in. Only the person who owns the store can write to it. Anybody can read that specific store.
Copy and paste security-rules.json and paste it in the rules .
Other
Rewatching #7 Passing Dynamic Data with Props
Header Component has prop tagline.
Within Header, we access it using this.props.tagline.
this means the component instance, so whatever gets passed when it is used.
For example within one component you may have many Headers like so:
The “this” within header is referring to that specific instance. So within the header component you would access what that instance’s tagline is using this.props.tagline.
8 - Stateless Functional Components (video 8, 1:40 seconds into it)
If your component only has a render method, no need for it to be a full blown React component.
First we will make it are regular function and then refactor it into ES6
from
class Header extends React.Comopnent{
render(){
return(
<header className="top">
<h1>
Catch of the day </h1>
<h3 className="tagline">
<span>{this.props.tagline}</span>
</h3>
</header>
);
}
to
function Header(props){
	return(
<header className="top">
<h1>
Catch of the day </h1>
<h3 className="tagline">
<span>{props.tagline}</span>
</h3>
</header>
);
}
The only thing is when you have a function there is no this, so what happens is that function gets one argument called props and you remove “this”.props and use {props.tagline} for example.
ES6 Arrow Function, no real benefit gained but most people write it like this.
const Header = (props)=>{
	return(
<header className="top">
<h1>
Catch of the day </h1>
<h3 className="tagline">
<span>{props.tagline}</span>
</h3>
</header>
);
}
We can take this one step further, and do an implicit return (we don’t need return keyword).
If we return it on the same line, that’s what an arrow function will do.
const Header = props =>(
<header className="top">
<h1>
Catch of the day </h1>
<h3 className="tagline">
<span>{props.tagline}</span>
</h3>
</header>
);
Destructuring props into own variables
const Header = ({tagline, age}) =>(
<header className="top">
<h1>
Catch of the day </h1>
<h3 className="tagline">
<span>{tagline}</span>
</h3>
</header>
);
10 - Helper & Utility Functions
When you have a function that does something like formatting money, or auto populating an input, which is not specific to react, it’s just a regular javascript function
Put those in a separate file.
Named export: you know the name of the method that you want to import, and then you have to use the {} syntax.
Instead of importing the entire file.
You can use that method inline then.
<input type=“text” defaultValue={getFunName()}/>
When the component mounts to the page, it will run getFunName() and then set the default value.
11 - Events
They are the same as javascript or JQuery, the one difference is you can do them inline.
Fore example, if you have a button that says “click me”.
In JS you would give it a class or id and then in a script file or later in the page you would select that button, add event listener or say .on in JQuery, listen for a click and then what that thing happens you would run some code.
In React what happens is you do inline event handlers..
<button onClick={}/>
So you do on[EventName] and give it {} and tell it which function to run when that thing happens.
Normally we will do {this.handleClick}
<button onClick={this.handleClick}>click me!</button> and above you would have
handleClick(){
alert(“heyyy”);
}
We leave out {this.handleClick()} the () that we used above in getFunName() because that would cause the function to execute when the component mounts, which is NOT what we want.
We just provide it the function, and say hey react when someone clicks this, run the function handleClick.
A ref is touching the Dom element to grab the reference.
Ref allows us in react to reference a Dom element.
Binding In React
let’s say you have
goToStore(event){
console.log(this)
}

render(){
console.log(this);
return (
<p>dummy</p>
);
}
The console.log(this) within the render method will return the store picker component, however the console.log(this) within the store picker component will not work. WHY?
Because of binding!
React has all these built in methods like render, and lifecycle events.
componentDIdMount = runs as soon as the component is put on the page.
Inside of componentDidMount, we can call console.log(this)and it will return the store picker component.
Why?
This is because all of the methods that come with React, all have the react component.
If we add any methods that extend that, they are not bound by default. Which means it’s hard to reference a component within it’s own methods which is a problem.
SOLUTION: Bind our own methods as well. Couple options… Because es6 classes are fairly new, there is no standard way to do this.
ES6 right now..
Add constructor method. This is a method that will run before the store picker component is created.
constructor(){
super()
this.goToStore = this.goToStore.bind(this);
console.log(this)
}
What that will do is overwrite the method on it, and attach a binding to it, it will reference this inside the store as the store picker instance.
this.goToStore = this.goToStore.bind(this);
Rather than using the constructor is, instead of declaring a method on the component we declare a property and set it to an arrow function.
A property will be bound to the instance rather than nothing, and then we can access this inside of it.
goToStore = event => {
console.log(this);
}
But to break it down, goToStore is a property just like myInput is a property. And then we set it to an arrow function which will allow us to bind the value of this to the storepicker component.
If you need to access this inside of a custom method, you must use that syntax or use a constructor.
So either arrow function or constructor.
12 - Handling Events
How do we access router within a component? There are a couple of different ways. One way is you can export your component with the router… (if it was a component that was 7 or 8 levels deep, it would be hard)
There is no way to access something from a high level to a low level.
Since storepicker is a child of the router, we have access to all the methods that we need.
Firebase
-using websockets instead of Ajax where we ping the db for changes
firebaseApp.database()
LocalStorage
Added code to two methods, componentDidUpdate() and componentDidMount().
componentDidUpdate we update the local storage to match by doing
localStorage.setItem(this.props.match.params.storeId, JSON.stringify(this.state.order));To reinstate localStorage, we do it on componentDidMount(){
const localStorageRef = localStorage.getItem(params.storeId);
if(localStorageRef){
this.setState({order:JSON.parse(localStorage));
In react, if you return null it will render out nothing.
25 - Building For Production
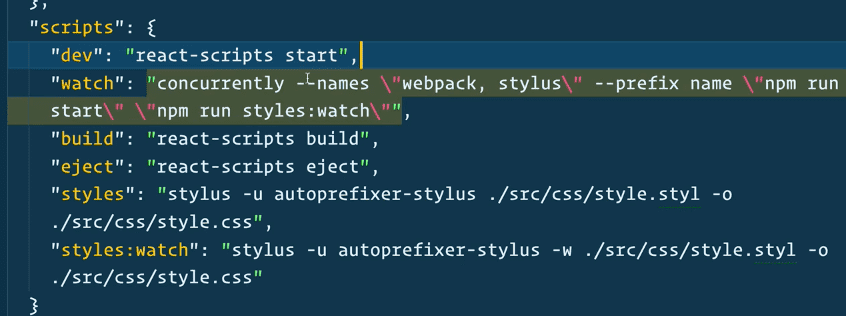
Stop running the dev environment. In packages.json there is a build command, which right now is react-scripts build.
In the directory, in the terminal run npm run build.
That will take all of our files, css, javascript and compile it into a tiny javascript file that has stripped out warnings, prototypes etc.
If you navigate to the build directory, all the files inside of it are to be deployed.
That /build/javascript/js/ contains a file for that entire application. There is a source map file which will point back to where the errors are but only devs will load it.
It gives us a media folder with the images, the fonts we use. The css folder has the .css file. That is web pack doing that.
The index.html points to all of the files.
The build/ directory is almost a static site. However, if you try to open it up it doesn’t run. That is because the code still needs to be run on a server. The server needs to be smart enough not to look into look for directories based on the urls, we have to tell it to go back to the index.html side and figure out the routing from there.
26 - Deploying to Now
Now requires you to bring the server, it doesn’t have a server built in, you have to bring a server that handles all the server side routing for them. They have a package called serve.
First install now globally using npm i -q now
Next we need to require a local dependency called serve. npm i serve
It will add it to our list of dependencies.
Then we need to modify npm scripts because the start command is for development.
In packages.json, modify the “start” command to be the “dev” command.
   "dev": "react-scripts start",
    "start": "serve --single ./build",
We use —single to tell it that it’s a single page application and to go into the build folder.
Two things will happen when we deploy this. It will run the build command (it knows to do that) and then the start command.
Now you just run now in the terminal.
It will start deploying it and give us a temporary url

These instructions don’t seem to work still.
Hey folks! I ran into a few snags trying to deploy my site with Now. Authentication was working locally but, once the site deployed to prod, I wasn’t able to sign in to view my lovely fish. Here’s how you can fix that:Make sure you’ve got the latest versions of
package.jsonandnow.jsonin your project. You can get those here: https://github.com/wesbos/React-For-Beginners-Starter-Files/tree/ca5802e4556fc3af48f78e5d0a053da880d7c2a5/catch-of-the-dayHowever,
now.jsonis missing routes for images. You’ll want to add the following (I added this as a comment to the PR in Github):
{ "src": "^/images/(.*)", "dest": "/images/$1" },
Run
now. After it builds, you should be able to point tohttps://[appname].[username].now.sh. You can find this inhttps://zeit.co/dashboardGo to Firebase > Authentication > Sign-in method > Add domain. Enter the domain referenece above:
https://[appname].[username].now.shEdited for clarity
27 - Deploying to Netlify
Install globally: npm i netlify-cli -g
Check version netlify --version
In directory, run netlify deploy
It will prompt you to authorize.
Then follow the prompts. Point the path to deploy to the build directory
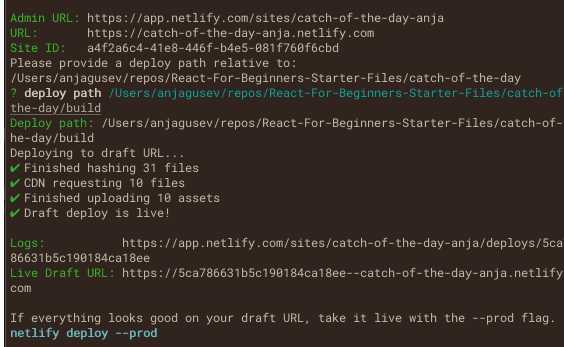
Now it is deployed!
However, if you reload the page, you get an error.
https://5ca786631b5c190184ca18ee—catch-of-the-day-anja.netlify.com/store/sparkling-glamorous-teeth
Netflixy is actually looking for those directories. What we need to do, is in our build folder we need to make a file called redirected.
$ cd build
$ touch _redirects
$ code _redirects
In their docs Redirects | Netlify find HISTORY PUSHSTATE AND SINGLE PAGE APPS
Add this line to redirects
/* /index.html 200
Save and cd out of build directory.
Run netlify deploy
It should work now!
28 - Deploying to an Apache Server
Hav a folder on your server called catch of the day. Point it to a subdomain.
Take the build folder and upload it to that directory.
We need to add the subdomain to firebase authentication -> sign in method -> add domains
However when you refresh the page, we will get a 404.
Create a .htaccess file.
Add the following:
RewriteBase /
RewriteRule ^index\.html$ - [L]
RewriteCond %{REQUEST_FILENAME} !-f
RewriteCond %{REQUEST_FILENAME} !-d
RewriteRule . /index.html [L]
29 - Ejecting from Create-React-App
Create-React-App takes away the complexity of config files, builds a common default and puts it behind it’s own package called react scripts.
However, what if you want to do something custom, like custom web pack or eslint or babel plugins.
If and when you need to do that, you need to eject from create-react-app.
Ejecting is one way. Do this on a branch in git.
Run npm run eject
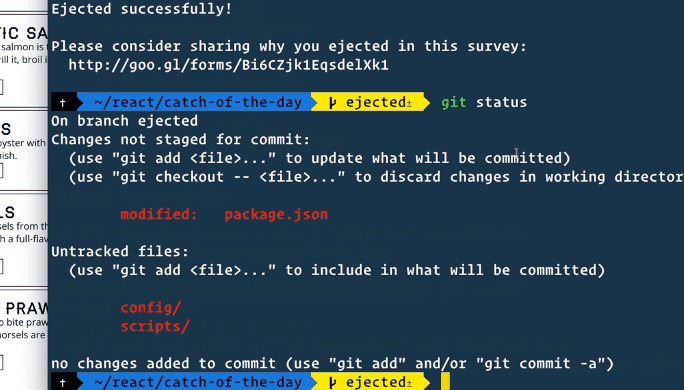
It edited package.json and it edited config/ and scripts/ directory.